Bookable Areas
Bookable Areas enables site administrators to directly manage capacity for sub-sections of their site, eg bar, beer garden, booths, and snugs, and have capacity update within a set area only. Bookable Areas also allows your customers to book a table in their area of choice, and have their booking automatically assigned to a table in that area, which reduces the workload of site hosts having to manually assign bookings to tables in the correct area.
With the addition of capacity groups in addition to areas, a site can gain full control over any level of capacity in their site, and can structure a combination of tables, areas, and capacity groups to best suit the needs of their site.
Bookable Areas Topics
Check List
The below steps are required to be completed to ensure bookable areas works:
-
Create Table Layout
-
Create Table Plan
-
Create Areas
-
Assign Tables to an Area within Table Layout
-
Create Capacity Groups
-
Assign Areas to a Capacity Group
-
Optionally Assign Area to Occasion
-
Create timeslots against capacity groups
-
Enable Bookable Areas
Pre-Requisites
Events Admin
-
‘Capacity Management’ feature flag must be enabled.
This will be enabled by default for your Estate. If you are unable to locate this setting, or it is not displaying, please speak with your Account Representative who will be able to get this enabled for you.
Tables Admin
-
Auto-Assign enabled
By default, sites are enabled for bookings to be auto assigned to a table. In some instances, some businesses disable this in line with their operations. This setting must be enabled in order for Bookable Areas to work as expected.
Editing Capacity Group Availability Templates
Once your standard day timeslots have been created, they will be visible within the day list table within the Standard Tab. Next to each day will be an ‘Edit’ button. Selecting this button will take you to the capacity group matrix tabs, where you enable timeslots for additional capacity groups, and then add, edit and delete timeslots for each capacity group.
This is the same concept as timeslot management within Tables Admin, applied across multiple capacity groups.
Follow these steps to configure timeslots for a capacity group:
-
Select a Site from the Outlets drop-down menu in the top right of the page
-
Select the Edit button from the Actions column for the day you wish to edit
You will arrive on the Overview tab for that day. Here you can see an overview of all timeslots for that day across all sessions. Across the top you will also see a tabbed list of existing capacity groups. The default capacity group will always appear first in the list, with additional capacity groups appearing in alphanumeric order -
Select the ‘+’ button from the Actions column, to insert a new timeslot
You can only insert timeslots at the minimum interval as set in your preferences. If you are unable to insert a timeslot, it is because you are already at the minimum interval -
Select the check box underneath the capacity group name for the timeslots you want displaying for that area
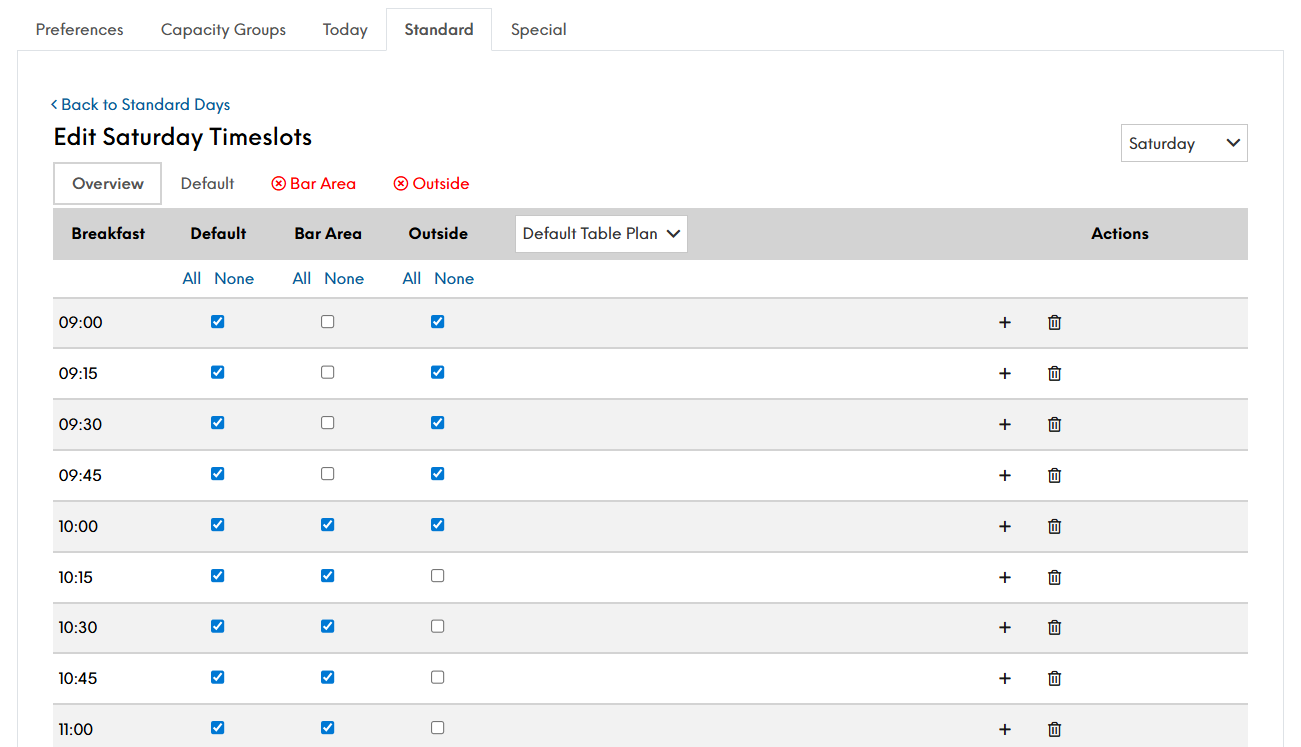
In this scenario, the 09:00 timeslot is only enabled for the Default and Outside capacity group, but not the Bar Area capacity group, whereas the 10:00 timeslot is enabled across all capacity groups
Once a timeslot has been enabled for a capacity group, it will need configuring, as shown in the above image by each additional capacity group now showing in red
-
Select the Area name highlighted in red.
You will now be presented with the page to configure the individual timeslots per area. The page will highlight the mandatory fields that require configuration before you can save your work.
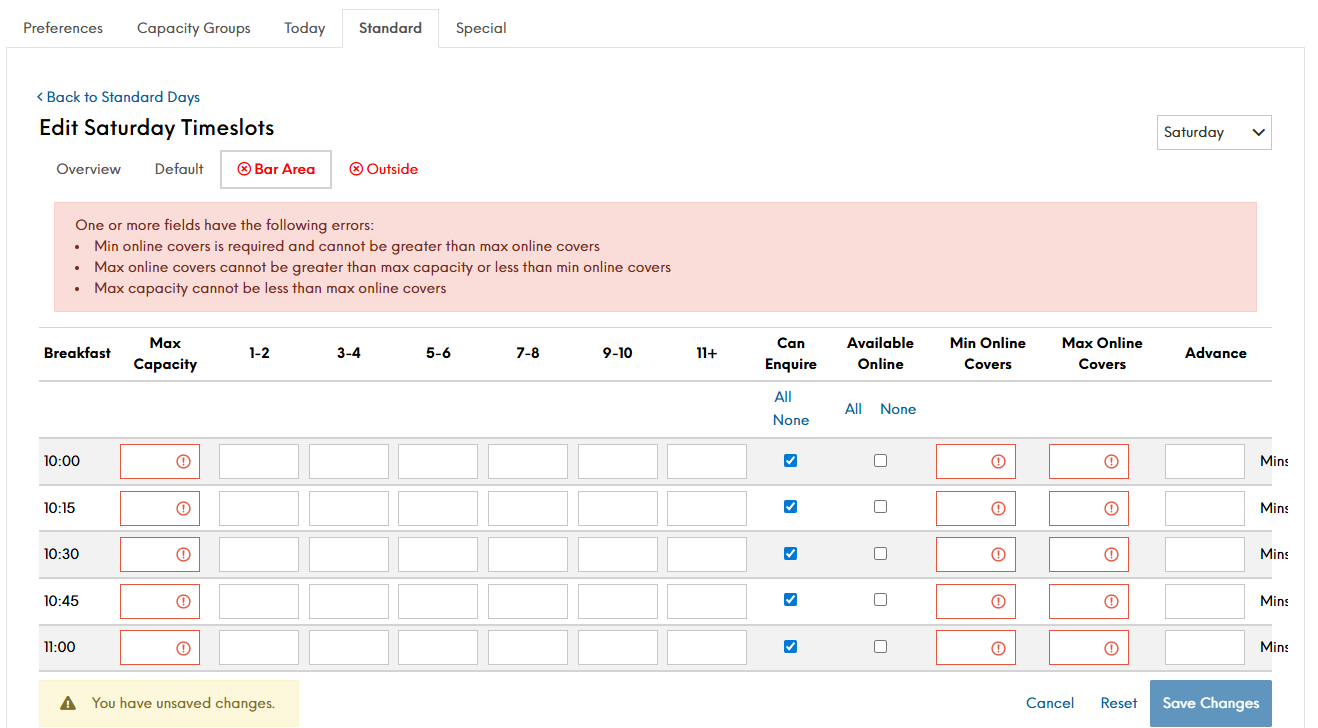
The following should be completed:
-
Min online covers
-
Max online covers.
-
Max capacity
-
-
Click Save Changes
There is the ability, once saving your templates to delete timeslots, and even disable timeslots
-
To delete a timeslot across all capacity groups, select the waste bin icon in line with that time
-
To disable a timeslot from a specific capacity group, deselect that checkbox
When you have made a change on any tab (Overview or capacity group), several buttons will appear at the bottom of the table
-
Save - will save all of your changes, assuming you have provided all the mandatory information and all information provided is valid
-
Reset - will reset the information on all tabs for that day to the last saved version
-
Cancel - will return you to the Standard Day tab, where you can bulk create, or edit a different day
Creating Capacity Groups in Bulk
When creating timeslots, for a new capacity group, it can often be easier to create the timeslot template from scratch, rather than editing timeslots line by line.
Follow the below steps to create an availability template:
-
Select the Session
-
Define the interval for timeslots
-
Define the start time
-
Define the end time
-
Define the Maximum Seating Capacity per timeslot
-
Define the Smallest Online booking
-
Define the Largest Online booking.
-
Define the lead time
-
XX Minutes ahead of time OR
-
before XX:XX o'clock
-
-
Select the days of the week this configuration should apply to
-
Select the Area
-
Click Create
Once loaded, a new page will open. On the timeslot configuration screen, you will now see which capacity groups you are creating timeslots for. In the below image, a bulk capacity was created for the Bar Area from 09:00 - 10:00.
Above the timeslots, the preview outlines what your change will take effect to:
-
Selected Days
-
Selected Session
-
Selected Capacity Groups
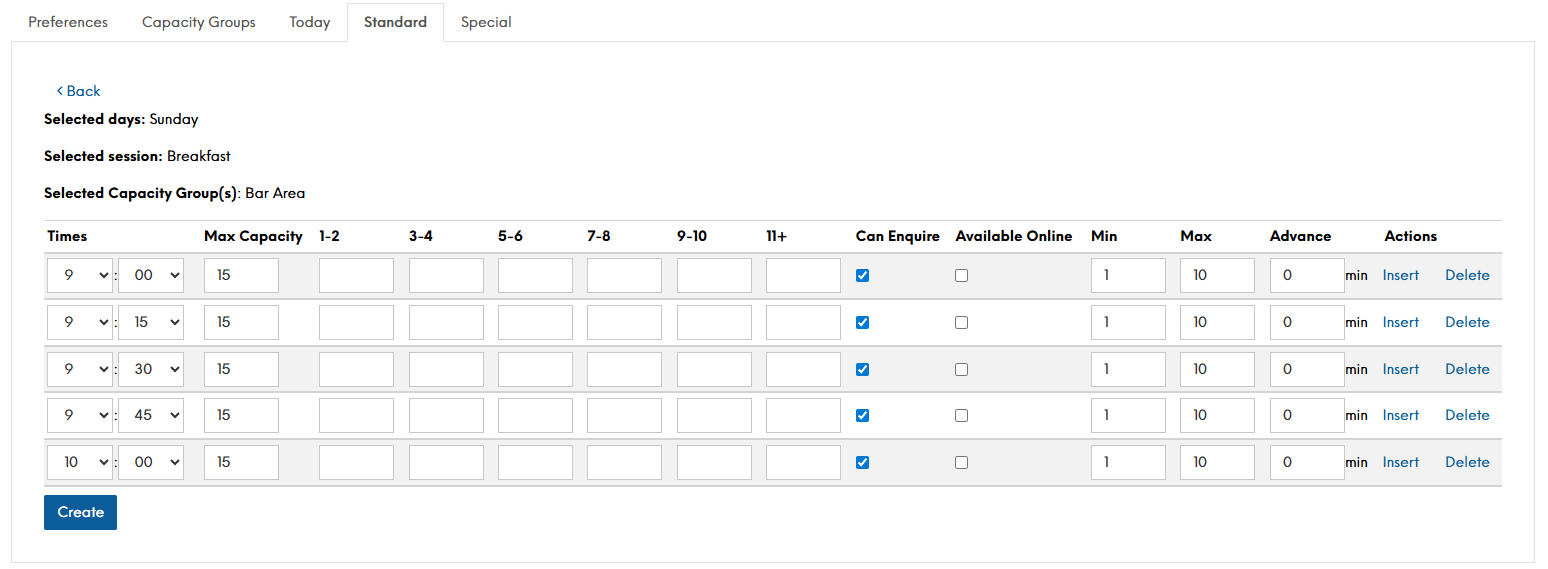
Where when editing a capacity group to add timeslots many of the fields display in red, here the timeslots are pre-populated. You now only need to tweak the timeslots as needed, or simply click save changes
-
-
Click Create
Once saved, you will be taken back to the Standard Page with a green message displaying to state "Time slots created successfully"