Creating Pre-Order Menus
Pre-Ordering is known to improve operational efficiency by allowing your team to plan stock, staffing, and preparation in advance. It also opens up opportunities for pre-sold items and extras during the booking journey, generating extra revenue and reducing on-the-day service pressure.
Creating Pre-Order Topics
Requirements
To enable pre-order functionality at your site, it’s essential to have the correct set up completed from the start. Using the wrong software version or leaving configurations incomplete will delay testing and postpone release to your customers.
Versions
| System | Minimum Version | Description |
|---|---|---|
| Aztec | 3.25.0 |
Versions earlier than 3.18.0 do not facilitate delayed ordering. Further fixes since |
| ZCF | 4.41 |
Zonal Connect Framework |
| iOrder | N/A |
iOrder is a digital ordering solution that allows customers to browse menus, place orders, and make payments directly from their own devices. iOrder is where you build customer facing Product names |
Pre-Order Send Setup
Pre-order can be sent up to send to POS and to the Kitchen in different ways. For the majority of sites, they like to have pre-orders on the POS with as much notice as possible. This allows servers to review pre-orders, as well as insuring that pre-orders have sent to the POS correctly.
Our recommendation for configuration is as follows:
-
Defining a send time and pick-up time:
-
Send Time: 4am – 7am. Within this time window, pre-orders will attempt to send order to the site POS from 4am on the dining date of the booking
-
Pick Up Time: 23:59. All pre-orders will display on POS with a pickup time of 23:59
-
-
Delayed Order Send time: 5 mins before pickup time
Using a delayed ordering send time, pre-orders will automatically send to the kitchen 5 minutes before pickup time set above (23:59) unless manual intervention has happened. If no manual intervention happens the order will be sent to the kitchen without a table number. This is why we recommend this pickup time being set to 23:59 to prevent orders sending directly to the kitchen without Tables Numbers.
Creating a Pre-Order Menu
To create your menu, you will first need to create the details tab for the menu setup.
Follow these steps to create a basic menu:
-
Select Add New Menu
-
Enter an Internal Name
-
Enter a Display Name
-
Enter a Description
-
Select the companies and/ or sites applicable to this menu
If you do not select a company or a site, the menu will be enabled for all sites and companies within your estate -
Select from the Channels you want the menu to display
Zonal recommends testing any menu before making it live to customers. If you don’t have time to test right away, deselect all channels so your work is saved but not publicly visible. You can return later to enable the channels once you’re ready. When enabling channels, you can temporarily disable the Widget and API journeys, allowing you to test the menu internally through the Host apps -
Click Save Changes
Follow the below steps to complete the Pre-Order configuration within your Events Menu:
-
Select the Pre-Order tab.
-
Define if you require Adult / Child Pre-Order
If enabled, pre-order menus will only be shown to the specified adult/ child cover in the guest portal when making their selection. -
Select the menu from the Available pre-order menus
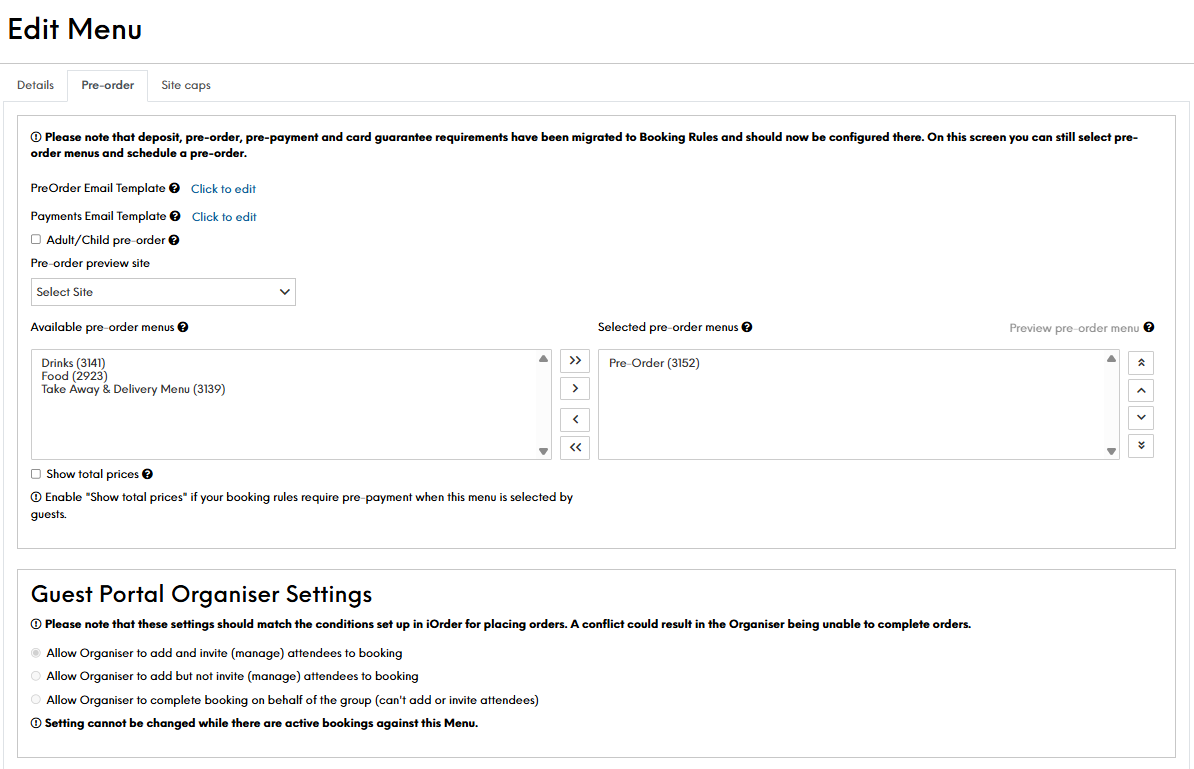
This section will show a list of all available pre-order menus from iOrder that can be assigned to this Menu for pre-ordering. In the image shown you can see there are menu names followed by an iOrder menu ID. You need to select and transfer the menus required to the "Selected pre-order menus" box.
If the menu you require is not displaying, check in iOrder against the menus ordering channels. -
Define your Guest Portal Organiser Settings
-
Click Save Changes
Now you have created your Pre-Order Menu, it's now time to test your pre-order.
Field Settings & Information
| Field | Description |
|---|---|
| Pre-Order Email Template |
Editing this option will allow you to use the Menu Pre-Order Email Description dynamic text to display this text in email templates |
| Payments Emails Template |
|
| Adult/ Child Pre-Order |
If this option is enabled, pre-order menus will only be shown to the specified Adult/ Child cover in the guest portal when making their selection |
| Pre-Order Preview Site |
Select the required site from the drop down, in order to then preview the pre-order menu |
| Available Pre-Order Menus |
This will show a list of all available pre-order menus from iOrder that can be assigned to this Events menu for pre-ordering If a menu is not displaying - it will likely require enabling within iOrder |
| Selected Pre-Order Menus |
The content of the selected Menu(s) will be displayed to guests when making their pre-order selections. If multiple menus are chosen, the order of the menus will be preserved when displayed |
| Preview Pre-Order Menu |
Clicking this button will open a white labelled Guest Portal Pre-Order page, where you can review your menu. You need to first select a site from the Pre-Order Preview Site option |
| Show Total Prices |
Enable "Show total prices" if your booking rules require pre-payment when this menu is selected by guests Enabling will show the total price for a customers pre-order selection in the guest portal |
| Guest Portal Organiser Settings |
Please note that these settings should match the conditions set up in iOrder for placing orders. A conflict could result in the Organiser being unable to complete orders The options to select from are:
Setting cannot be changed while there are active bookings against this Menu |