Your PMS Setup Steps
Welcome to the final setup checklist for your Zonal PMS onboarding. Before we can complete the set up of your new PMS system, we will require you to upload and enter some information and imagery specific to your business.
Here you’ll find a complete list of all the actions needed from you to enable us to complete your system setup.
Descriptions, T&Cs, & Cancellation Policy
Descriptions
To add a description for your hotel:
- Navigate to the Settings page by clicking the link that appears at the top right-hand side of the system
- Scroll down through the settings to find a text box titled Description
- Enter your hotel description
- Press the Submit button at the bottom of the page to save your changes
Terms & Conditions
- Navigate to the Settings page by clicking the link that appears at the top right-hand side of the system
- Scroll down through the settings to find a text box titled Terms
- Enter your hotel description
- Press the Submit button at the bottom of the page to save your changes
Cancellation Policy
- Navigate to the Settings page by clicking the link that appears at the top right-hand side of the system
- Scroll down through the settings to find a text box titled Cancellation
- Enter your hotel description
- Press the Submit button at the bottom of the page to save your changes
Room Types & Product Images
Here, Room Types need to be set up, and images need to be uploaded and assigned to both Room Types and Products.
Room Types
Overview
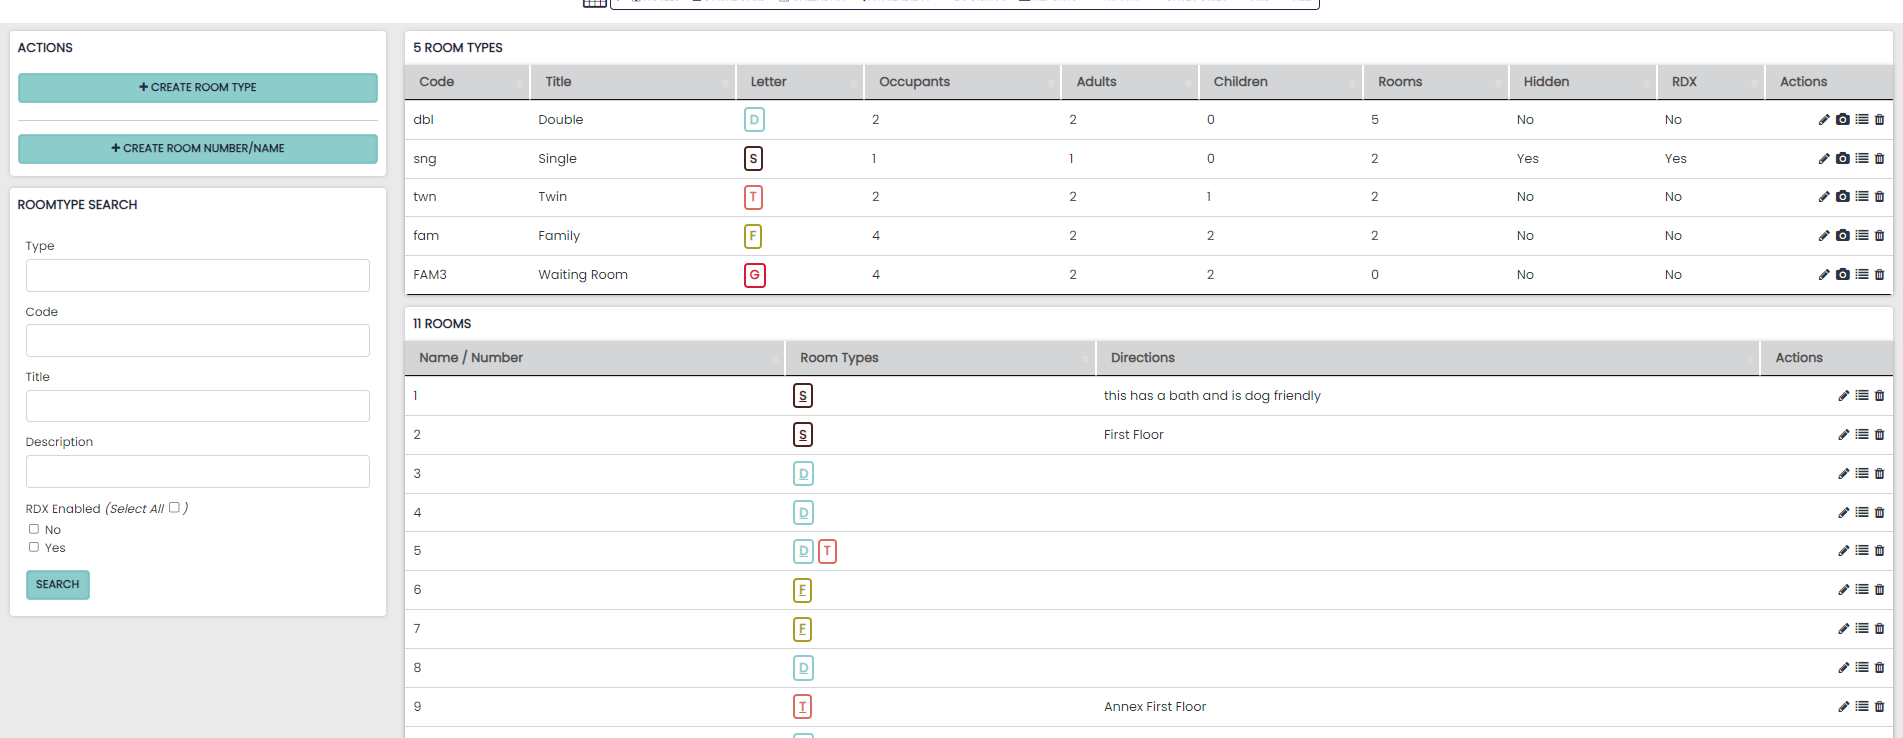
Here you can create new room types and physical rooms and view and manage your existing ones.
Actions Overview
The action buttons located to the right will allow you to edit and update any room / room type. The actions include the following options:
Opens the Edit Menu to Change the Room Type and settings
Allows you to add or edit photos for each Room
Allows you to drag and drop to change the order of the Room
Allows you to delete a Room Type or Room
Updating a Room Type
Due to the potential risks associated with editing your rooms, we would only recommend a hotelier access this area to make the following changes:
-
Room Description – This will be fed to your availability page and can be seen by prospective guests
-
Colour – This will change the colour displayed in your calendar
To action these changes select the edit pencil icon:

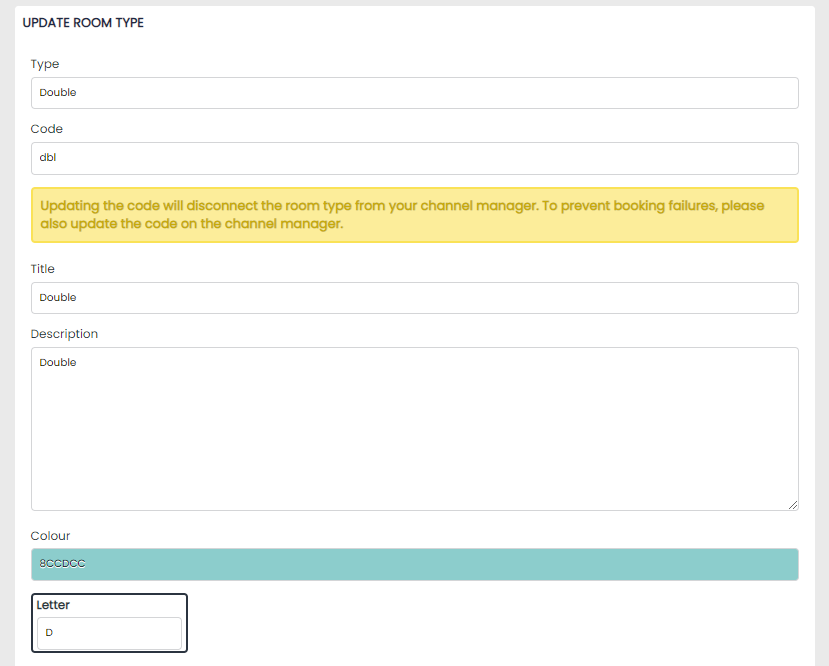
Here you can make the following changes:
-
Type – how the system refers to the room internally (not seen by guests)
-
Code – unique code to identify the room type within the system
-
Title – the name which will be displayed to guests
-
Description – The description shown on the Booking Engine
-
Colour – displayed in Calendar to help identify this Room Type
-
Letter – displayed in Calendar
Images
Overview
The PMS has an Image Gallery which can store all the images you may want to use within the system.
It is located in the Dashboard drop down menu.
It can hold as many images as you require as long as each image is under 2Mb in size. Preffered formats are JPEGs or PNG.
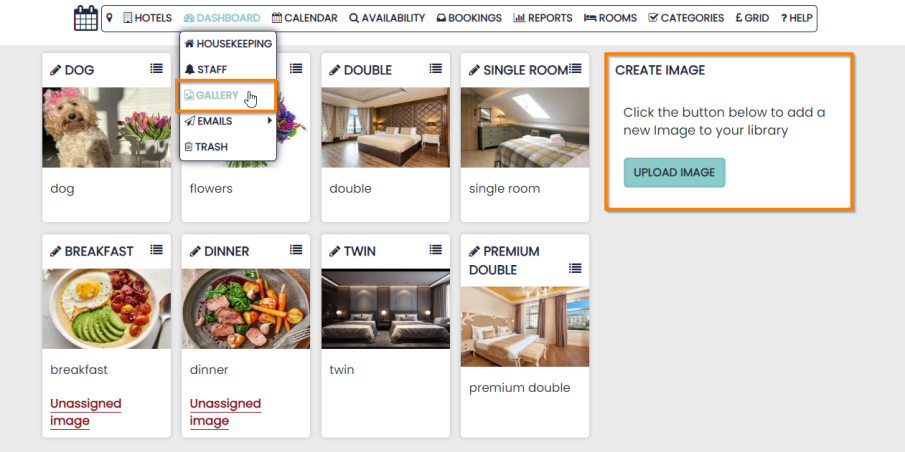
Each existing Image can be updated / edited in a number of ways:
- Use the edit pencil to edit the name or description
- Use the Drag to Sort icon to re-order the images within the Gallery
- Assign the image to Rooms, Rate Plans or Products (only displayed on the edit page)
Upload Images
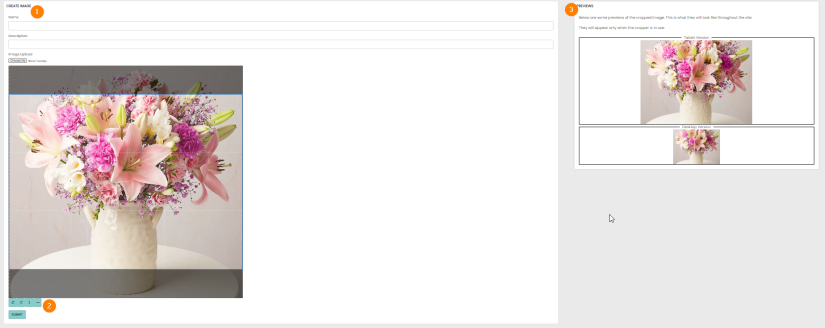
Once you have clicked on the ‘Upload New Image’ button, the Create page will prompt for a new image to be selected. Use the Choose File option to open your file explorer.
-
The name and description are for internal use only. Your Guests will not see this information
-
A preview of your image will be displayed showing how it will be cropped. You can adjust this accordingly
-
A further preview panel will show how the image will be altered when viewed on a mobile phone or tablet
Assigning an Image from the Gallery
Once an image has been uploaded to the Gallery it can be edited and assigned from the Gallery page.
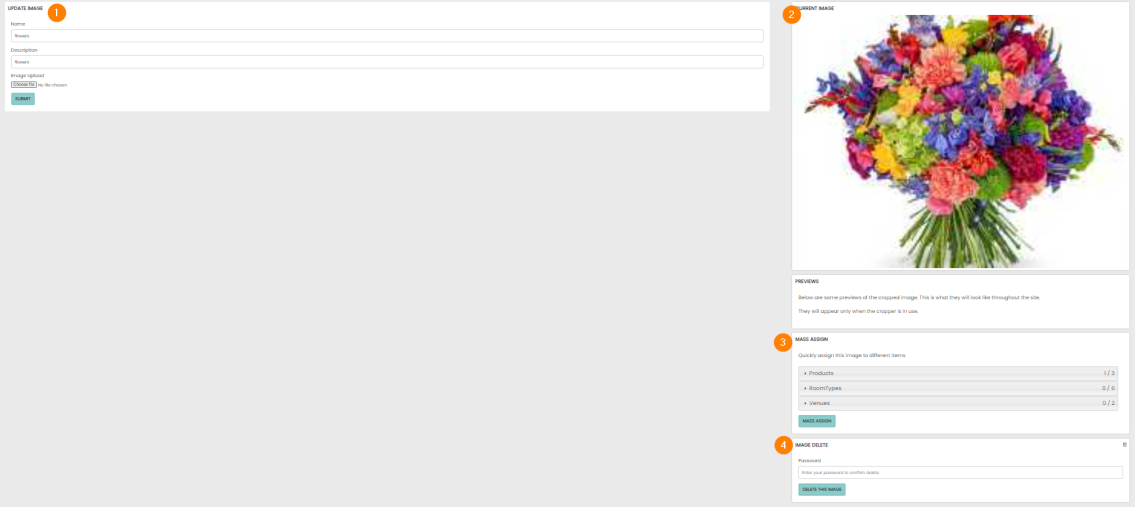
- The name and description can be edited from this page
- The current image will be displayed
- The image can be assigned to any of the already-created Products, Packages, Room Types or venues
- A further preview panel will show how the image will be altered if viewed on a mobile phone or tablet
Assigning an Image from a Module
Images can also be assigned and managed from the modules themselves. These are Rooms, Rate Plans, Packages and Venues.
-
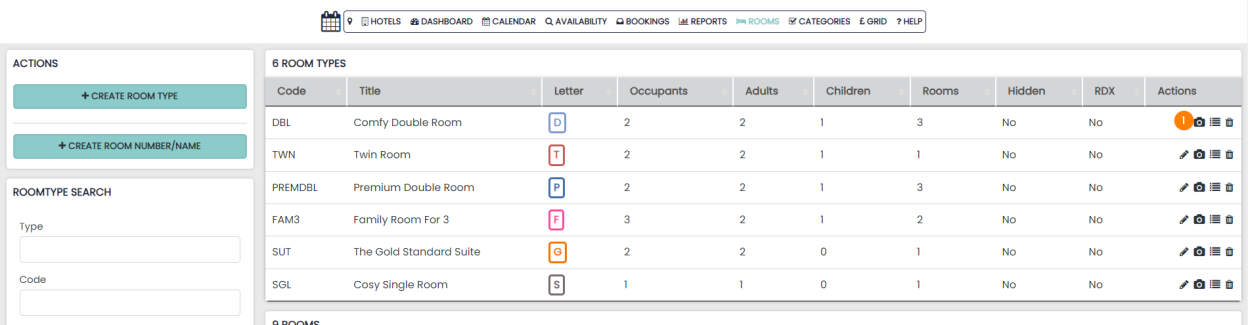
Look for the camera icon in the Actions column on any of the modules to display a list of all Gallery images available
-
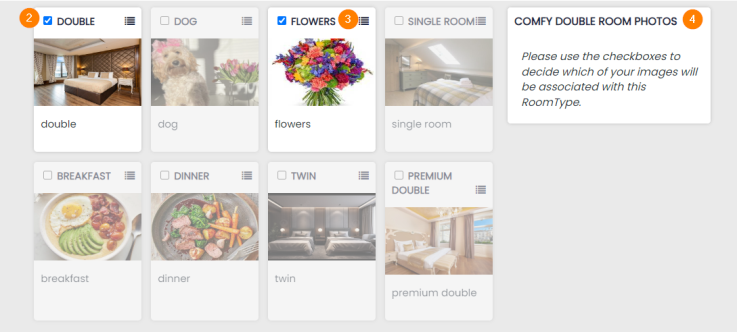
Any images that are ticked will display on the Booking Engine
-
The Drag to sort icon will allow you to re-order the images assigned to the selected item
-
The Selected item will be displayed to indicate what you are editing
Descriptions for Rooms, Room Types, Rate Plans & Products
Room Descriptions
Room Descriptions will be seen by guests when they are making a booking. Click below to find out how to add a Room Description.
Overview
Here you can create new room types and physical rooms and view and manage your existing ones.
Actions Overview
The action buttons located to the right will allow you to edit and update any room / room type. The actions include the following options:
Opens the Edit Menu to Change the Room Type and settings
Allows you to add or edit photos for each Room
Allows you to drag and drop to change the order of the Room
Allows you to delete a Room Type or Room
Updating a Room Type
Due to the potential risks associated with editing your rooms, we would only recommend a hotelier access this area to make the following changes:
-
Room Description – This will be fed to your availability page and can be seen by prospective guests
-
Colour – This will change the colour displayed in your calendar
To action these changes select the edit pencil icon:
Here you can make the following changes:
-
Type – how the system refers to the room internally (not seen by guests)
-
Code – unique code to identify the room type within the system
-
Title – the name which will be displayed to guests
-
Description – The description shown on the Booking Engine
-
Colour – displayed in Calendar to help identify this Room Type
-
Letter – displayed in Calendar
Product Descriptions
Product Descriptions will also need to be applied for items that you are looking to sell that are separate from the cost of a room. Click below to find out how to create and manage Products.
Overview
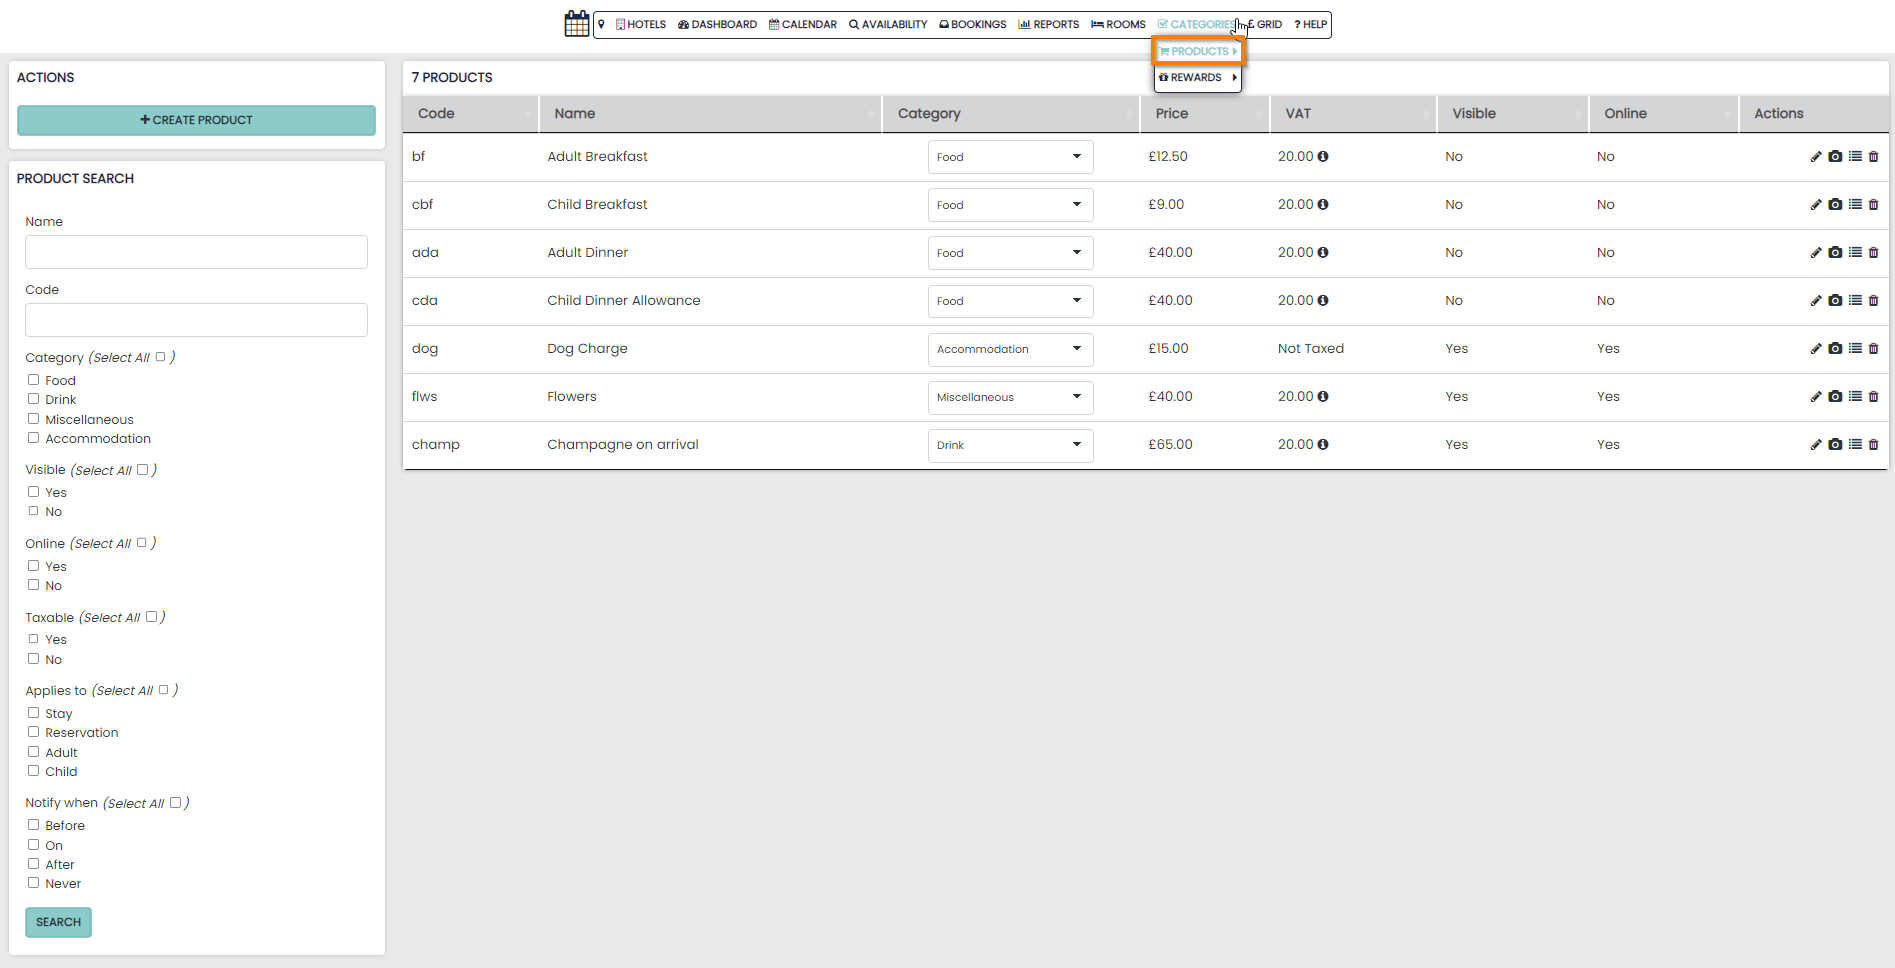
The Products section is found in the Categories drop down menu on the Navigation bar and will allow you to create and manage all Products in the system.
A Product is a sale item that is separate from the Accommodation cost of booking a room.
In the PMS you can create Products for the below reasons:
- To be upsold on your Booking Engine (via your website)
- To be added to Rate Plan or Package
- To easily choose from a list of frequently sold items
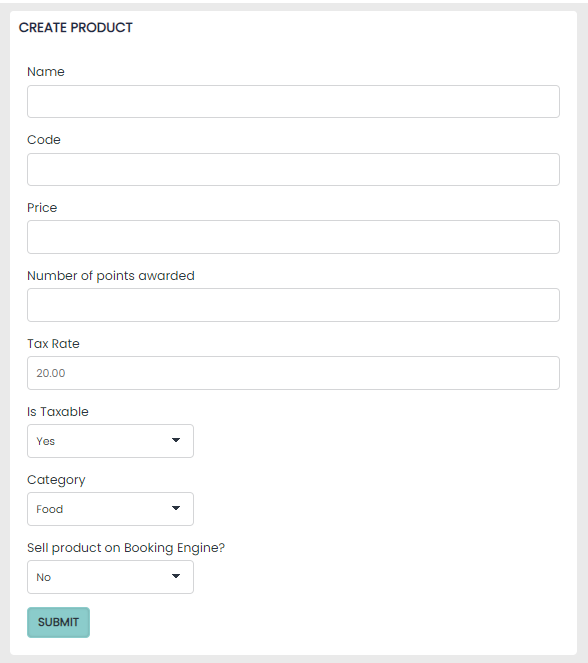
Creating a Product
New products are created on by selecting the Create Product button on the left hand side and simply require:
-
Name
-
Code
-
Price
Edit a Product
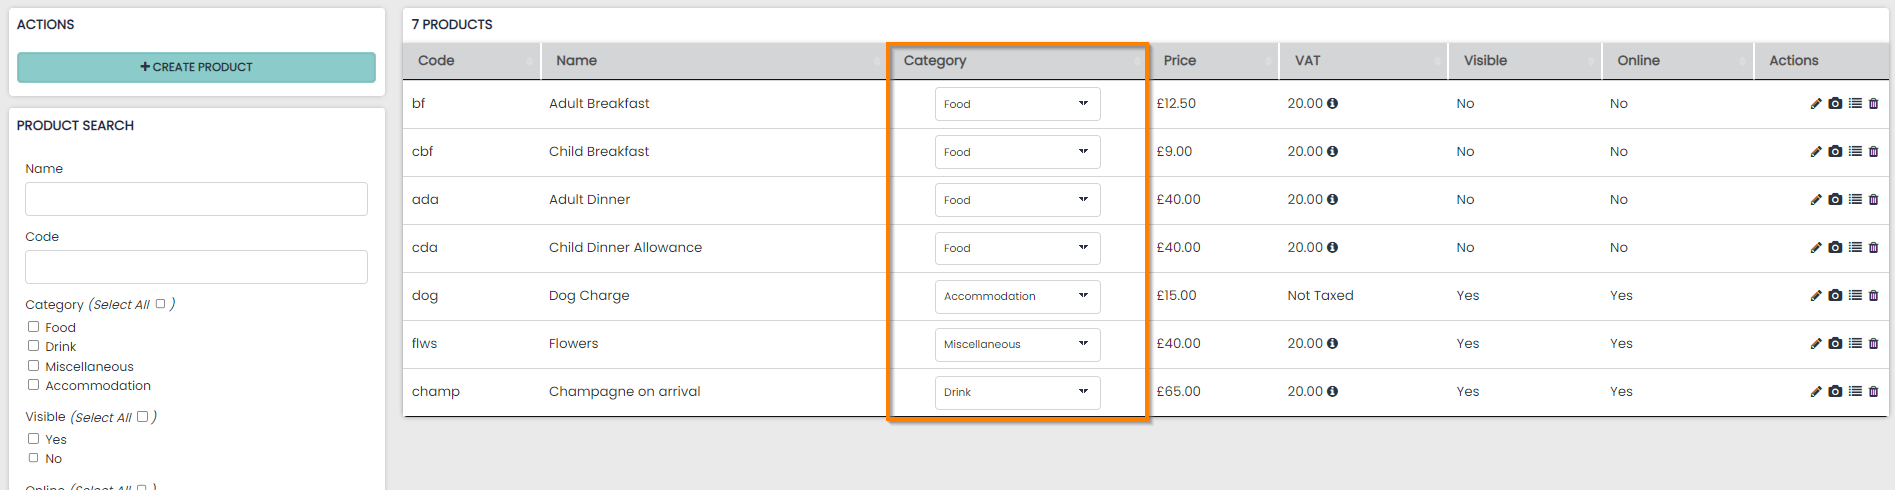
Use the Actions column to make changes or update your Products:
- Edit Pencil
- Add Image
- Drag to Sort (re-order)
- Delete
Edit Revenue Category
The Category column will display the revenue category that has been assigned to the Product. All Products must be assigned to a Category when created.
The Category can be edited on-the-fly from this column using the drop down menu.
Rate Plans
A description will also need to be assigned to your Rate Plans. Click below to find out how to create Rate Plans.
Overview
You can set up multiple rate plans in the PMS for flexibility and customisation catering to different Guest preferences.
You need to have at least one rate plan attached to a room for it to be visible in your availability page.
You can also set up hidden rates for exclusive use on your OTAs.
Rate Plans can be:
- Hidden from your Guests
- Derived from other rate plans
- Discounted for all Occupancy levels in the room
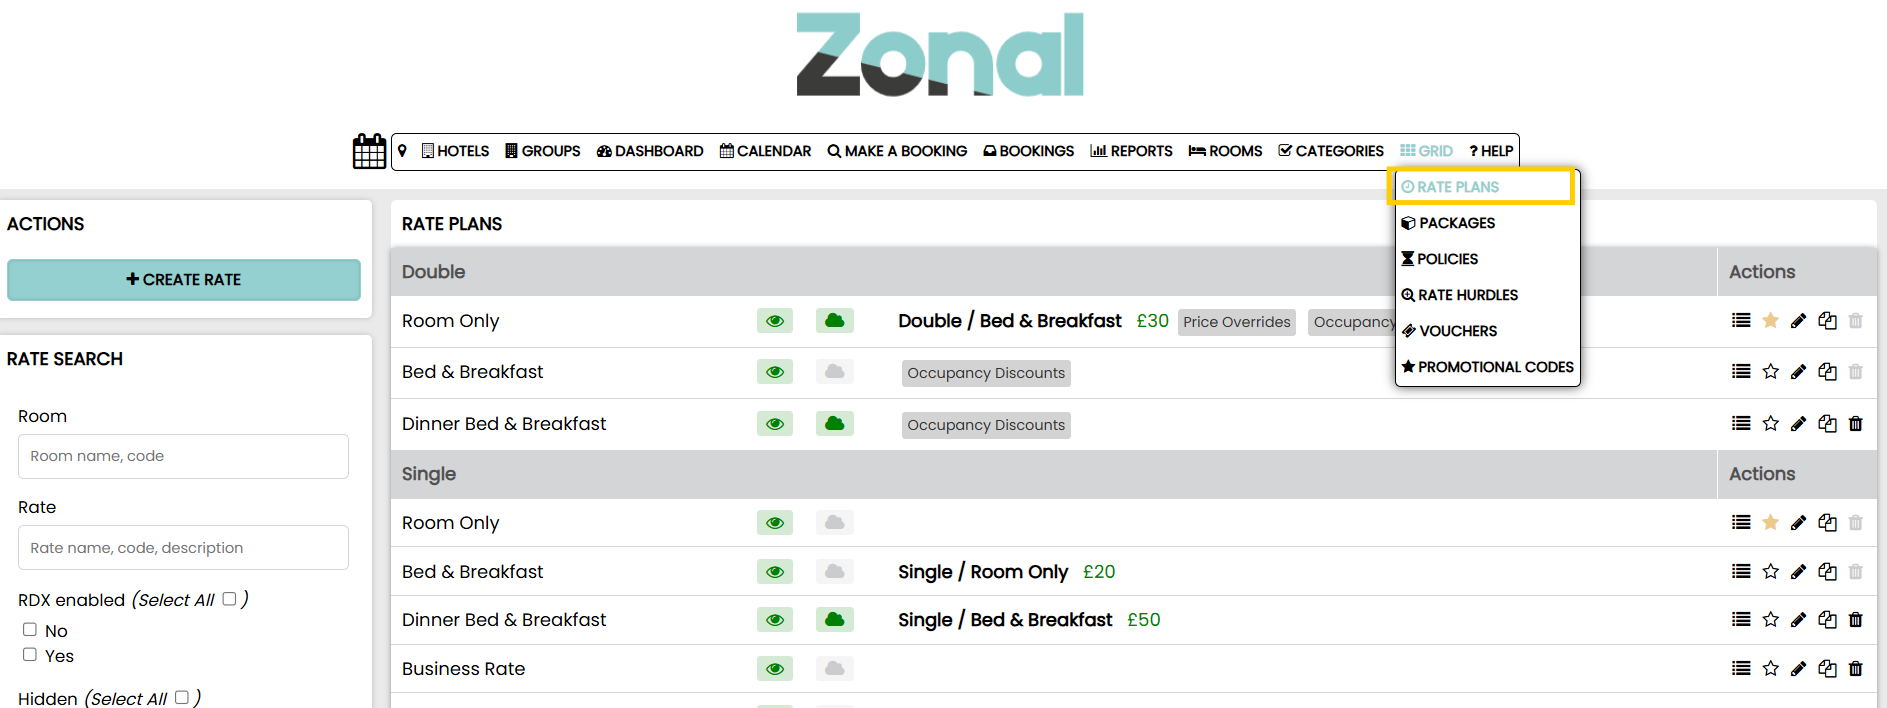
To access your rate plans hover over Grid and select Rate Plans.
Rate Plans hold the following data:
- Rate (daily cost)
- Stop Sell On/Off
- Minimum and Maximum Stay values
- Closed to Arrival On/Off
- Closed to Departure On/Off
Creating Rate Plans
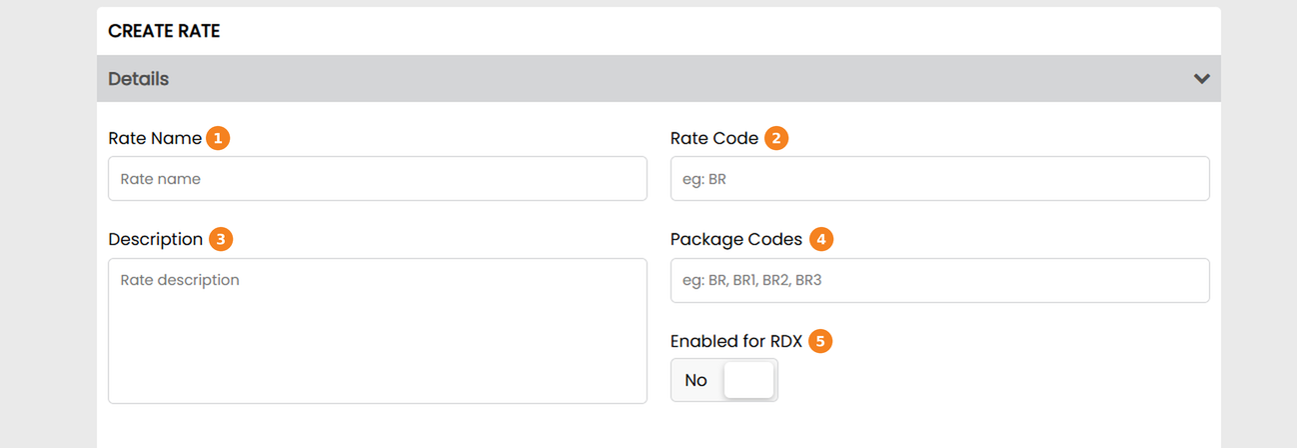
To Create a New Rate click Create New Rate on the rate Plans page.
Enter Details for the Rate Plan:
-
Rate name is how the plan will be identified within the system internally and shown to your direct guests
-
Rate Code will be used to map /connect to RDX Siteminder if also being sold on OTA channels. This should be an abbreviation of the Rate name eg Bed and Breakfast code would be BB
-
This is the description your customers will see in the booking engine
-
This is a legacy feature which you can ignore
-
Enabling a Rate Plan (toggle the switch green) for RDX (Channel Manager) will allow it to send updates to OTA Channels
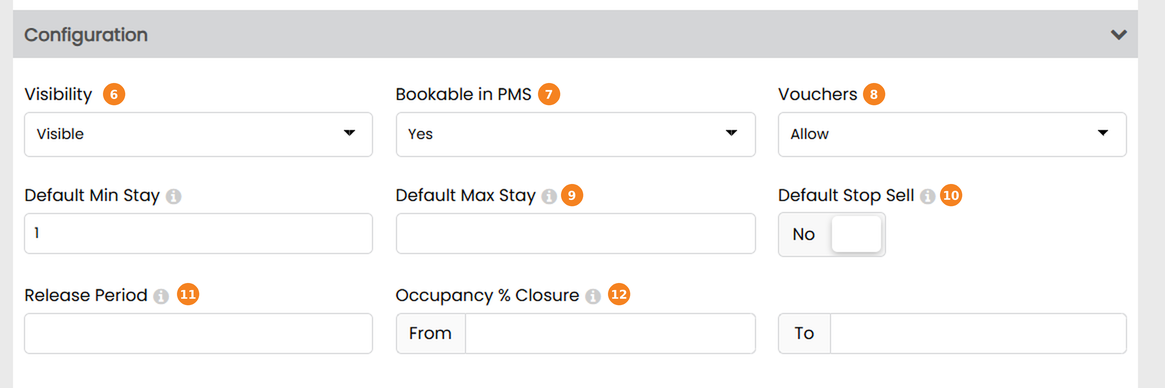
Configuration details:
-
If visibility is set to Hidden Staff Only, your Guests will not see this on the availability page. Staff members will still be able to book these but see point below
-
The rate plan can be set to be bookable or not bookable in the PMS. If set to not bookable, it will not appear as a bookable rate within the calendar
-
Vouchers can be set to be Allowed or Restricted
-
Default Min/Max stay allows you to set a default value for both of these restrictions for all dates in the calendar
-
Default stop sell will create the rate plan with a stop sell applied indefinitely. This can be removed within the grid
-
Release period will set a number of days into the future that the rate plan will be available to book after. Eg Advance Purchase Rates
-
Occupancy % Closure – Auto-adds a stop-sell on dates where the occupancy is outside of the two entered values
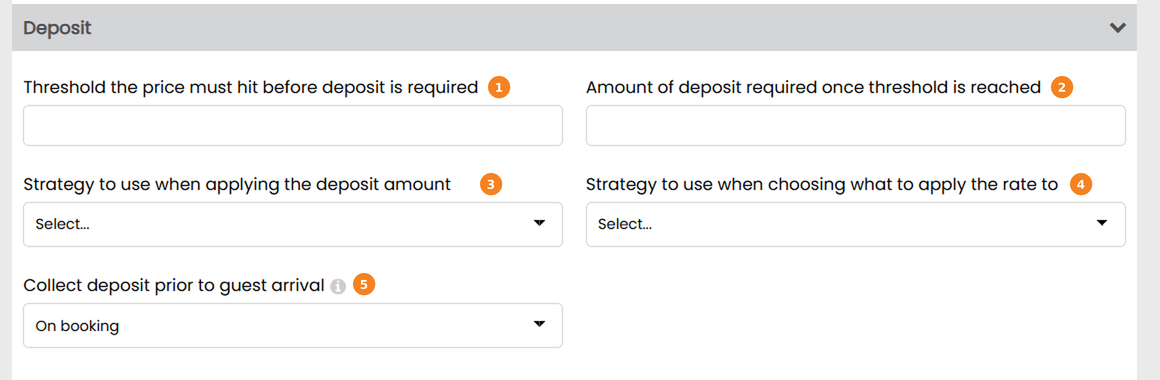
Deposit Details:
-
Threshold is the price must hit before a deposit is required
-
Amount – Can be a whole amount or a percentage
-
Strategy to use – Decides a strategy if 2 differing strategies are combined on 1 Booking
-
Strategy – Applies deposit requirement to first night or whole reservation
-
This enables the deposit when toggled to green
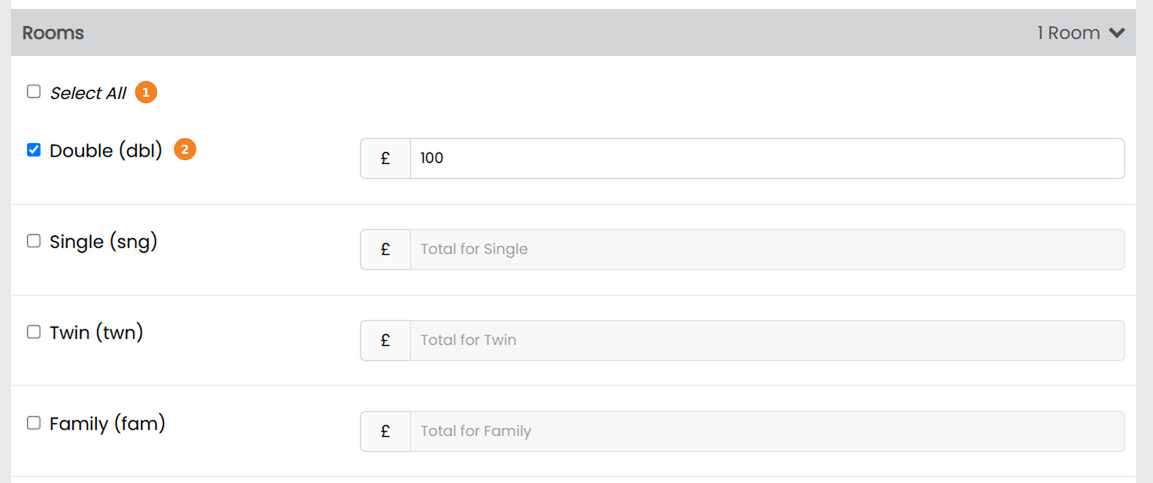
Add a Room:
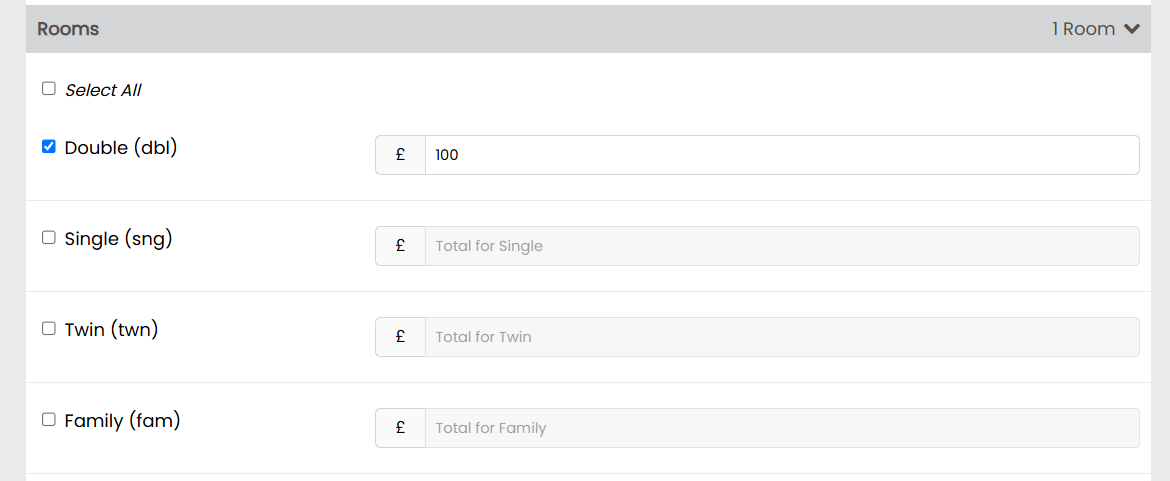
Each Room that you want the Rate Plan to apply to must be selected and a Rack rate added.
-
Toggle ‘Select All’ to enter a base rate for every room. Or toggle each room individually
-
This is where you can enter a rack rate
Products:
Products are inclusive of the rack rate set above, but apportion revenue to additional sales categories.
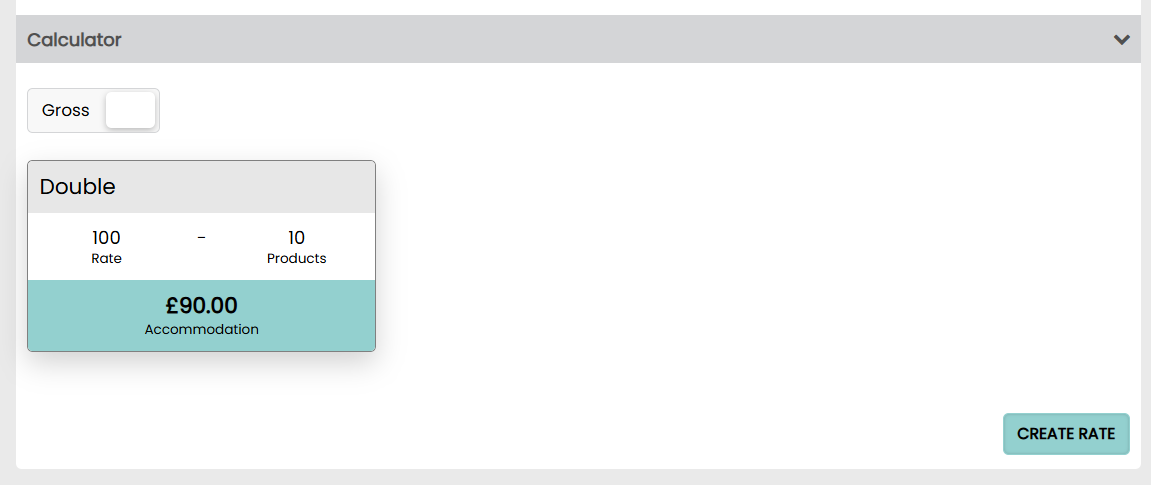
If the rack rate is £100 but your breakfast is £20, £80 will go to your accommodation revenue category and the £20 to your food category.
To add a product, select ‘add product’.
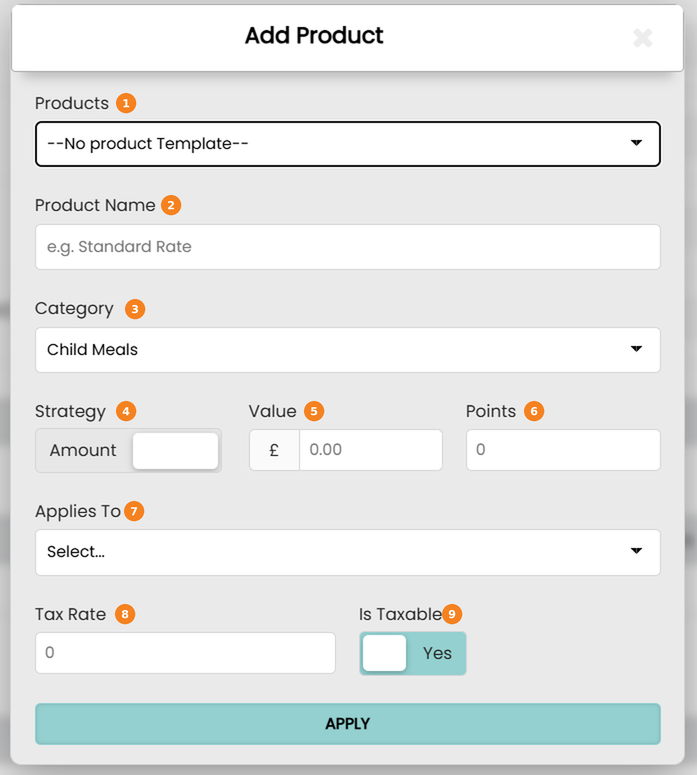
Adding a Product:
- You can select an existing product in your inventory
- Product name. This will automatically populate upon selecting a product
- The sales category the product belongs to. This will automatically populate upon selecting a product
- You can set an amount or a percentage based on the product strategy; however, percentage amounts apply only to tourism tax, please do not use this for any other product.
- Price of the product. This will automatically populate upon selecting a product
- Loyalty points awarded. This will automatically populate upon selecting a product
- The product can be applied to the reservation, stay, adult, or child
- Whether the product is taxable or not. This will automatically populate upon selecting a product
- If taxable, the tax rate. This will automatically populate upon selecting a product
Each room that you select for this rate plan will display at the bottom of the rate plan creation page with a calculator of revenue.
The calculator shows each Room Rate and the breakdown of the prices for each Room Rate based on the Rack Rate entered above and the attached Products that have been set up as part of the Rate Plan.
Additional Features and Settings
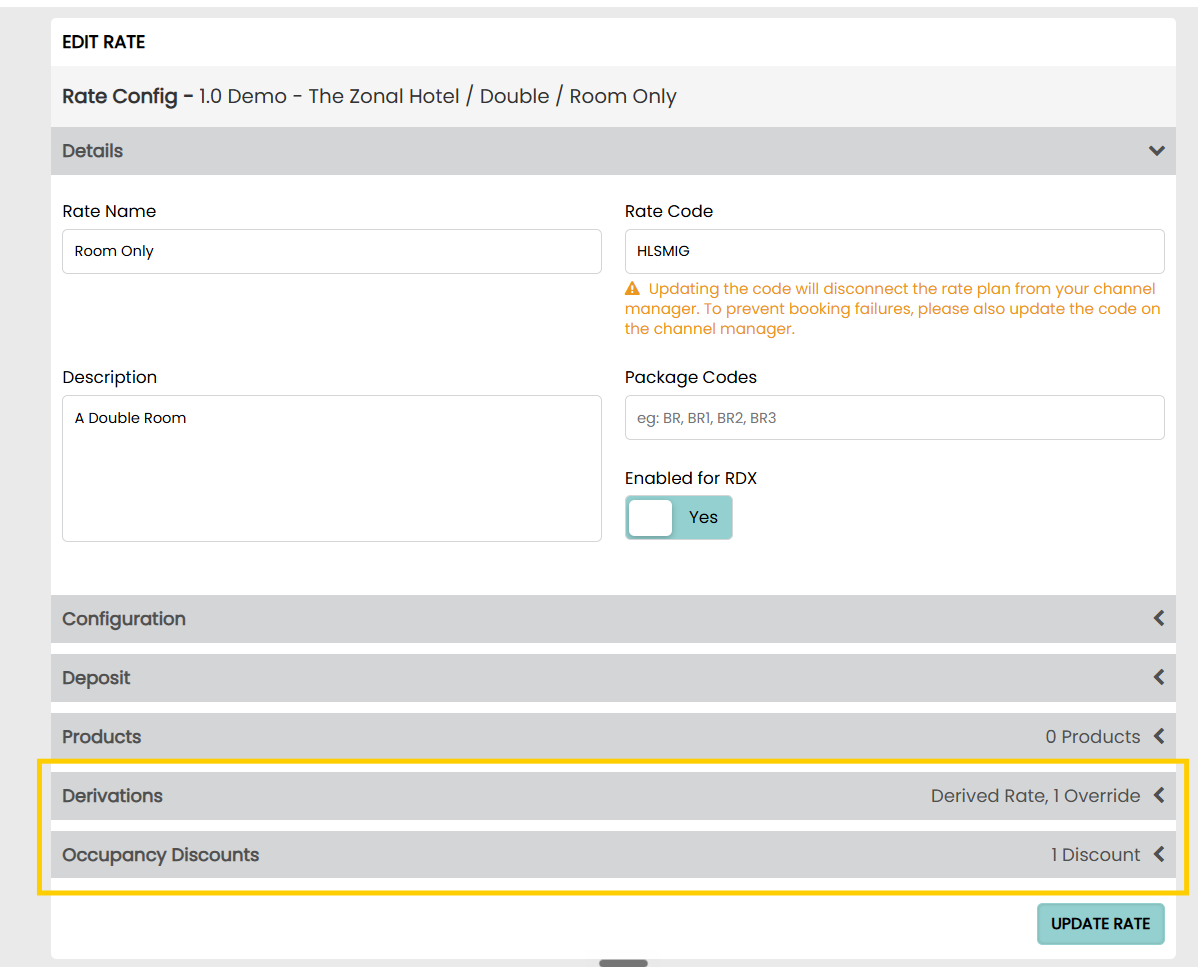
Clicking the configuration arrow takes you to the configuration page for the rate plan.

Located at the bottom of the form, are two extra configuration tabs:
Derivations – these allow you to set a default price based on a flat amount or percentage from another rate
Occupancy Discounts – these allow you to adjust the price based on occupancy
Derivations
Any rate can be derived from another rate.
The price on a derived rate will automatically update when the original rate is updated saving the hotelier time.
Derived Rate Plans will display on the Rate Plans page with the derivations visible.

Adding a Derivation:
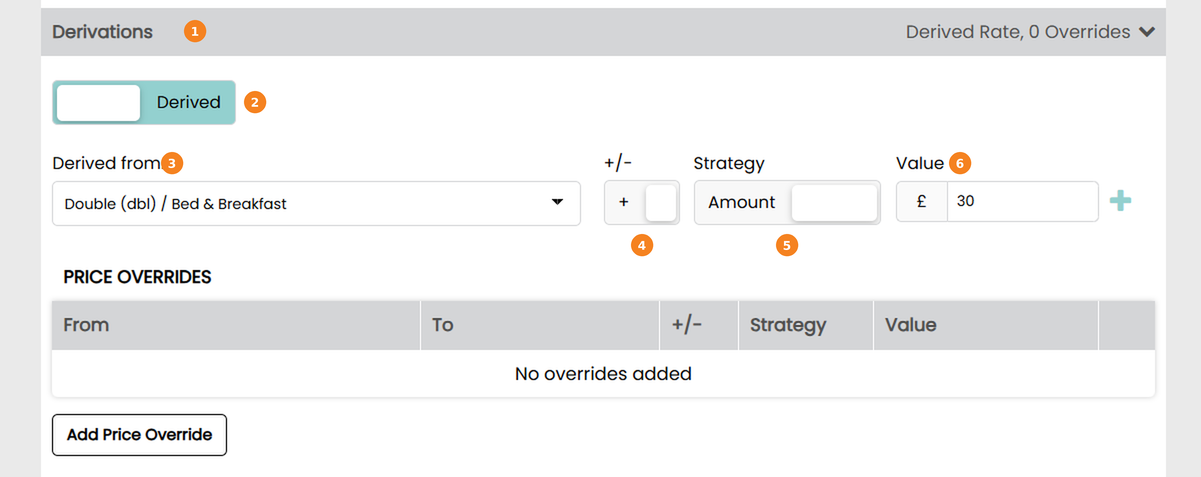
To add a derivation, edit an existing rate plan.
- Select the Derivations tab at the top of the lightbox
- In this box, change the manual box to derived by clicking on it
- In this drop down, select the rate you’d like to derive from
- The rate can then be increased(+) or decreased(-)
- The Strategy allows a selection of either Amount or Percentage
- Finally, the desired value can be entered
Occupancy Discounts
This allows you to discount the rate based on occupancy.
In the example below, if one person books the room they will receive a discount from the base rate of £12.50.
- Select the 3rd tab at the top of the Rate Config panel
- Click the button to add a discount. You will need to add a discount for all occupancy levels. ie. For a triple room you’ll need to add a separate discount for 2 people and 1 person (£10 for 2 people, £20 for 1)
- Select the occupancy level for the discount
- The Discount Strategy can be set to an Amount(£) or Percentage
- The Discount Value needs to be entered
- Select the days that the discount will apply to (selected days will show green)
Once set, the rate plan page will display that there is a discount on the rate.
Copying an Existing Rate Plan
Existing Rate Plans can be copied to save time or to add to a newly created Room Type.
The copy icon can be found in the Actions panel on the right hand side.
Once the icon has been clicked, the existing Rate Plan’s configuration page will appear.
In this example, the Bed and Breakfast (BB) Rate Plan has been copied. The rate code, however, appears as ‘BB_copy’.
This should be edited correctly before saving.
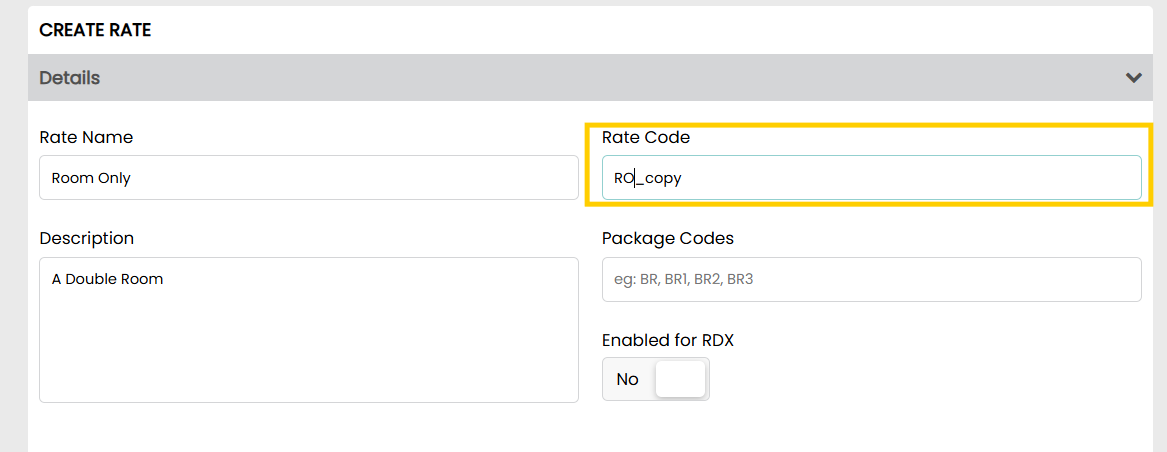
To complete a Copied Rate Plan set up this must be assigned to the correct Room Type and a rack rate entered.
Once the new Rate Plan has been saved make sure the following is updated:
- Update all Rates and Restrictions on the new rate plan via the Grid page
- Set the new Rate Plan to derive from an existing Rate Plan if required. Edit the rate plan to set this
- Add any Occupancy Discounts required for the new Rate Plan. Edit the rate plan to set this
Peak & Off Season Rate Pricing
Here, your prices, e.g. peak and off rates and seasonal pricing needs to be changed. Click below to learn how you can make these changes using the Rates Grid.
Overview
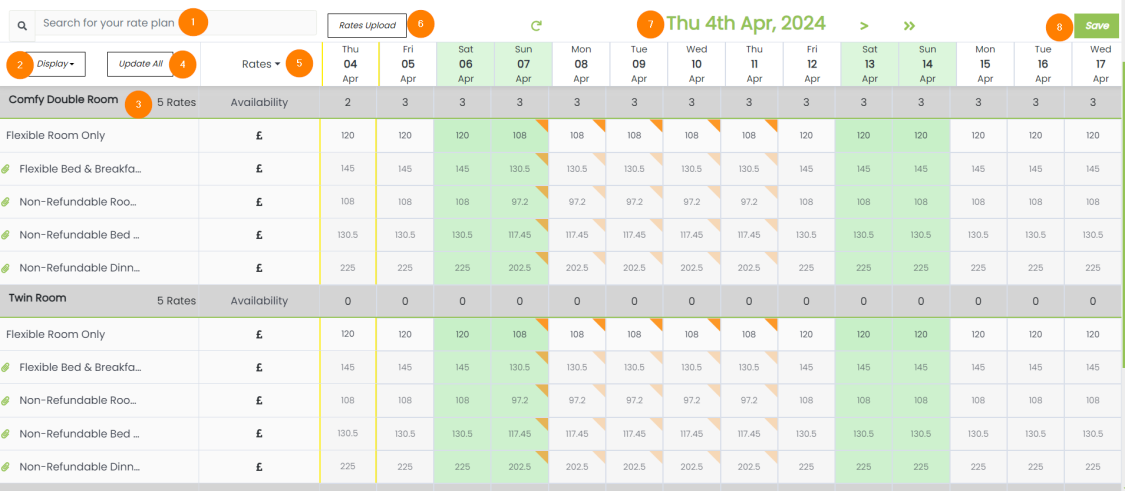
The Grid is an editable calendar where you can manage your rates and restrictions.
The below features can be found within the Grid:
1 Search / Filter for Rooms or Rates
2 Toggle between editable and derived rate plans.
3 Room types and rate plans
4 Update All (Bulk Update)
5 Rates / Restrictions selector
6 CSV Rates Uploader
7 Grid micro calendar
8 Save Button
Grid Data
The Grid will, by default, show the daily rates for all rate plans in the PMS. Rates for individual days can be updated by entering a new value in the cell and pressing save. Derived rates cannot be edited in this way, these are indicated by the green paperclips.

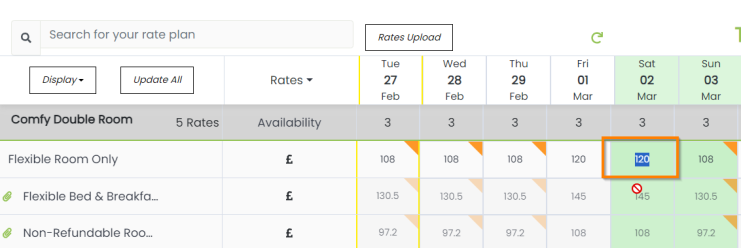
Stop sells allow you to stop selling specific rooms or rates. Stop sells will display a no entry sign when they are correctly applied.

Minimum and Maximum stay sets the minimum / maximum days the room / rate needs to be booked for. The default minimum stay is 1.

Closed to Arrival and Closed to Departure settings are also either set to On or Off. Closed to Arrival / Departure means a Guest cannot check in / out these days but Guests can stayover. Eg Christmas Day.

Icons
The following icons will display on the grid:
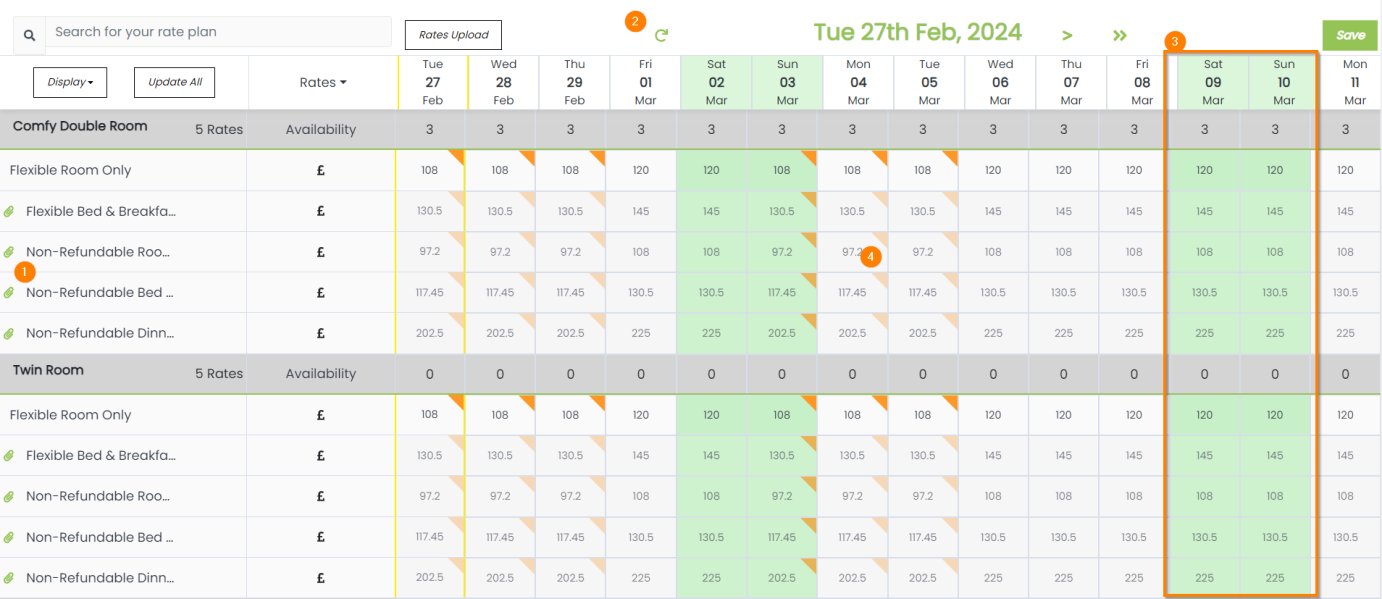
1 The paper clip icon indicates that the Rate price is derived from another Rate Plan and cannot be updated in the Grid.
2 Refresh Arrow will return the Grid to the current day when clicked.
3 Weekends are highlighted in green.
4 If an orange triangle displays within the cell, a rate hurdle is auto-adjusting the rate
Manual (Small Scale) Changes
Small scale changes can be made very quickly on the Grid page.
To change the rate cost shown within the Grid, click on the cell for the rate plan on the correct date. Be sure to click the ‘SAVE’ button to update the PMS.
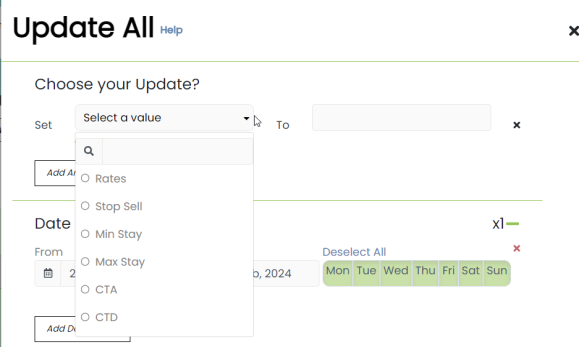
The same logic applies for all of the restrictions available in the drop down:
- Stop Sells
- Min Stay
- Max Stay
- CTA (Closed to Arrival)
- CTD (Closed to Departure)
Update All (Bulk Update)
To update multiple rates and restrictions over a period of time, click update all.
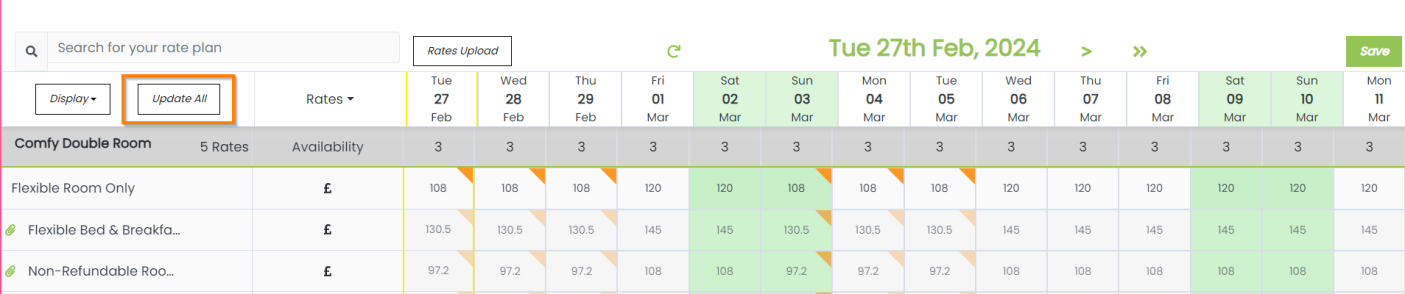
Once clicked, a lightbox will open up on the right hand side of the screen.
-
Choose the data type to be updated from the first drop down
-
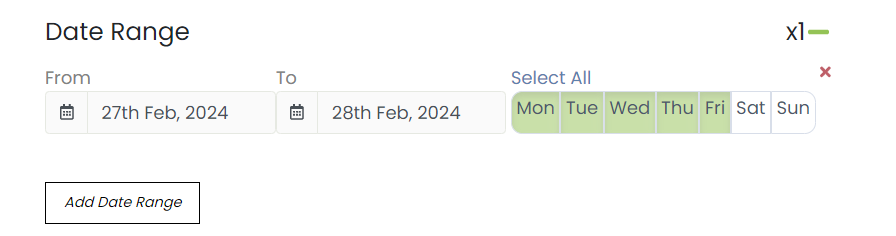
Supply a date range (max. 2 years at a time) and select the days of the week to apply the update to
-
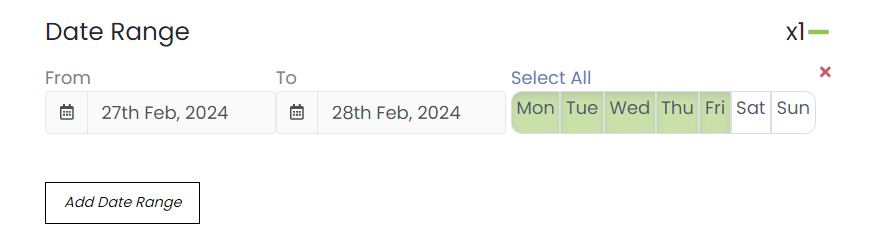
Select the Rate Plans you wish to update. You can select multiple. Be sure to click Save once you are happy with the selected update details
Some restrictions will have a toggle which can be set to green (on) or grey (off)

Rate Restrictions
If you have any rate restrictions, these will also need to be added using the Rates Grid – including stop sells, minimum stays, close to arrivals, and close to departures. Click below to learn how you can make these changes using the Rates Grid.
Overview
The Grid is an editable calendar where you can manage your rates and restrictions.
The below features can be found within the Grid:
1 Search / Filter for Rooms or Rates
2 Toggle between editable and derived rate plans.
3 Room types and rate plans
4 Update All (Bulk Update)
5 Rates / Restrictions selector
6 CSV Rates Uploader
7 Grid micro calendar
8 Save Button
Grid Data
The Grid will, by default, show the daily rates for all rate plans in the PMS. Rates for individual days can be updated by entering a new value in the cell and pressing save. Derived rates cannot be edited in this way, these are indicated by the green paperclips.
Stop sells allow you to stop selling specific rooms or rates. Stop sells will display a no entry sign when they are correctly applied.
Minimum and Maximum stay sets the minimum / maximum days the room / rate needs to be booked for. The default minimum stay is 1.
Closed to Arrival and Closed to Departure settings are also either set to On or Off. Closed to Arrival / Departure means a Guest cannot check in / out these days but Guests can stayover. Eg Christmas Day.
Icons
The following icons will display on the grid:
1 The paper clip icon indicates that the Rate price is derived from another Rate Plan and cannot be updated in the Grid.
2 Refresh Arrow will return the Grid to the current day when clicked.
3 Weekends are highlighted in green.
4 If an orange triangle displays within the cell, a rate hurdle is auto-adjusting the rate
Manual (Small Scale) Changes
Small scale changes can be made very quickly on the Grid page.
To change the rate cost shown within the Grid, click on the cell for the rate plan on the correct date. Be sure to click the ‘SAVE’ button to update the PMS.
The same logic applies for all of the restrictions available in the drop down:
- Stop Sells
- Min Stay
- Max Stay
- CTA (Closed to Arrival)
- CTD (Closed to Departure)
Update All (Bulk Update)
To update multiple rates and restrictions over a period of time, click update all.
Once clicked, a lightbox will open up on the right hand side of the screen.
-
Choose the data type to be updated from the first drop down
-
Supply a date range (max. 2 years at a time) and select the days of the week to apply the update to
-
Select the Rate Plans you wish to update. You can select multiple. Be sure to click Save once you are happy with the selected update details
Some restrictions will have a toggle which can be set to green (on) or grey (off)
Email Templates
If applicable, Zonal PMS allows you to create email templates that can be used to send information to guests related to their stay. Click below to learn how to create and manage your Email Templates in the system.
Overview
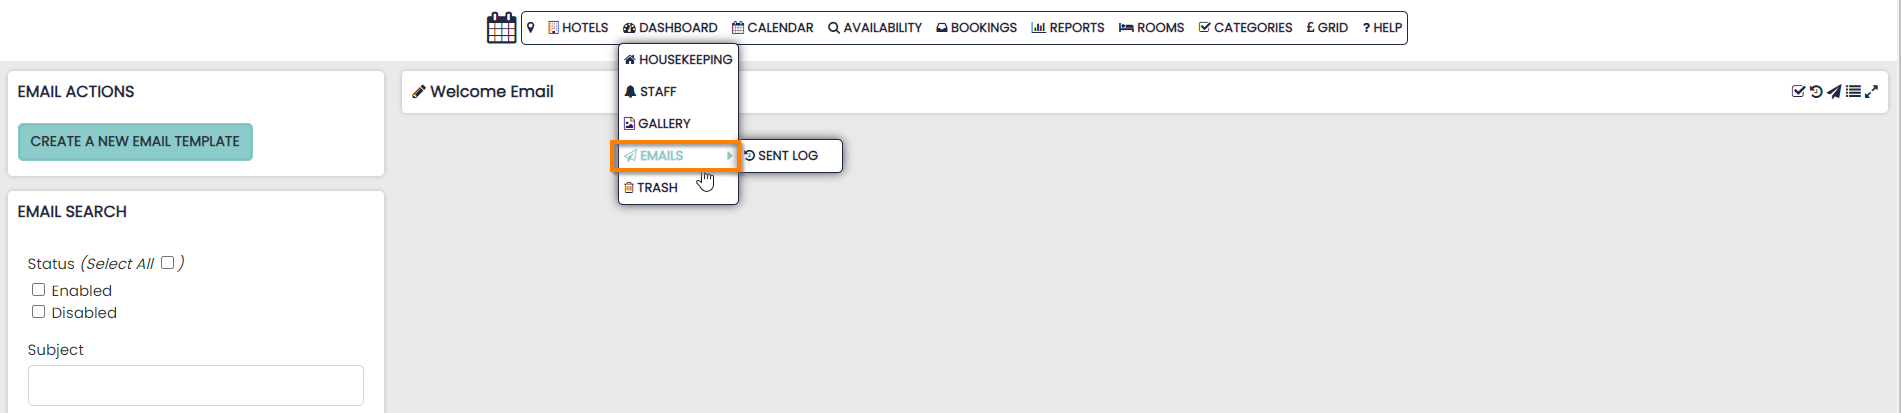
You can create email templates in the PMS to automatically send before or after a guest stays.
The emails are located under the dashboard button.
Create a New Template
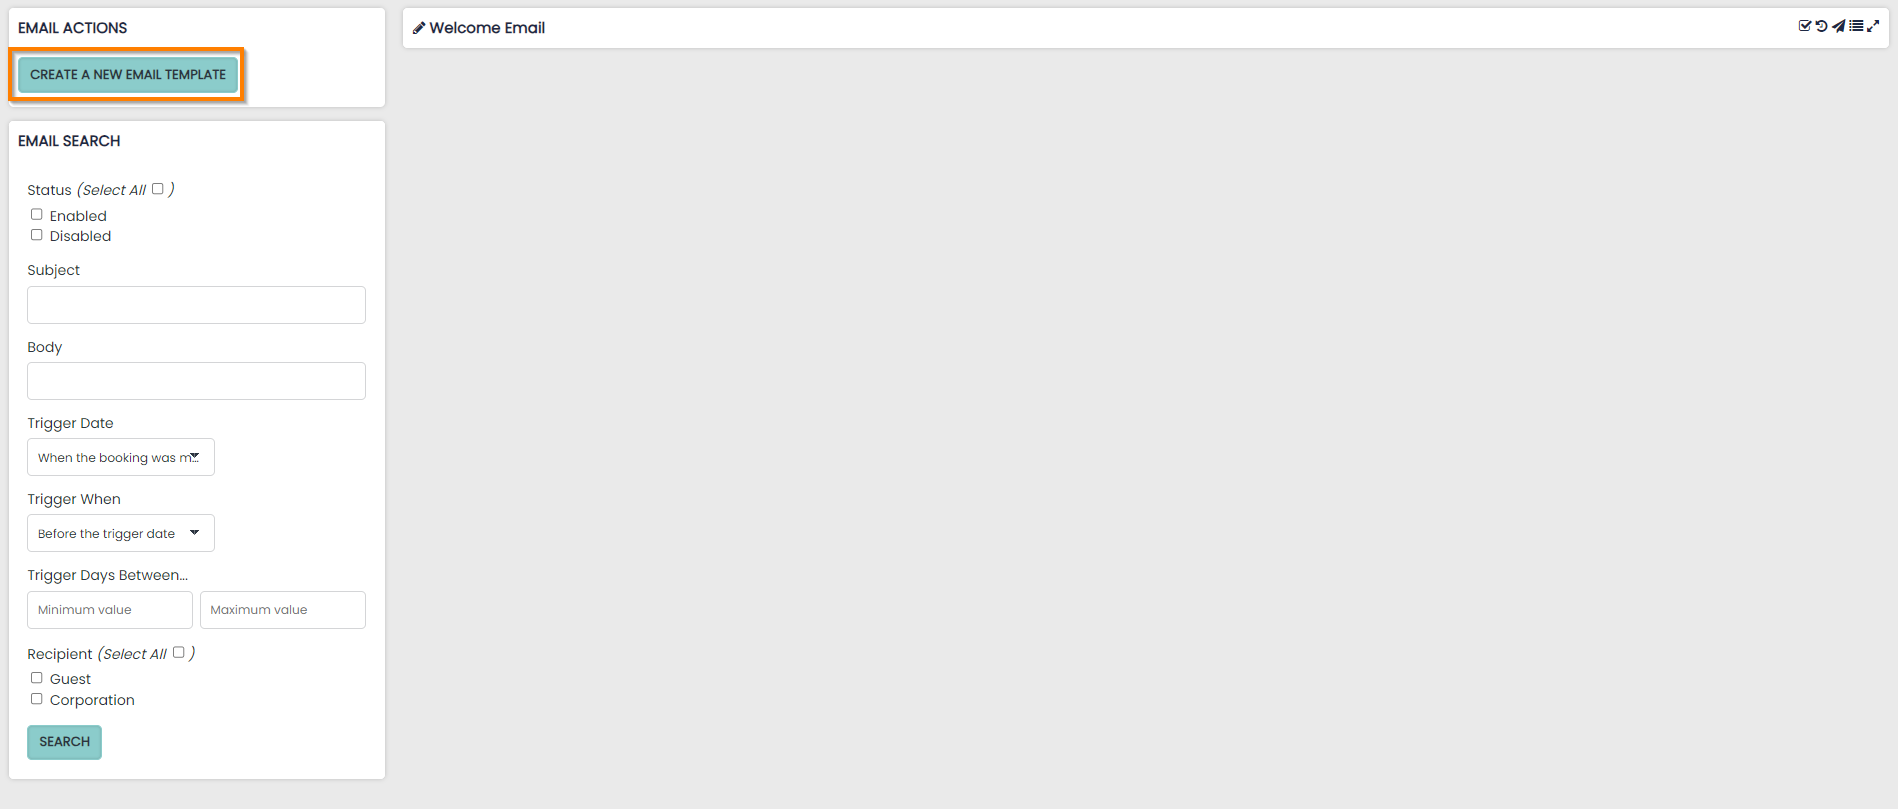
To create a new email template select the button located in the top left-hand corner of the page.
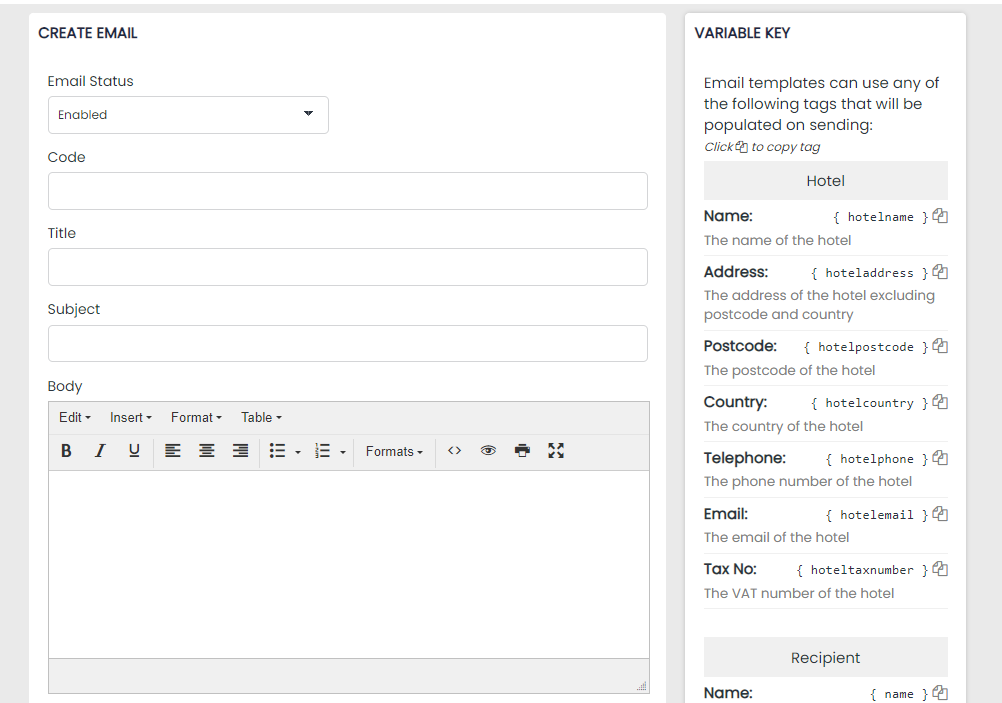
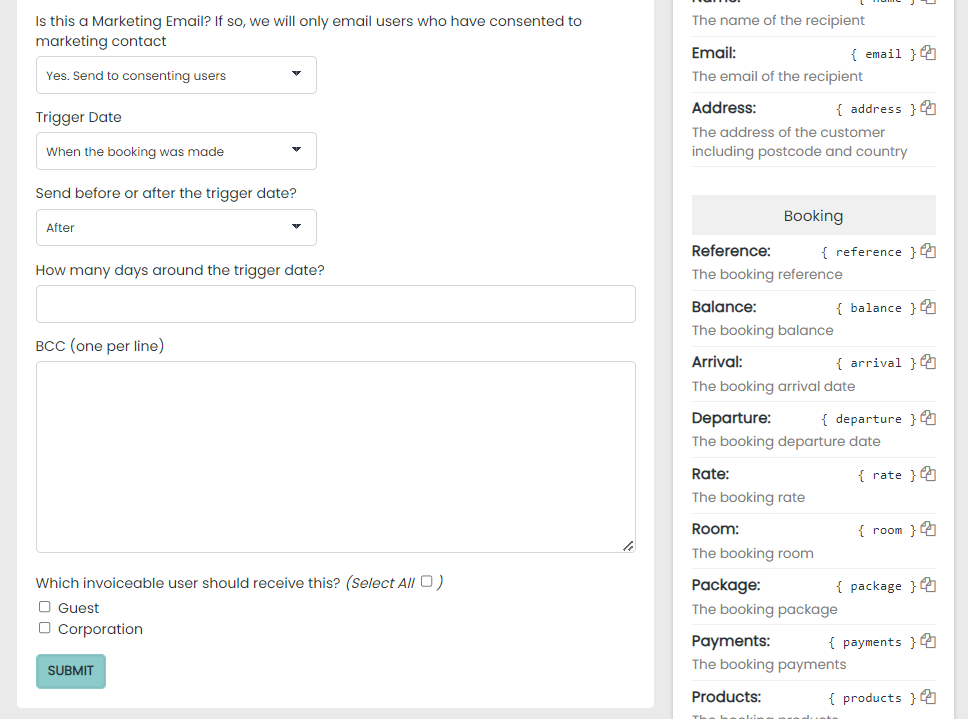
When creating a new template you must choose the following settings:
- Turn your email template On (Enabled) or Off (Disabled)
- Set the unique identifier code for the template (internal use only)
- Set the name (Title) of your email template
- Input the subject matter of your email template e.g. Summer Deals, Special Offers etc
-
Compose your email content using the body text box. You may include:
-
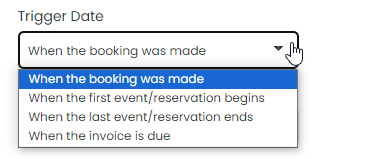
Set the specific circumstance (Trigger) after which you would like the email to be sent
-
Select whether you would like the email to be sent Before or After the trigger date
-
Set how many days before or after the trigger date the email will be sent
Using Variables
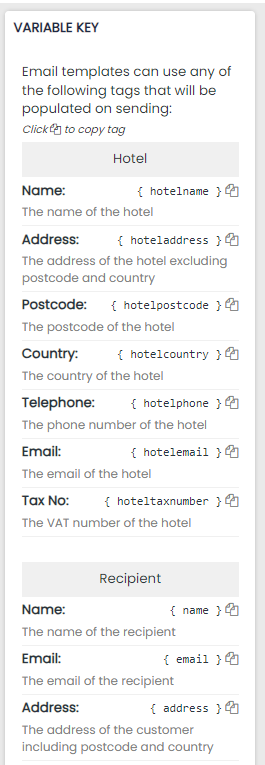
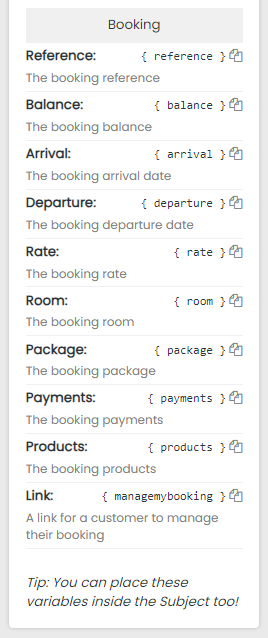
When creating or editing a template, be aware of the variables available to use which will transpose information from the Booking into your email content.
The format of the variables is very important so it is recommended to copy and paste the variables from the key found on the right hand side.
These variables can also be used in your subject line to create a more personalised email for your Guests.
Current Templates
Once the email template has been created it will appear on the right-hand side of the email screen.
Every template will have a series of icons located to the right-hand side of the email title.
- The ticked box displays when the email template is active. If the email campaign is inactive the box will appear empty
- Selecting the Clock / Arrow icon displays a log history of emails sent
- Selecting the Paper Aeroplane icon will send a test email to your email address
- Selecting the Drag to Sort icon will allow you to reorder the current email campaigns in the list
Events
If applicable and your property has an events space that can be booked, you will need to set this venue up in the system. Click below to learn how to create Venues in Zonal PMS.
Creating Venues
The venues page displays all venues that have been set up for the hotel.
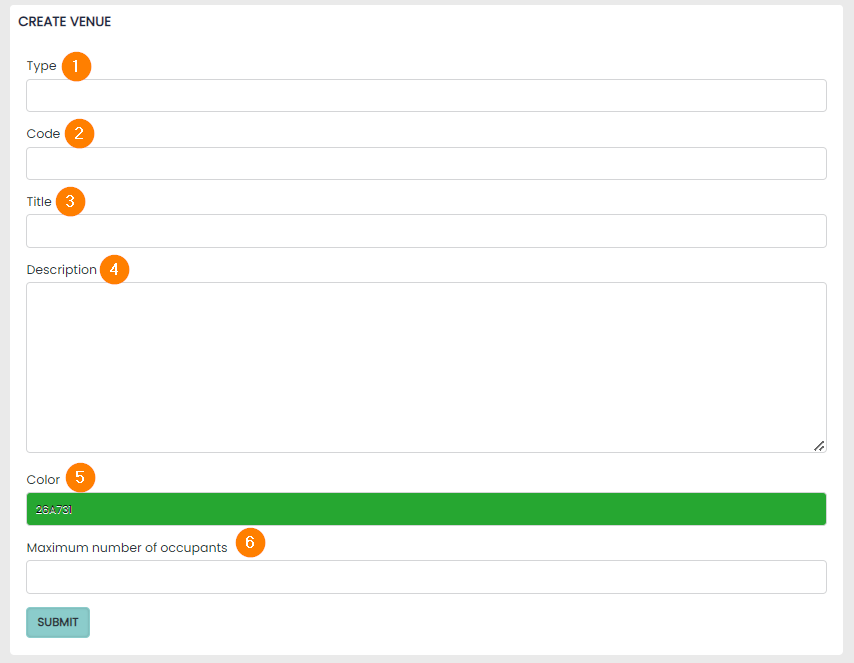
To create a venue, begin by selecting the + Create Venue button. The following then needs to be completed:
1 Enter the Type
2 Code – this is used by the PMS in the background and should be a short abbreviation of numbers and letters
3 The Title should be a copy of the Type
4 The description field is for internal use only and should help distinguish this venue for your staff users
5 The colour picker will be used for any bookings that are entered into the calendar
6 The Maximum Occupants field is used as a guide for your staff. It will not limit the occupants selected on any booking
Viewing Venue Calendars
The calendars for each of your Venues can be accessed in 3 ways:
-
Click on the calendar icon in the Venues overview page. This is located in the actions column
-
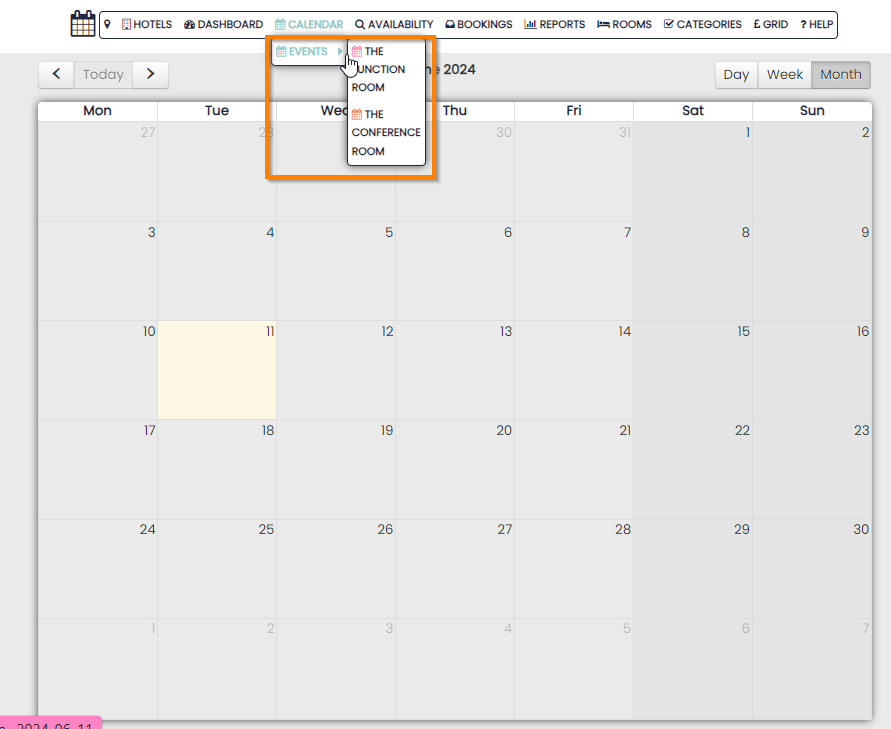
Hover over Calendar in the top navigation bar and select Events. This will show all Conferences booked in, on all Venues combined in 1 calendar. Each venue is colour coded
-
Hover over calendar in the navigation bar (as above), but click on an individual Venue. This will give you the same display as the first option
Making a Conference
Bookings in the Venue calendars are called Conferences and are made in the same way as the Accommodation Calendar i.e. Simply click on the date that you wish the Conference to take place.
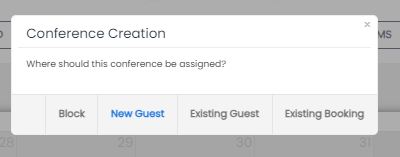
The creation panel will display allowing you to make conferences in the same 3 ways:
-
New Guest – as with accommodation bookings, conferences need to be assigned to a Guest Profile. This option will navigate the use to the Booking Engine and create a new profile if the email address is not already in use
-
Existing Guest – a conference can be assigned to an existing email address. This will create a new booking reference and assign the booking to the profile
-
Existing Booking – a conference can also be assigned to any existing booking in the system. A valid reference number must be supplied
Bookings
If applicable at this stage, any existing bookings you may currently have will need to be added to Zonal PMS. Click below to learn how to create and manage bookings, as well as how to view bookings in the system.
Managing Bookings
Viewing Bookings
Overview
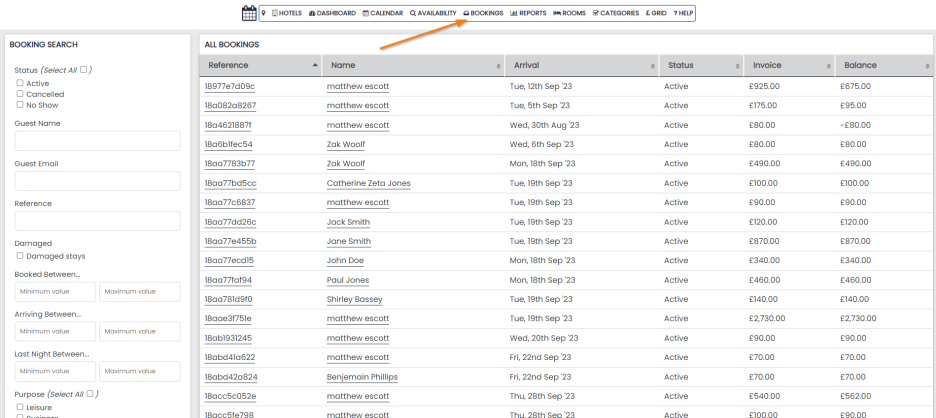
The Bookings Page is found in the centre of the navigation bar.
All Bookings that have been made or delivered to the system will be displayed in date order, starting with the furthest into the future.
All Bookings listed are hyperlinked to:
-
The Booking Hub via the reference number
-
The Guest Profile via the guest name
Searching for Bookings
You can search via:
- Status – active, cancelled, no show
- Guest Name
- Guest Email
- Reference
- Damaged Stays
- Booked Between – when the booking was created
- Arriving Between – check-in date
- Last Night Between – check out date
- Purpose
- Room Type
- Venue
- Rate Plan
- Loyalty Status
- Guest Address details (separate fields for city, county, postcode and country)
- Booked by – internally created bookings
- Channel
- Referrer – if you’d like to add any referrer choices to your availability page please contact the support team
- Notes – internal booking notes
Clicking the search button at the bottom of the filters will generate a list of any bookings which meet your search criteria.
You can export the bookings if you wish. There are multiple export options available below the search panel.
Corporation Accounts
If applicable setup Corporation Accounts to enable you to better manage corporate bookings. Click below to learn how to set up and manage Corporation Accounts.
Overview
Each corporation has an email address and contact name where Invoices and Confirmations can be sent. Guests attached to the corporation can have a separate invoice for their sundries, food and drink, etc.
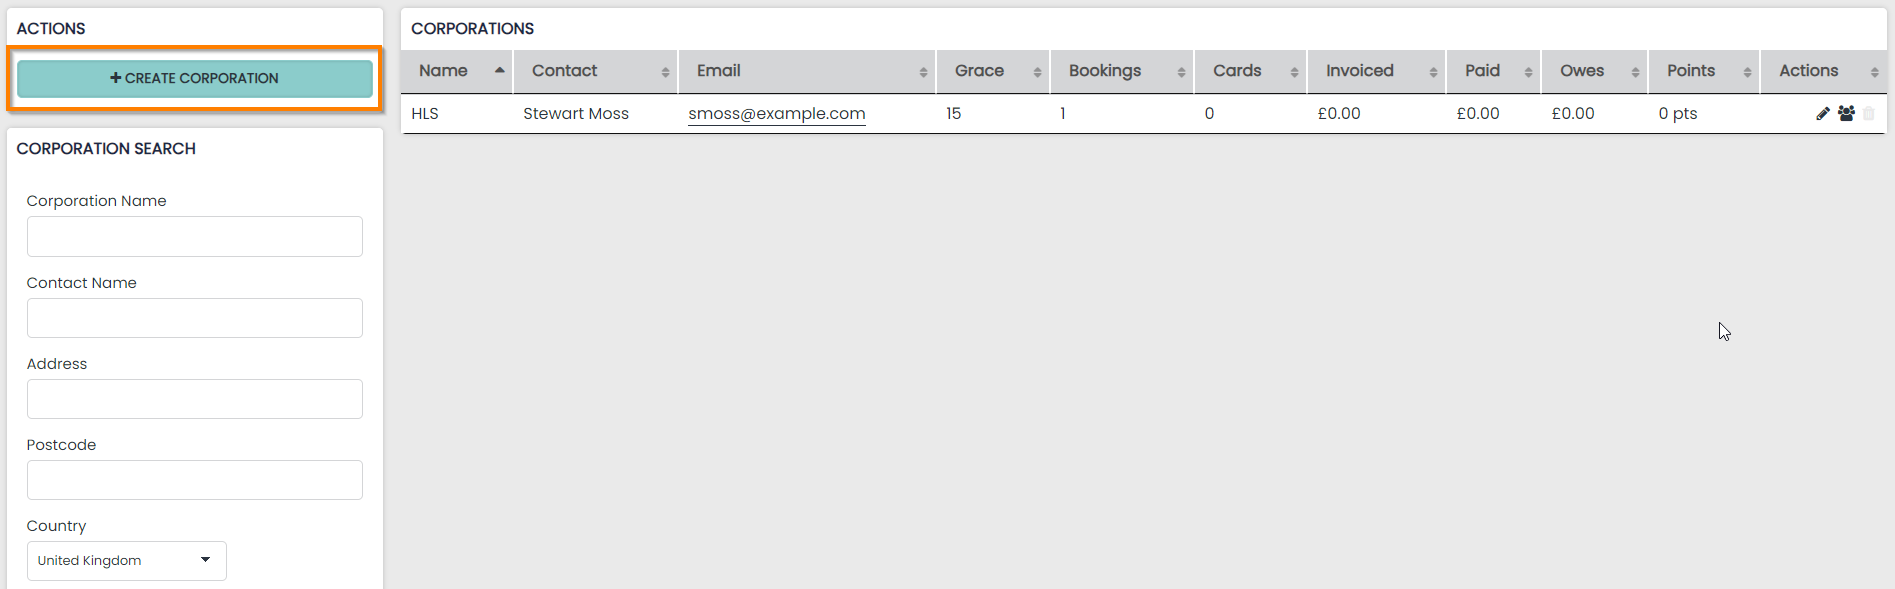
You will be presented with a list of all corporate accounts (this will of course be empty until you have created a corporate account)
Select the ‘+Create’ button in the top left hand corner and complete the form, click ‘Submit’ and the corporate account is created.
Apply Corporation
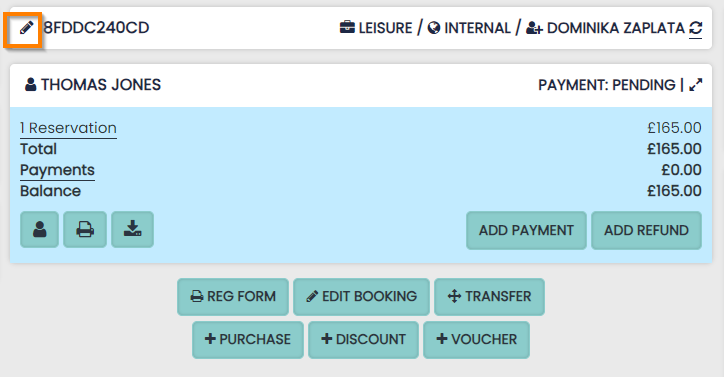
Select the booking you wish to apply a Corporate Account to and select the pencil icon next to the booking reference.
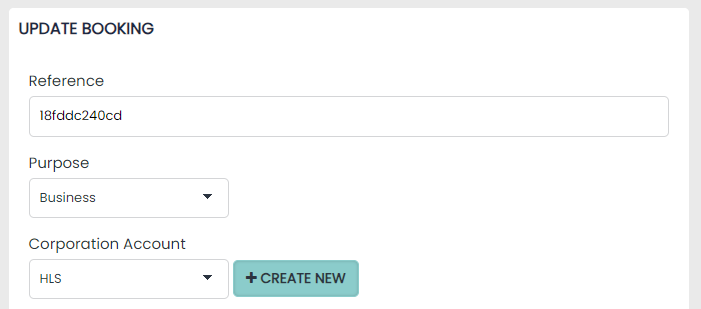
Change the purpose of the booking by selecting Business from the dropdown menu and select the relevant corporation from the ‘Corporation Account’ dropdown menu.
You will be taken to the booking page and notified of the update. The booking will then display the Corporate Account Notes that have been added to the profile page.
By applying a Corporation to a booking, all the reservation costs include any Products (extras, hireable, consumables) have been assigned to the Corporate invoice. This is indicated to you with the Corporation icon.
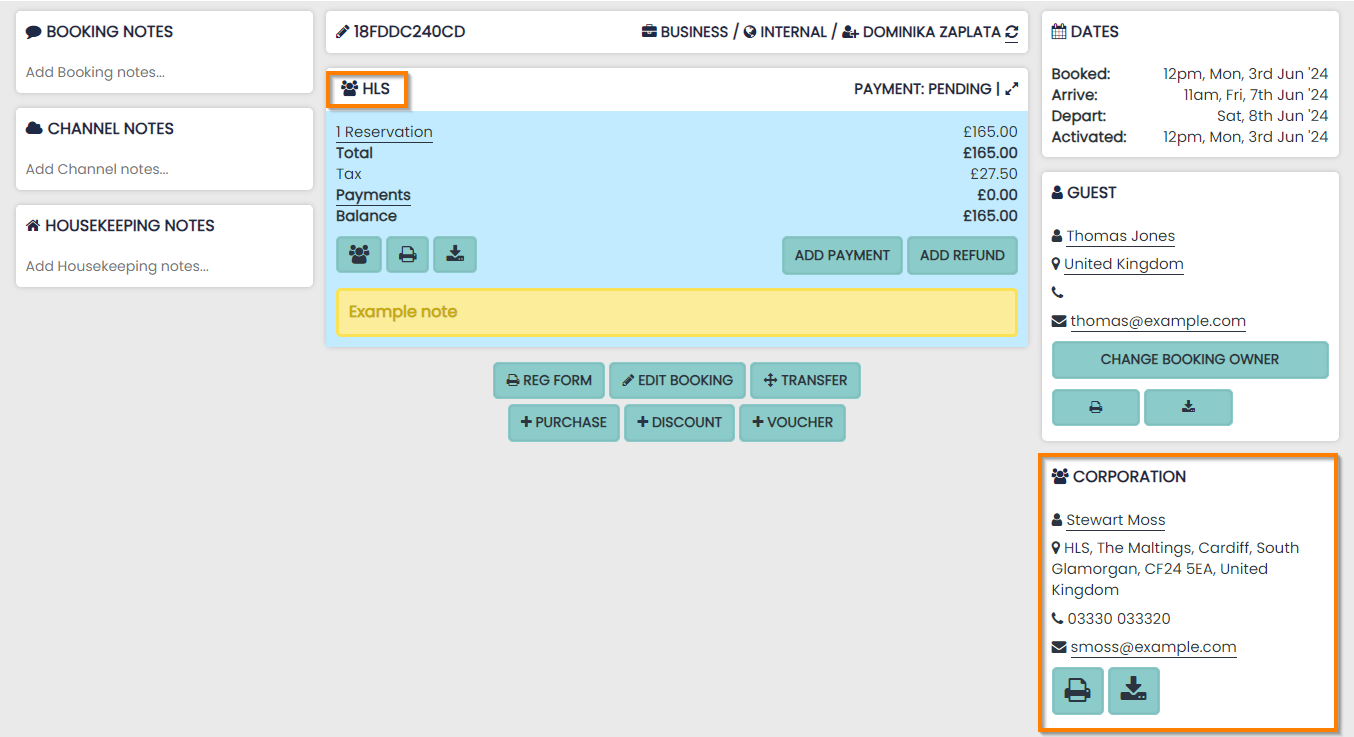
The assigned Corporate Account Profile details will be displayed in the right column.
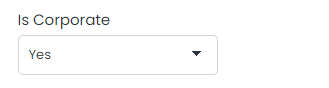
From this point, all additional items can be either assigned to the Corporation or the guest. This is option will now be displayed on all Products when added.
Managing Corporate Profiles
Each Corporate Account has their own ‘Corporate Profile page’ which shows you:
- All bookings and invoices
- Revenue generated
- Breakdown of their spend (accommodation, products etc.)
- Notes
To edit the details of a corporation, select the ‘pencil’ icon next to the corporation name.
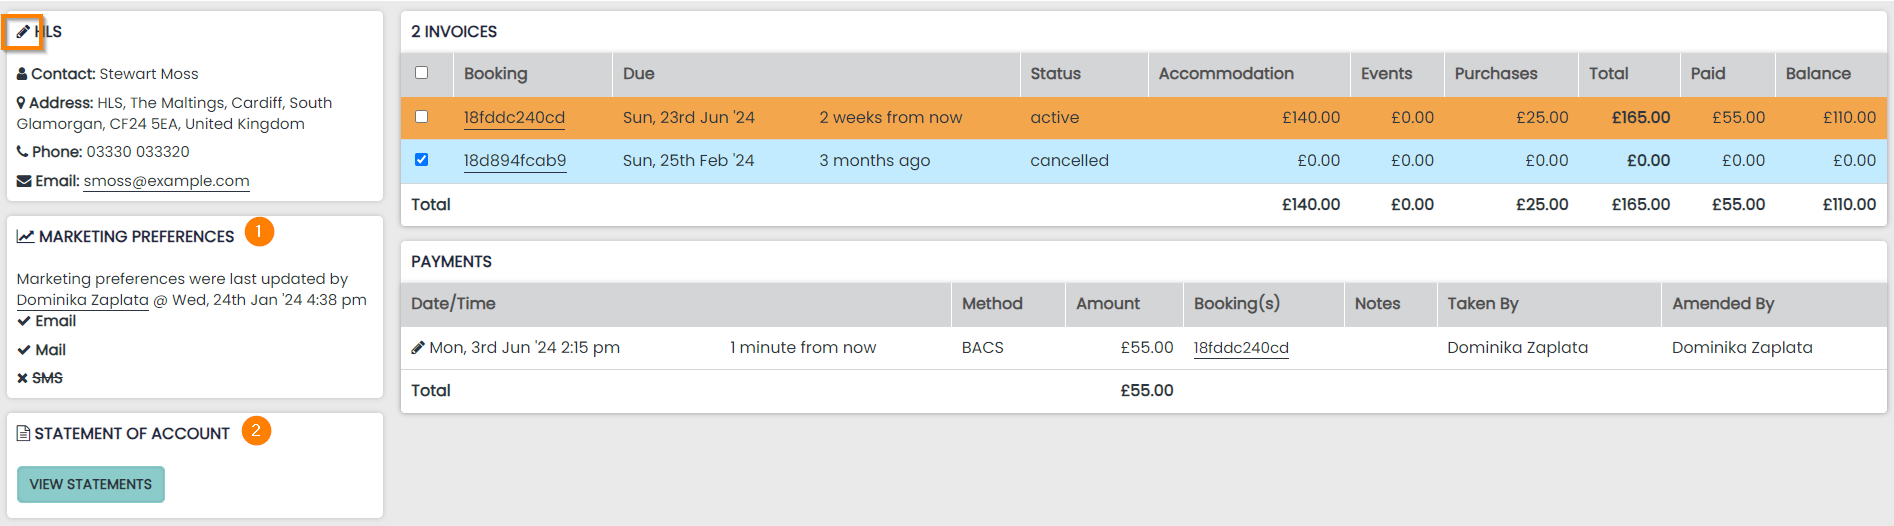
The list of invoices are colour coded as follows:
- Green – Paid
- Red – Overdue (according to grace period)
- Orange – Part paid
- Blue – Not yet due
1 Display of Marketing Preferences on the profile. These can be edited when the profile is edited using the pencil symbol above
2 A statement of Account can be generated for the profile. This involves options to display any specific dates along with an email option
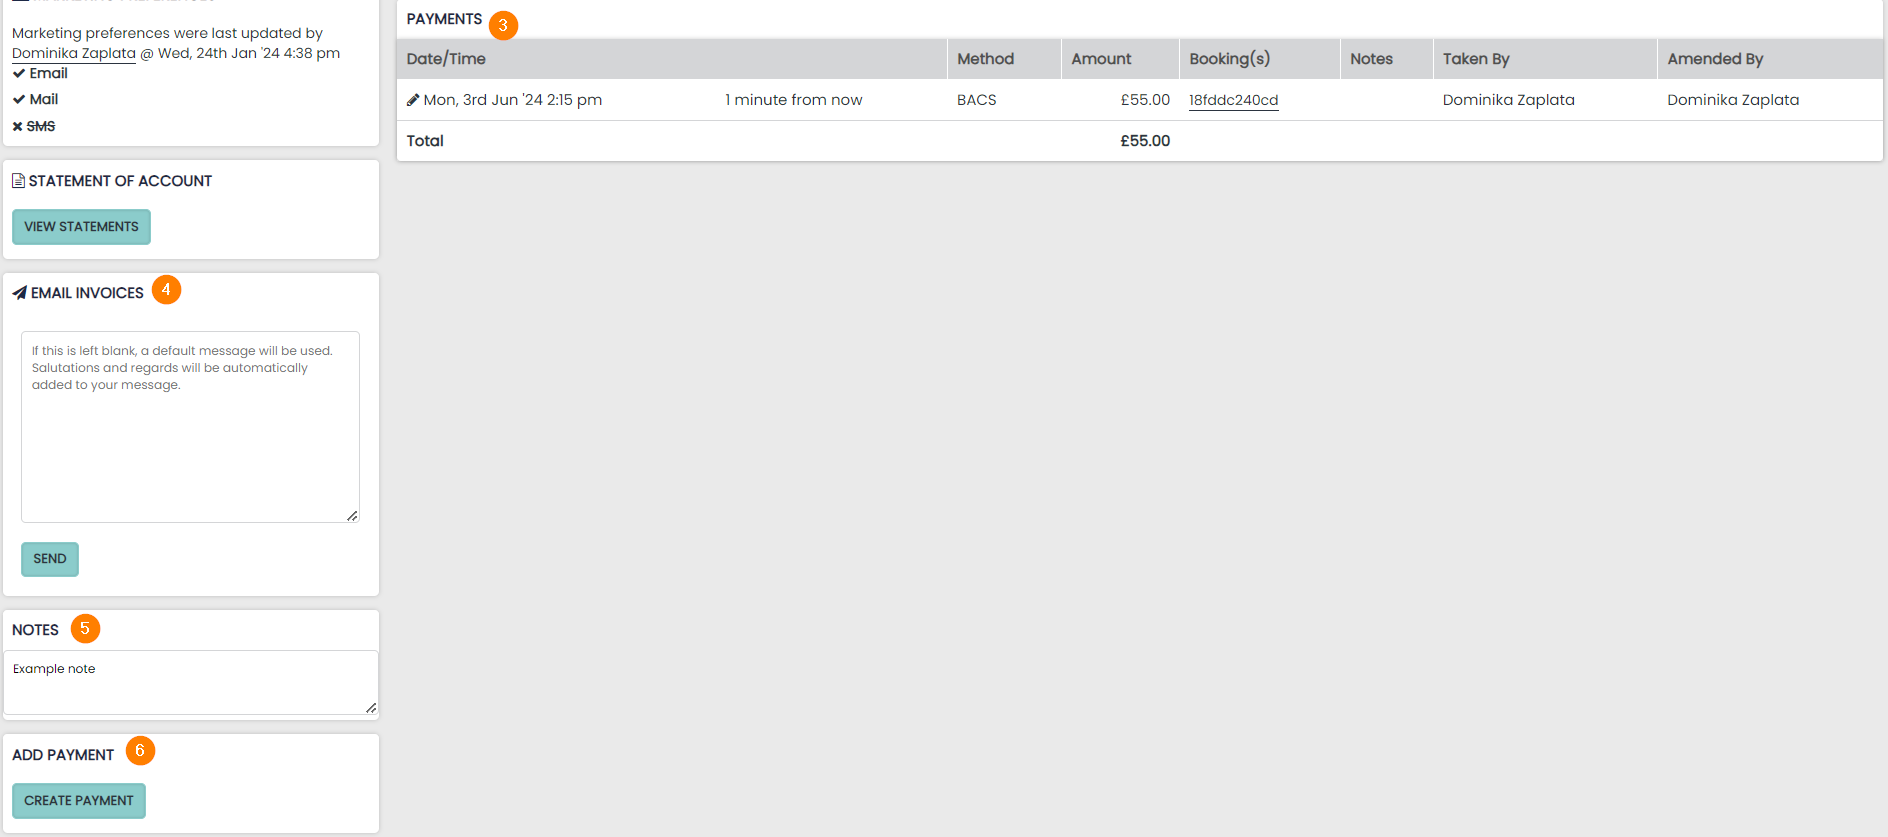
3 A list of payments made will be displayed here
4 To email any invoice (or multiple invoices) to the contact, select the one(s) you wish to send and a box will appear on the left
Enter a message and press ‘send’ and your email will be sent straight from our the PMS, with all invoices attached as PDFs
5 A space to add any notes to the Corporate Profile
6 Create a Payment for any bookings where the Corporate Profile is attached
Amenities
If applicable, within Zonal PMS, amenities can be added to your rooms and your hotel for prospective guests to see in the booking engine. Please watch the short video below to learn how to add and manage Amenities in the system.
Outlets
An Outlet is a point from which goods are sold but has no direct link to your accommodation, for example your bar or restaurant.
To create an Outlet:
-
Hover over the Rooms tab and select Outlet from the drop down menu
-
Enter a Type, Code and what time the Outlet closes, as well as whether payments should be recorded
-
Assign a colour to your Outlet, and click Create Outlet
Once created, Outlets are displayed with a unique colour and title.
Outlets, once linked to your EPOS, will list all items posted on a day to day basis along with payments. To view the day to day breakdown, click the Outlet title.
These items are fully trackable within the reporting suite.
Additional Training
As well as the above walkthrough guides, included below are some links to additional training resources that we’d recommend you complete to further familiarise yourself with the system ahead of go-live.
-
Explore the guest profile functionality → click here
-
Learn more about using categories in Zonal PMS → click here
-
Learn more about promotional codes → click here
-
Learn more about how to use deep links → click here
-
Learn more about how to use blocks in Zonal PMS → click here
-
Learn more about setting and managing staff permissions – guide → click here