External Import
The External Import function is for the purpose of uploading bookings from any 3rd party solution, or paper diary on mass. The tool is generally used on initial setup of a site or in readiness of go-live.
External Import Topics
Pre-Requisites
For the import tool to work correctly there are a few requirements that need to be met prior to the start of the
process. You can see them outlined below, please use this as a checklist before you start your import.
-
Your Estate needs to set up
-
Your Estate needs to have at least one associated Company
-
You Company needs to have at least one associated Site
-
You will need to have set up your Occasions prior to starting the import. You will require at least one Occasion to proceed with the import
-
You will need to have set up your Menus prior to starting the import. You will require at least one Menu to proceed with the import
-
You will need to have set up your Areas prior to starting the import
Data Preparation
A. Download an empty import template
To begin the process you will need to download and fill out a CSV import template. You can find it on the landing page and download it by clicking “Download Example Template” button.
Inside the template you will find the first line filled out with dummy data to help you understand the format of the import.
Please see the fields and their explanation below:
| Import Template field | Explanation | |
|---|---|---|
| siteId* | Mandatory |
Unique Zonal ID of the site you would like to import to. Often referred to as the site GUID found within Platform Services |
| occasionId* | Mandatory |
Unique Zonal ID of the Occasion you would like the booking to be assigned to. Please note, you can use different occasion IDs for different bookings |
| areaId | Optional |
Unique Zonal ID of the Area you would like the booking to be assigned to. Please note, you can use different area IDs for different bookings |
| Date* | Mandatory |
Date of the booking in DD/MM/YYYY format |
| Time* | Mandatory |
Time of the booking in HH:MM:SS format |
| adultCovers* | Mandatory |
Number of adult covers for the booking |
| childCovers* | Mandatory |
Number of child covers for the booking |
| menuId | Optional |
Unique Zonal ID of the Menu you would like the booking to be assigned to. Please note, you can use different menu IDs for different bookings |
| firstname | Mandatory |
First name of the lead guest |
| lastname* | Mandatory |
Last name of the lead guest |
| companyName | Optional |
Name of the company in case of a company booking |
| emailAddress | Mandatory |
Email address of the lead guest |
| telephoneNumber | Mandatory |
Phone number of the lead guest |
| specialRequest | Optional |
Any special request notes to be added to the booking |
| bookingNotes | Optional |
Any additional notes to be added to the booking |
B. Select your Destination Site
The second step of the process is to select your destination site, i.e. the one that you will be importing to. The new import tool is able to import bookings on a per-site basis. Events will automatically validate your input IDs against this site. You can browse all the sites assigned to your estate by clicking on the dropdown menu “Select Site”. For your convenience, you can also use the search bar to find the site you are looking for.
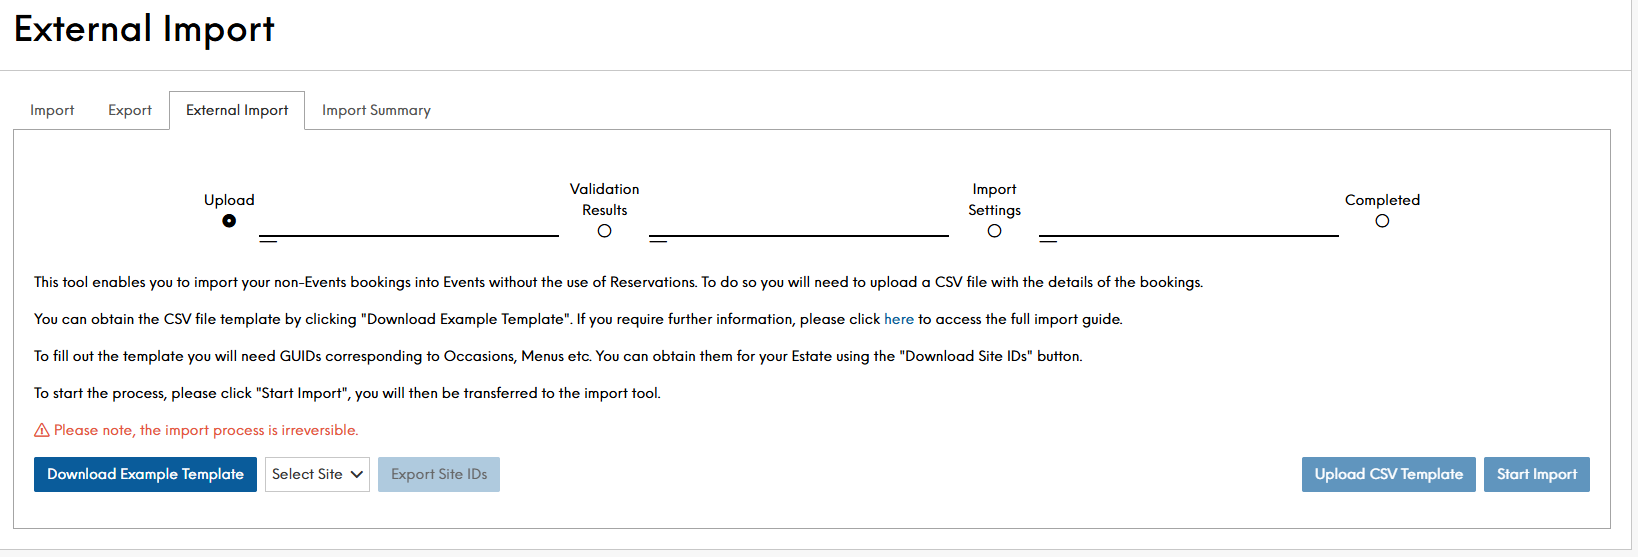
C. Export Site IDs
To fill out the aforementioned import template you will require the unique IDs for your site, occasions, areas and menus. You can easily obtain them after you’ve selected your site in the previous step, as once you’ve done so, the button “Export Site IDs” will become clickable.
|
Export Field Name |
Explanation |
|---|---|
| occasionID |
Unique Zonal ID of a given unique Occasion |
| occasionInternalName |
Internal name given to each Occasion in Events → Admin → Occasions. Not required for the import, stated for easy distinction between Occasions |
| menuID |
Unique Zonal ID of a given unique Menu |
| menuInternalName |
Internal name given to each Menu in Events → Admin → Menus. Not required for the import, stated for easy distinction between Menus |
| areaID |
Unique Zonal ID of a given unique Area |
| areaInternalName |
Internal name given to each Area in Events → Admin → Manage Sites → Areas. Not required for the import, stated for easy distinction between Areas |
Using the above identifiers, you will be able to fill out your import template with relevant data in preparation of the upload.
Importing Data
The last step on the landing page of the import tool is to upload your filled out import template using the button “Upload CSV template”. Just like “Export Site IDs”, “Upload CSV template” will become clickable only once you’ve selected your target site,
-
Select site from the dropdown
-
Upload CSV Template
-
Click Start Import
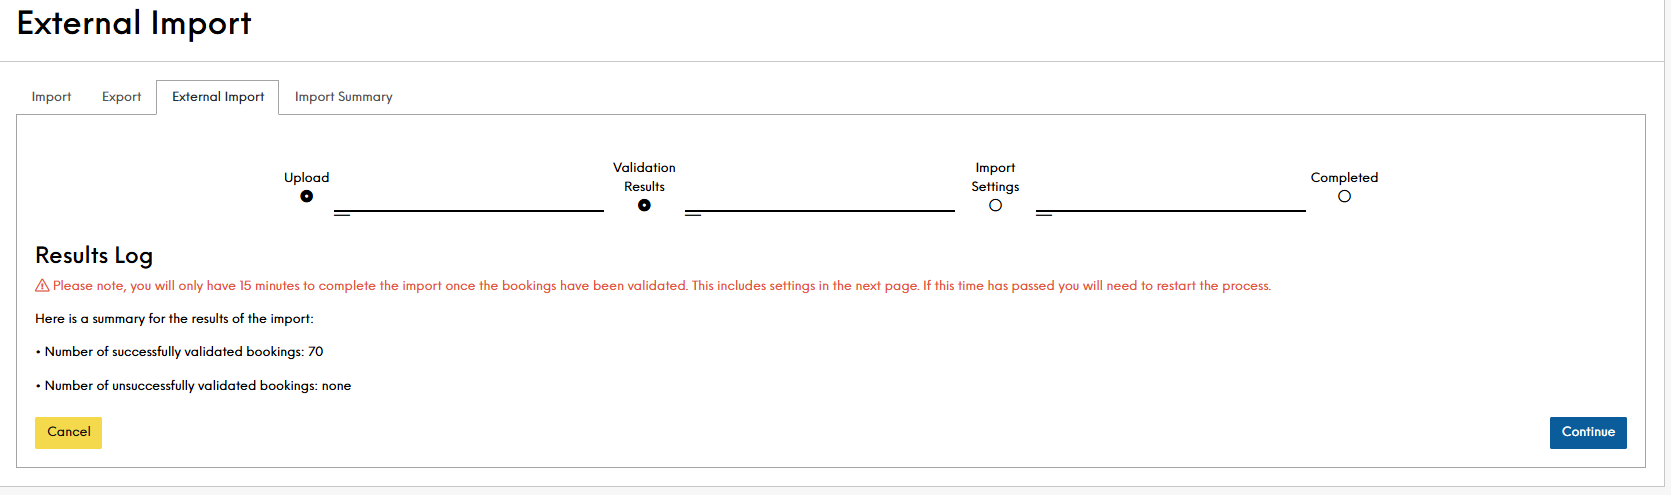
Your import file will be validated. If successful, you will be repesented with a summary of your total successful bookings validated as shown below:
If however, you are unsuccessful, you will be required to export the fail summary. Using the download, review each of the fail reasons

Unsuccessful bookings will be available by clicking "Download CSV with errors referenced". Doing so will download the invalid bookings in a handy CSV file containing only the unsuccessful ones, so that they can be corrected and re-uploaded at a later time. In this new CSV (named “FailedImports”), there will be a column with a comment detailing the issue at hand for each of failed bookings
We recommend completing the successfully validated bookings, then as a separate task, correct those that have errored and re-run an import with the new file once corrected.
From this point on you will only have 15 minutes to start the import, this is because the uploaded file is kept in Events’ cache which needs to be periodically cleared in order to maintain the stability of the system -
Click Continue
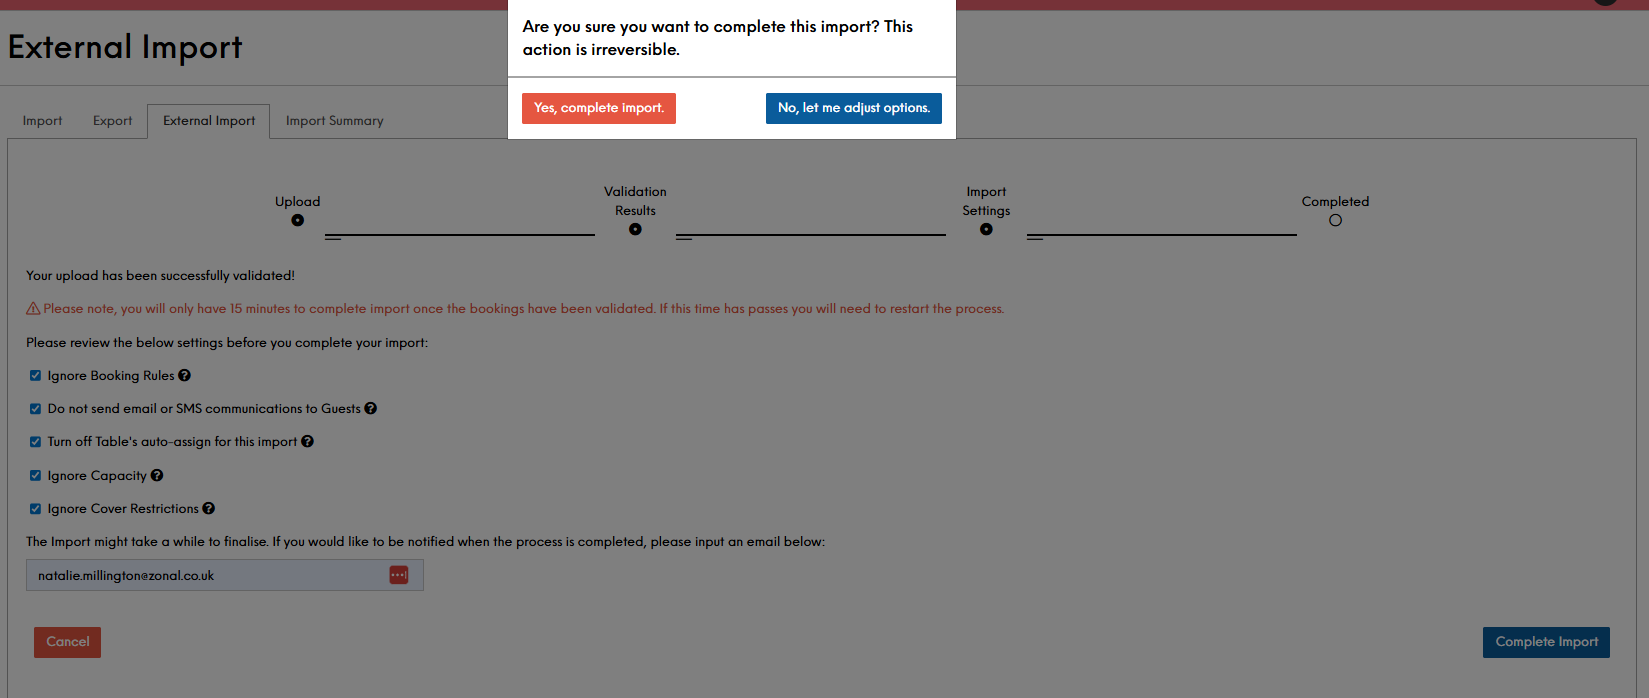
You will now enter a screen showing that "Your upload has been successfully validated", followed by some final options:
 For further information on field settings and their impact - review the Import Settings & Information section belowZonal recommends that you enter your email address into the field provided. Often imports can run for a number of minutes, having an email notification allows you to have confidence as to when the import is complete
 -
Click Complete Import
A warning message will present:
-
Selecting “No, let me adjust options” will close the window and return you to the settings screen,
-
Selecting “Yes, complete import.” Will close the window and transfer you to a new screen where you can “Return to Start” by clicking the button of the same name
After completing the import. The screen will show a message that "Your bookings are being processed. To see all imports head to the Import Summary Tab".
-
Import Settings & Information
This section outlines and explains the functionality the settings available to the user during any import. All of the below settings are set to ON by default.
| Setting | Description |
|---|---|
| Ignore Booking Rules |
This setting turns Booking Rules application ON and OFF Because you might be uploading to a site where Booking Rules have already been set up, the tool gives you an option to ignore them. If you choose to set this option to ON, by “ticking the box”, your new bookings will not trigger any Booking Rules If you choose to to set this option to OFF, by “unticking the box”, your new bookings will trigger Booking Rules, as if created via any other channel |
| Do not send email communication to Guests |
This settings controls whether Events will send out any confirmation emails to the newly created Bookings. If “ticked” (ON), then the new bookings will not send any of the initial email communications to newly added guests. If “un-ticked” (OFF), then the new bookings will send respective email communications to newly added guests This setting works only for emails in Events, to ensure that SMS communications are not sent out, you will need to turn them off in Tables
|
| Turn off Table's auto-assign for this import |
This setting controls whether Tables will automatically assign tables to the newly created bookings. If “ticked” (ON), then this setting will overwrite Tables' auto assign functionality so that the newly created bookings are not automatically assigned to tables If “un-ticked” (OFF), then this setting will respect Tables' auto assign functionality so that the newly created bookings are automatically assigned to tables |
| Ignore Capacity |
This setting controls the number of bookings that can be imported due to capacity constraints If “ticked” (ON), then this setting will ignore any capacity constraints for the new bookings, and will allow the import to be larger than the available capacity. Therefore, you might end up overbooking your site If “un-ticked” (OFF), then this setting will respect available capacity for the new bookings, and so will only import the bookings that can be accommodated. The rest will be unsuccessful and available for download in the summary table discussed in the last sub-chapter |
| Ignore Cover Restrictions |
This setting controls whether the imported bookings will respect cover restrictions as set out in Occasions, Menus and Areas If “ticked” (ON), then this setting will ignore cover restrictions allowing bookings larger than available tables If “ticked” (OFF), then this setting will respect cover restrictions blocking bookings larger than available tables Bookings that would be larger than cover restrictions will be unsuccessful and available for download in the summary table discussed in the last sub-chapter |
| Email input field |
Underneath all the settings there is an additional text field which allows you to input an email address. This is because the import might take a while to finalise, bu sharing an email a confirmation message will be sent as soon as the process is complete |
Troubleshooting
"The selected site has no occasion which are required for imports"
This error will be flashed by Events, when the selected site does not have any valid occasions to make bookings against. You will be required to review the basic occasion setup.
Error – “Upload file - Failed to upload CSV File”
Whenever there is an issue with the file, e.g. the mandatory column is missing, then Events will flash this error after user attempted to upload an incorrect formatted CSV template. It will inform the user where the error occurred exactly.
Error – “Upload file - Failed to upload CSV File: No File Provided”
This error will appear if you attempt to upload a non-CSV file into the import tool.
During the validation process, the 15 minutes waiting period has passed

If you wish to continue, please re-start the process by re-uploading the file as existing uploads are time limited.