The second section when configuring sales item is item details which enables you to optionally add ingredients, choices, check / manage costings. Additionally sales items can have their full prices set and be added to a menu directly within the item.
Item Details Topics
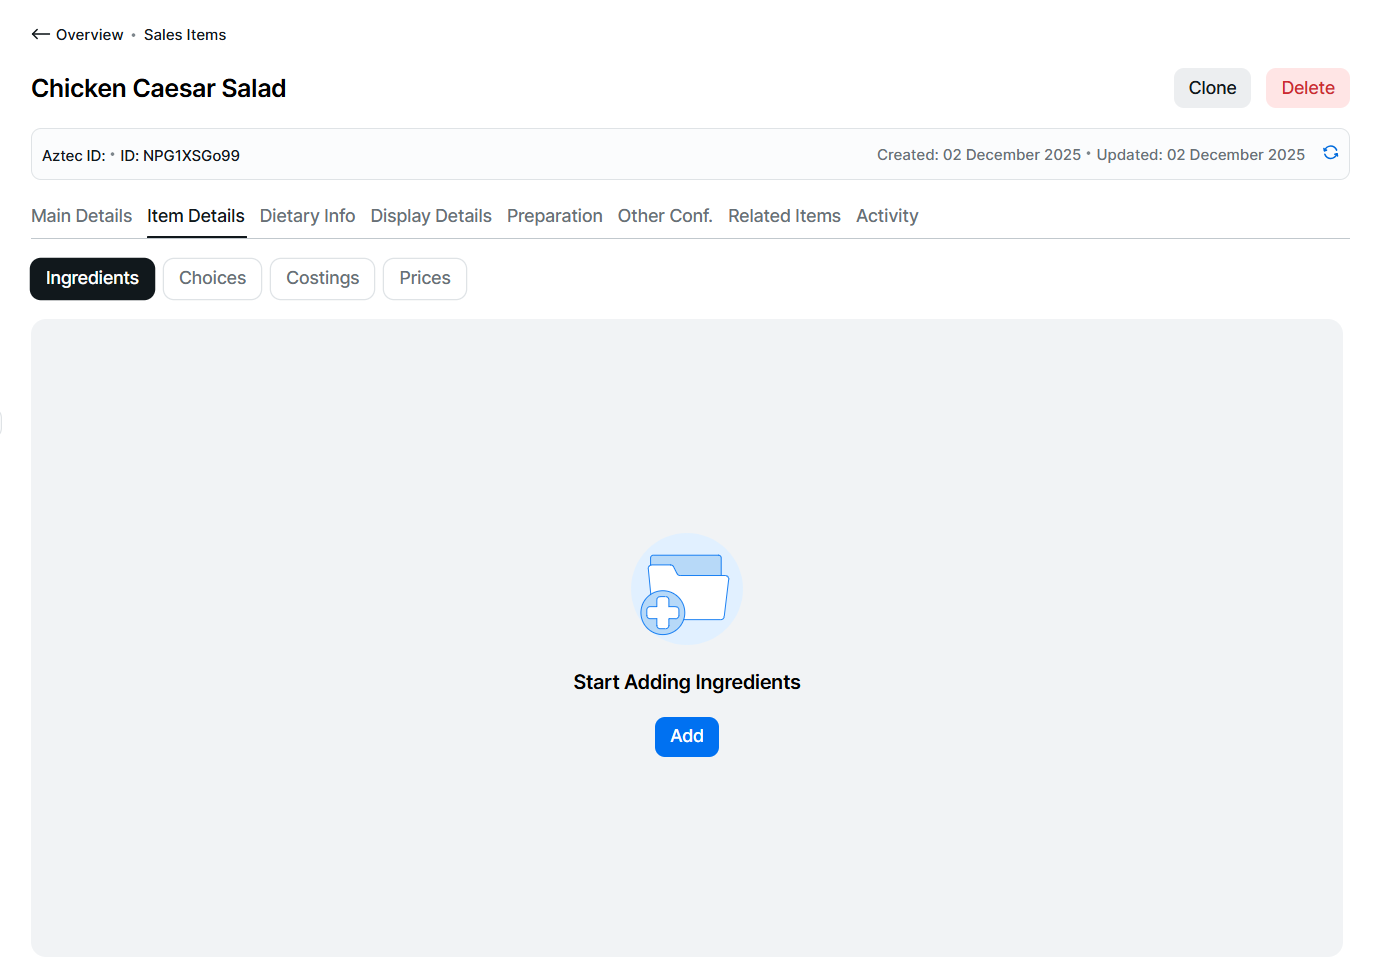
Ingredients
Step 3 of 4 - optional
Adding Ingredients to the Sales Item
Follow these steps to configure this section:
-
Click Add
-
Search for the required ingredients to add to the sales item
The following types can be added to a sales item: Sales Item | Purchase Item | Prep ItemClick here for more information on filtering and searchingProduct Structure Filter & Search Tips
When searching for product types you can:
-
Use the product structure to select 1 or more parts of the hierarchy
-
Click into a drop down and either type to search or scroll through the list of available items and select
-
Select filters from multiple sections, to provide more accurate results
-
Click the X on the selected item to remove
-
-
Apply a filter by selecting product tags
-
Use search to find items by main name, description, Aztec ID or external reference
-
-
Select the required ingredients | click the check box for each option or to select all check the box in the table header
To help the selection each option listed is displayed with its type badge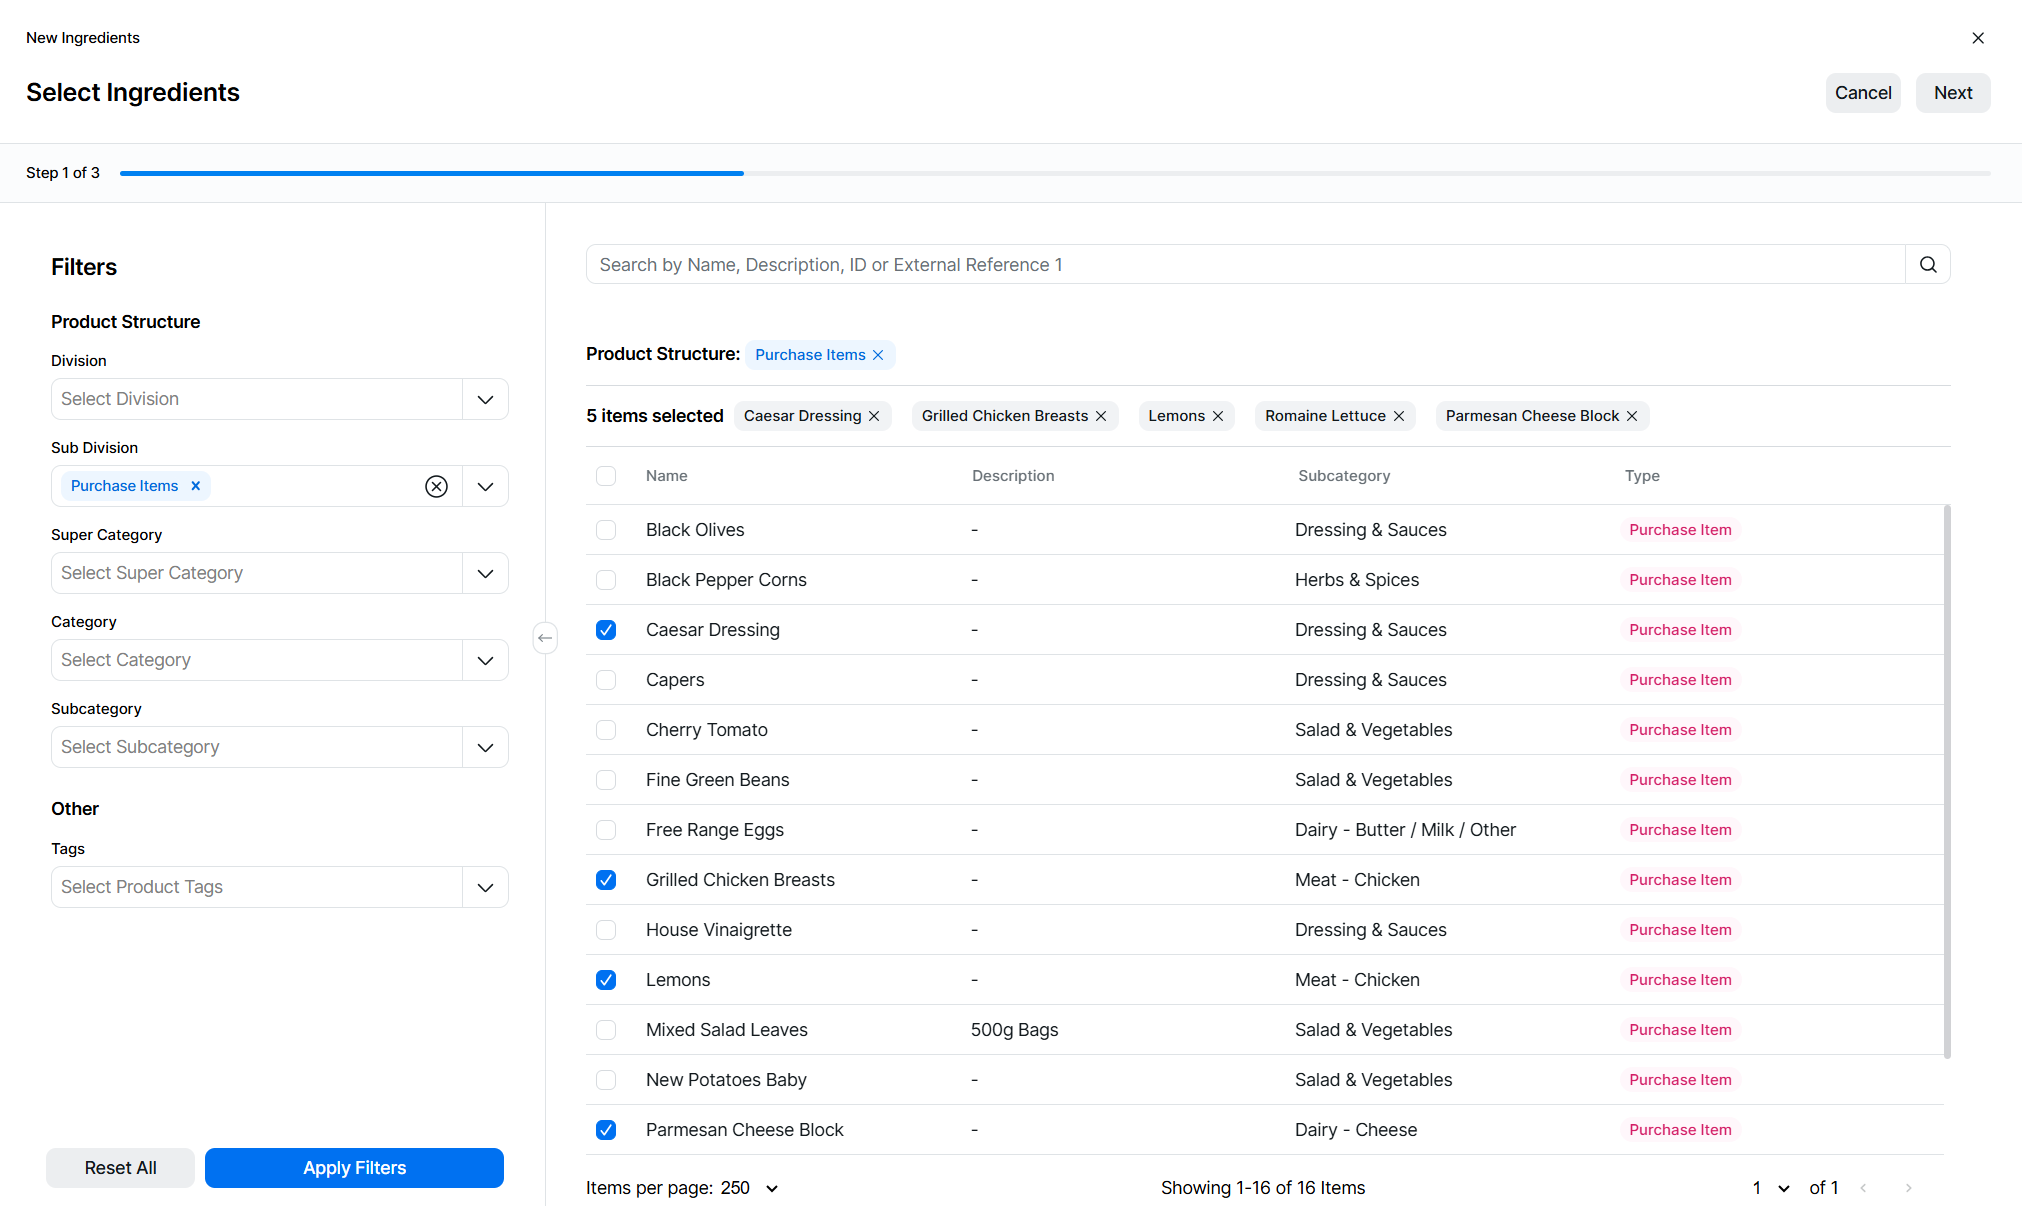
-
Continue filtering and searching until all options are selected, selected items are displayed at the top of the screen, clicking the X on an option will remove it from the selection
-
Click Next
-
The ingredients list can be sorted, follow this step or click Next
Sort the ingredients to set the correct order to be displayed in the ingredients table
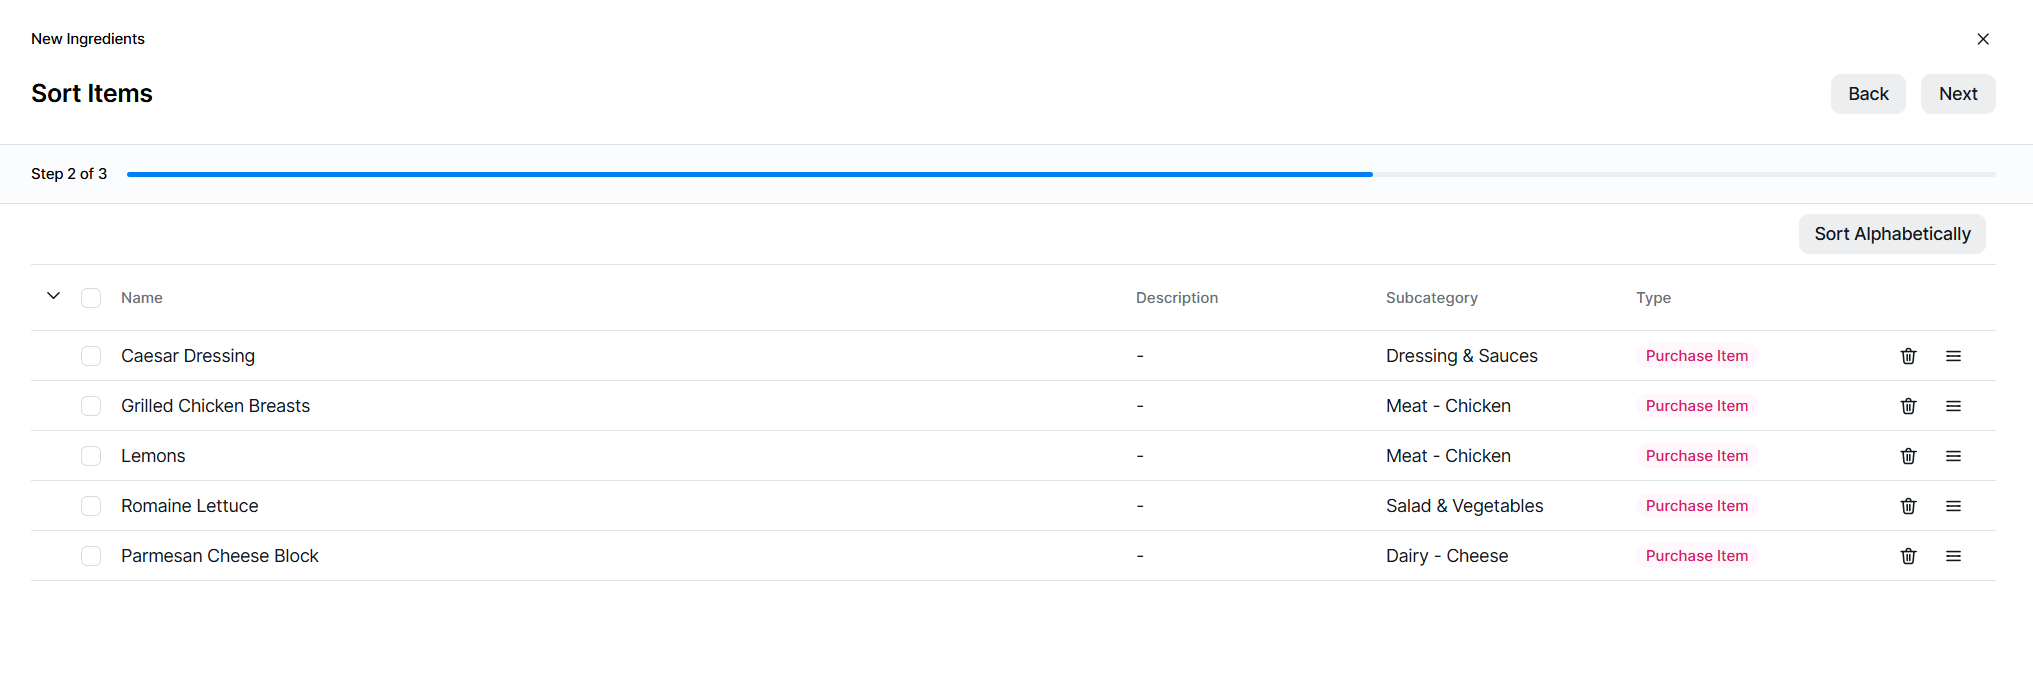 Click here for more information on sorting
Sorting Tips
To help sort options you can:
-
Click Sort Alphabetically to automatically sort items
-
Use the drag and drop icon to move options up and down
-
-
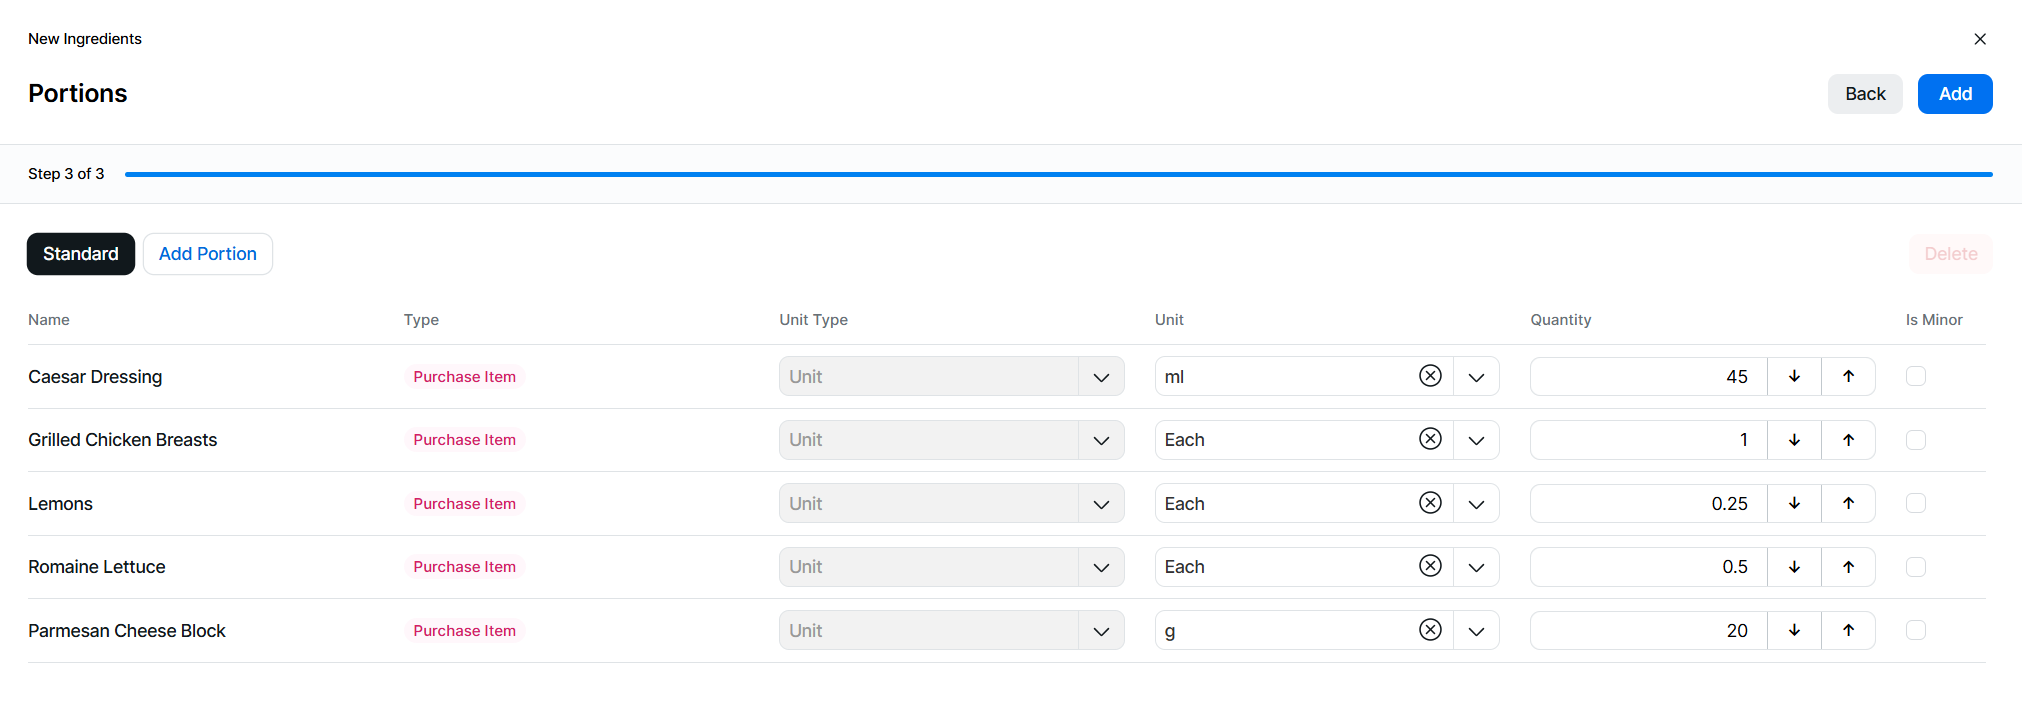
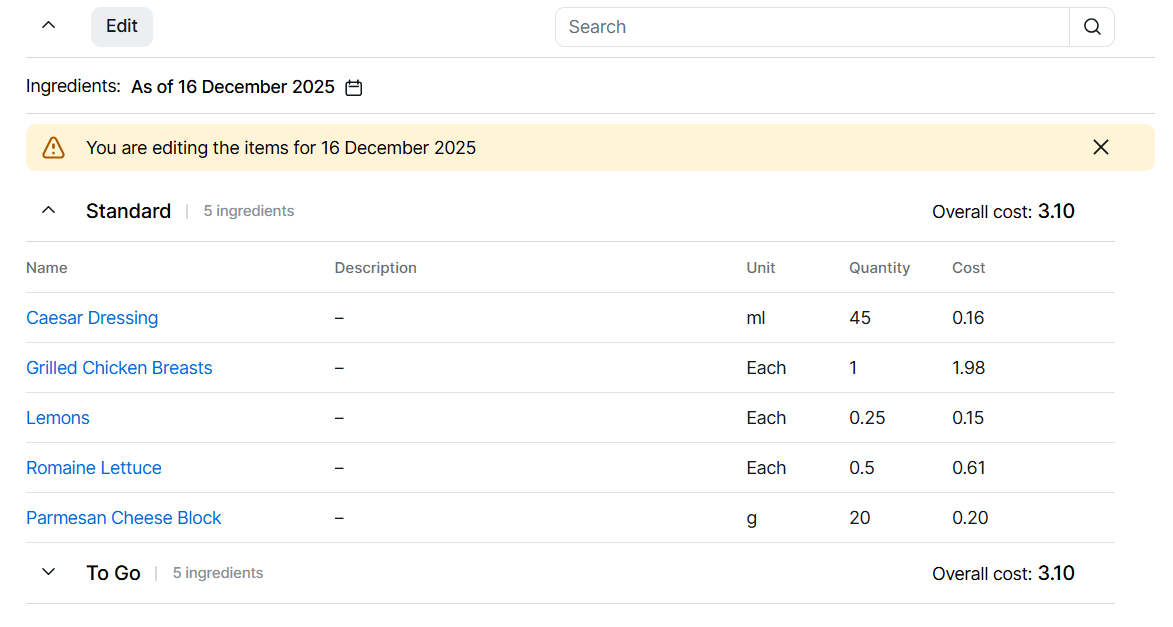
For each ingredient added the required mapping between the unit type, unit, and quantity needs to be completed for the correct stock reduction when the sales item is sold
-
Unit Type
-
Sales Item - "Portion" will automatically be selected
-
Sales Item Purchasable - "Portion" will use the ingredients of the selected or "Unit" will enable the definition of the unit of measure required for this ingredient, the unit must match that of the ingredient, for example if the purchasable sales item is configured with the unit type of "items" then the ingredient unit must be of the same type
-
Purchase Item - "Unit" will automatically be selected
-
Prep item - "Unit" will automatically be selected
-
-
Unit
-
When Unit Type is "Unit" - select the required unit of measure
-
When Unit Type is "Portion" - select the required portion
-
-
Quantity
-
Enter the quantity of the ingredient
-
-
Is Minor
-
If the ingredient does not effect the overall item for example a garnish of chives on soup and the item can be still sold selecting "Is Minor" check box will enable the sales item to be still be sold
-
-
-
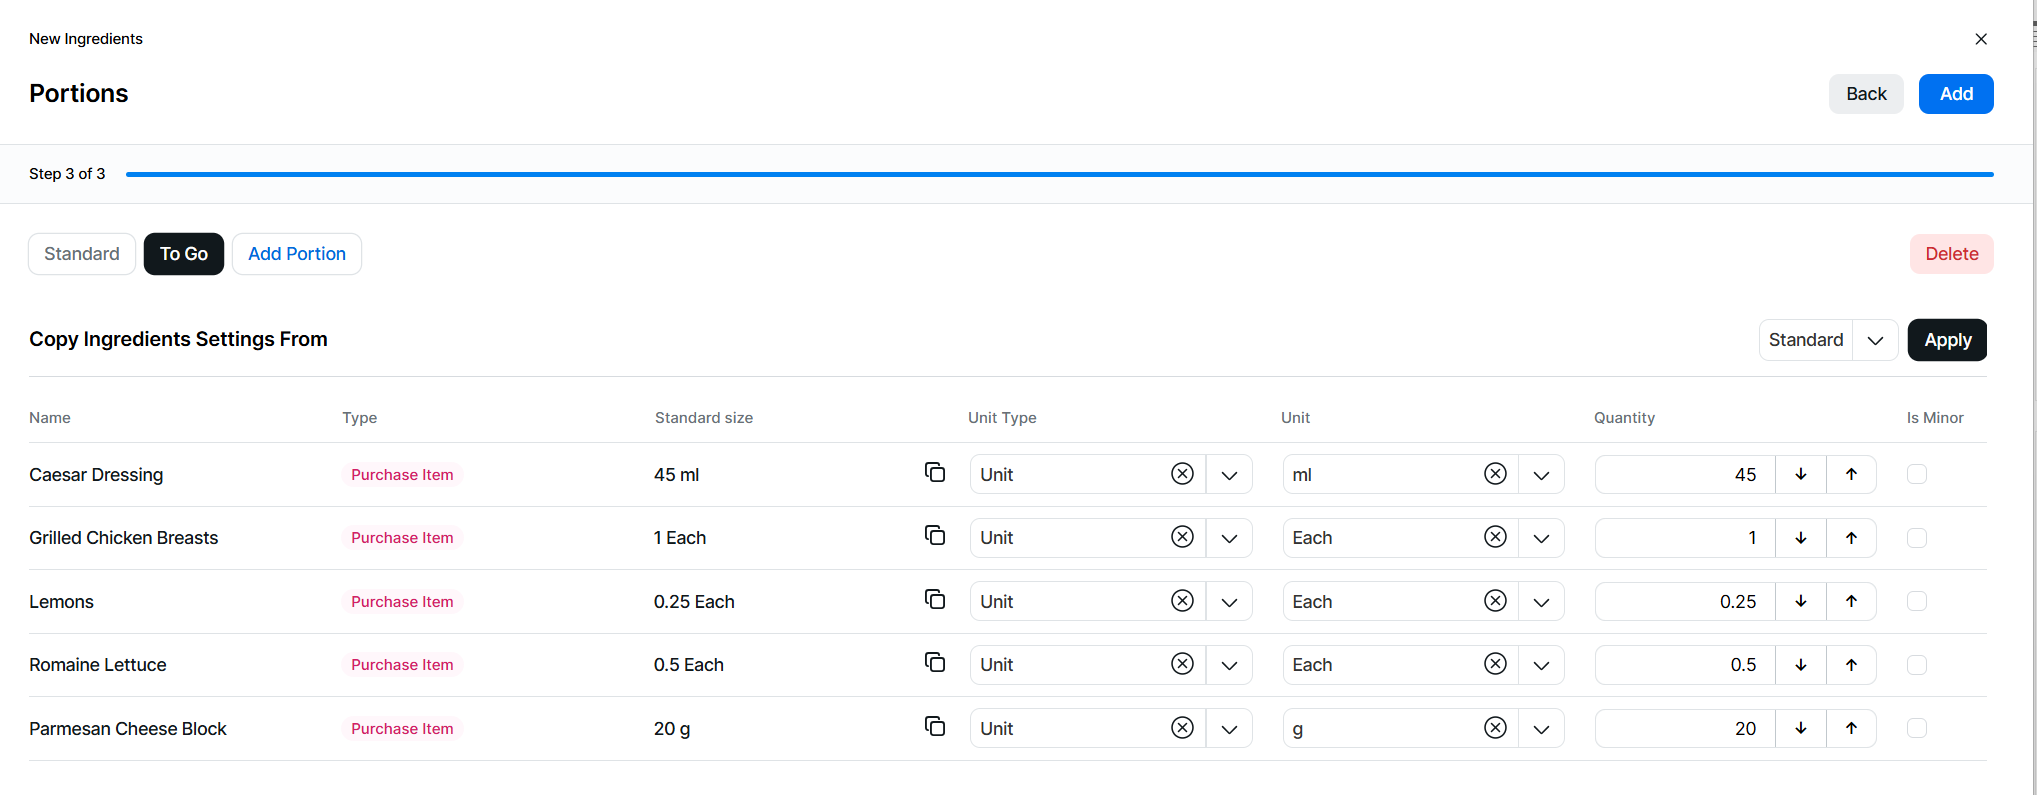
If multiple portions have been added or other portions are being added the following functions are available within the other portion tabs
All portions must have their ingredients mapped to their correct unit type, unit and quantity to complete this final step of adding the ingredients to sales itemsFor information in additional portions the details used for the standard portion are always displayed-
Manually set all the ingredient information as per step 7
-
Copy Ingredient Settings From - select a portion to copy the ingredient information | click Apply
-
Copy Individual Ingredient - for each ingredient the standard ingredient information can be selected by using the copy icon
-
-
Click Add
The ingredients added will be displayed in a table where you can:
-
View the ingredient, unit type, unit, quantity, cost, is minor
-
Navigate to the ingredient by clicking the link
-
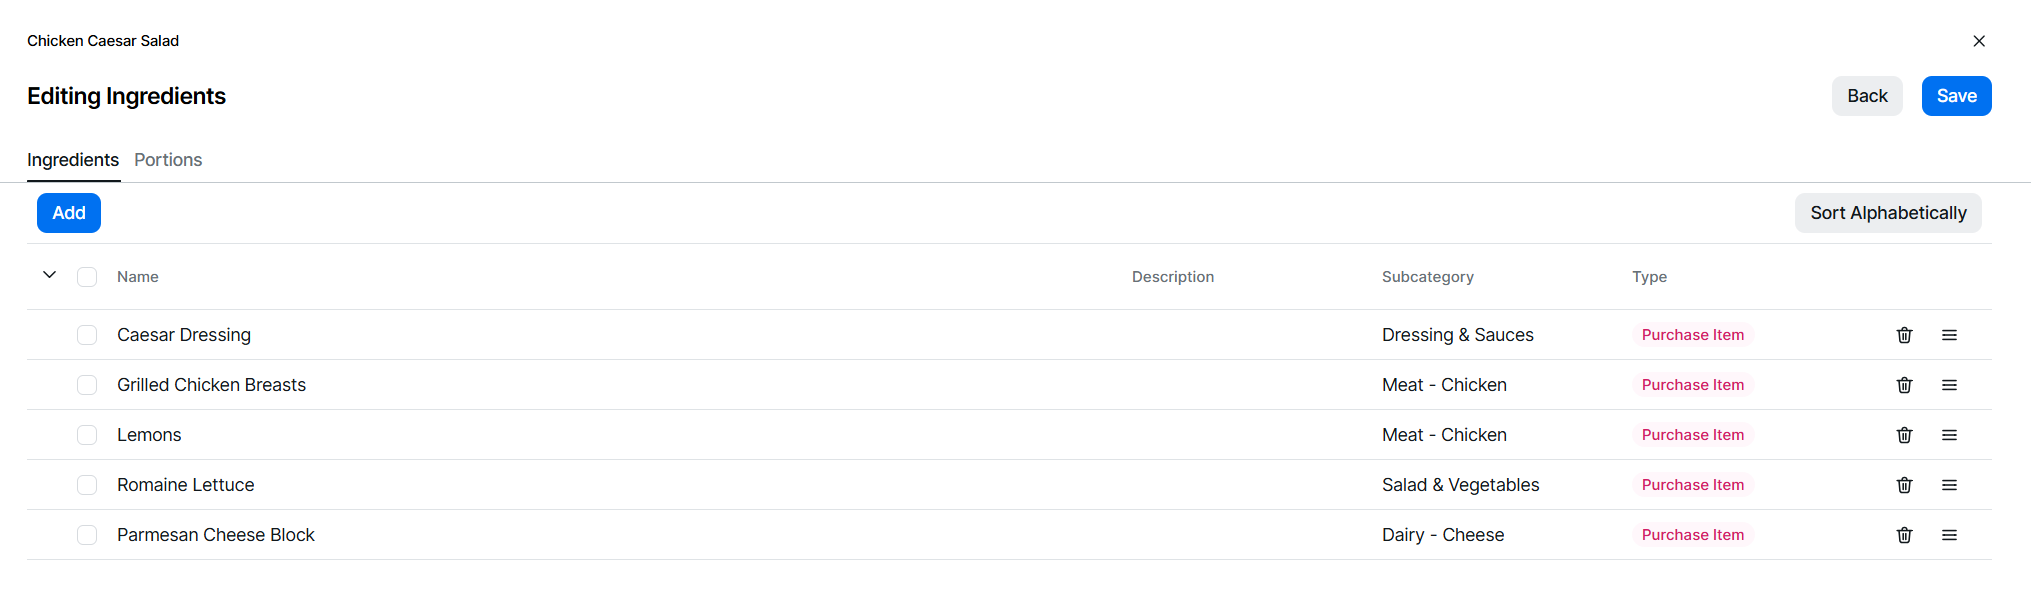
Editing Ingredients
Follow these steps to configure this section:
-
Click Edit

-
From the Ingredients tab the following options can be edited:
-
Sort Ingredients - sort by drag / drop or click Sort Alphabetically
-
Remove an Ingredient - select 1 or more ingredients | click Remove | or click the Delete icon
-
Add Ingredients - click Add
-
-
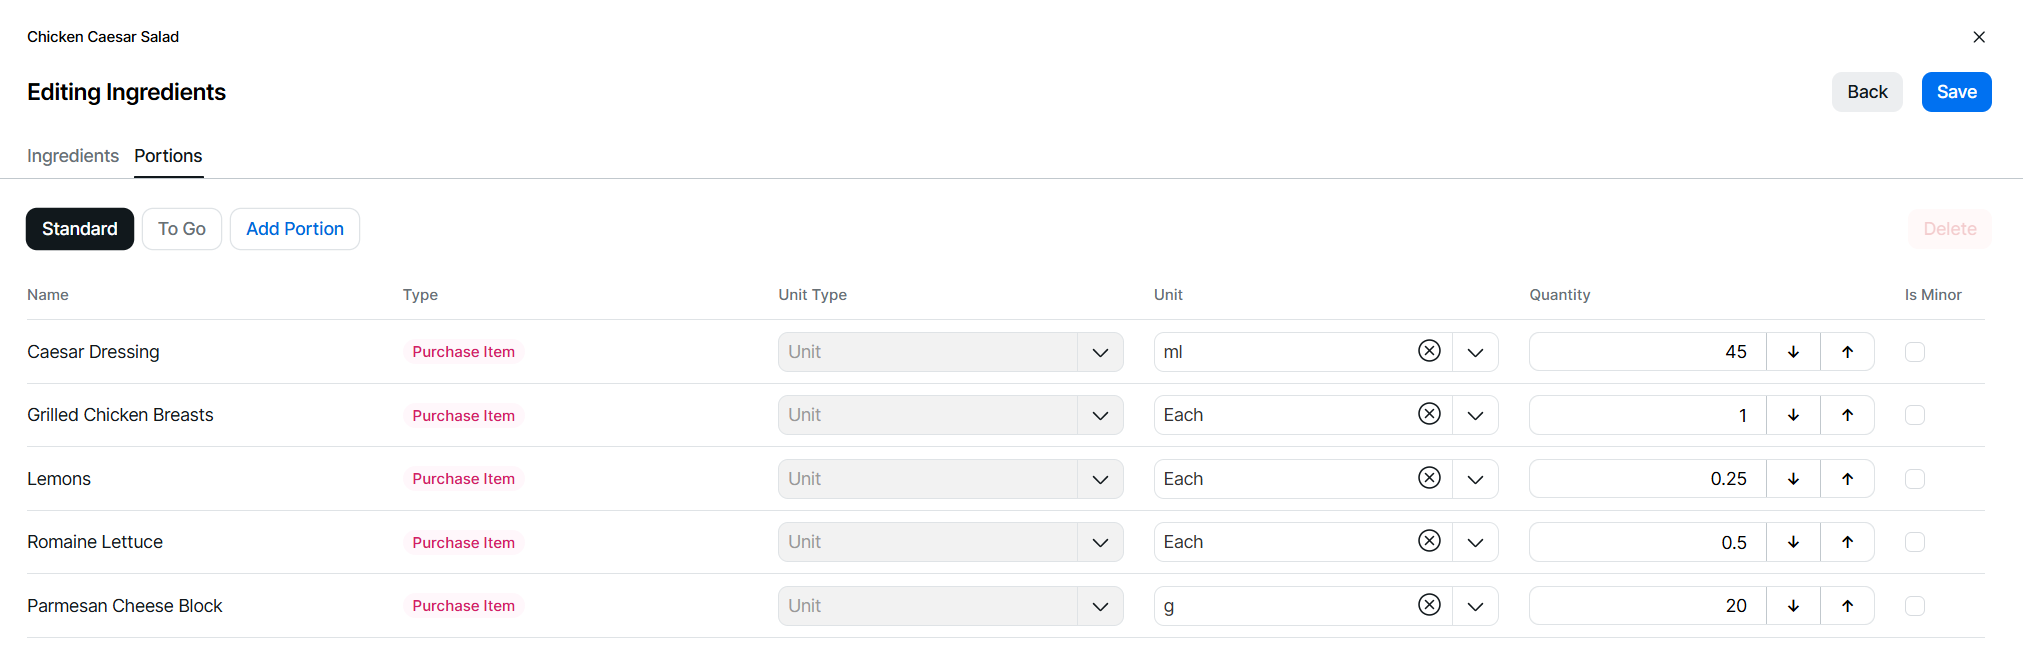
From the Portions tab the following options can be edited:
-
Add New Portions - click Add Portion | select required portion, this will automatically move to this portion for mapping to be complete
-
Delete Portions - select required Portion | click Delete
-
Change Unit Type, Unit and Quantity mapping
-
Update Is Minor setting
-
-
When all edits have been completed, click Save
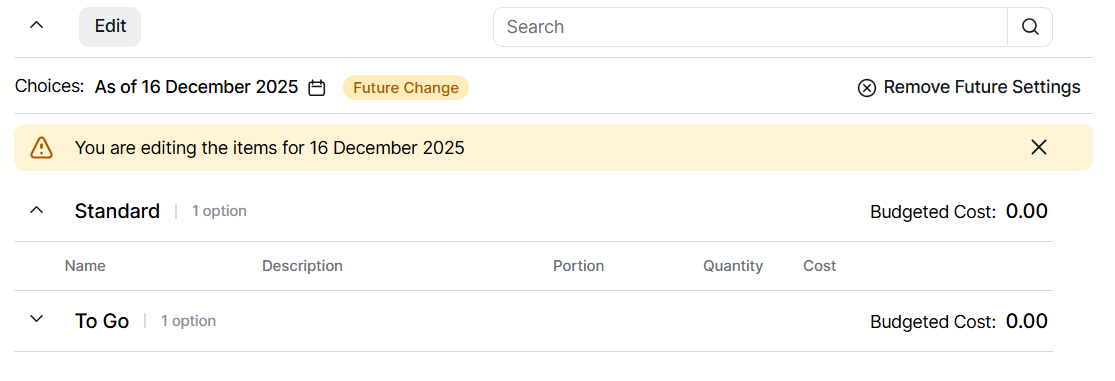
Future Dated Ingredients
Ingredients can be configured for future dated changes, enabling updates to be completed in advance.
-
Future dated records added for ingredients and choices are separate and do not populate any advanced dates within display details
-
Future dated records added for ingredients also add the same future date for choices and cook times
Follow these steps to create future dated choice options:
-
Select the calendar titled "As of Today"
Future dates with options already configured will be displayed with a yellow dot below the date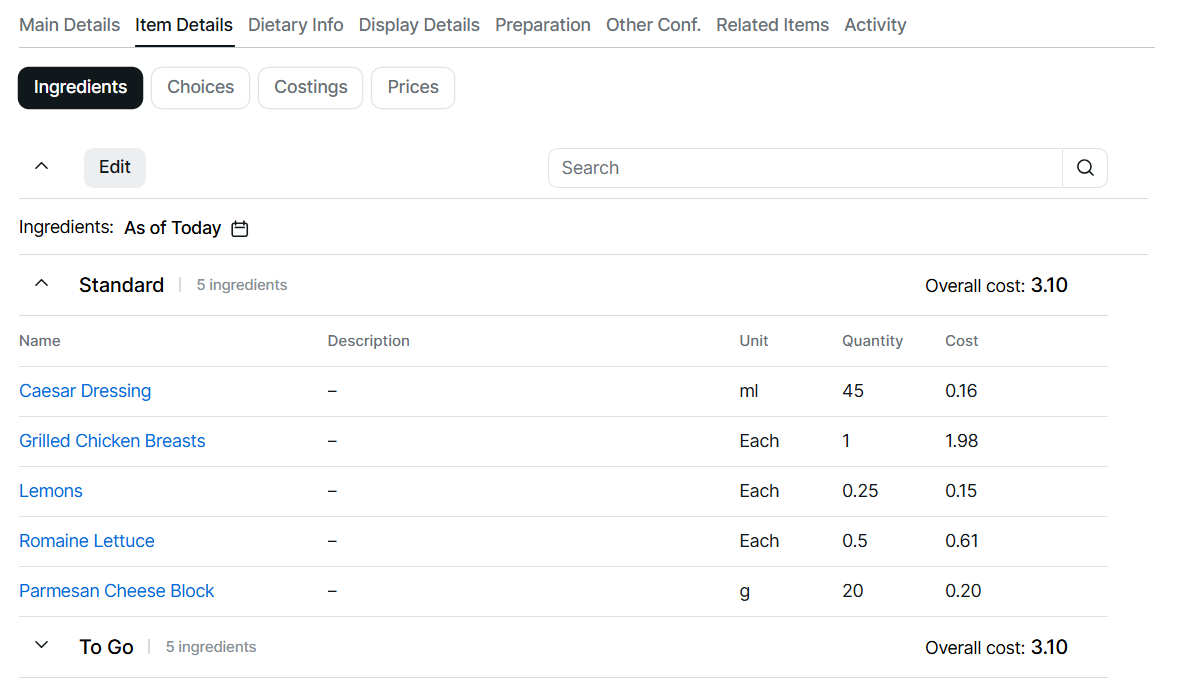
-
Choose a date in the future for which you wish to update ingredients | click Apply
-
Click Edit | update ingredients options as required including
-
Removing existing ingredients
-
Editing existing items / quantities
When editing future options new portions cannot be added -
-
Click Save
-
Or click Add | add additional ingredients as required
-
Click Next | set the required sort order
-
Click Next | complete the required ingredient quantities (per portion configured)
-
Click Add
Removing Future Dated Ingredients
Follow these steps to remove future dated ingredients:
-
Select the calendar titled "As of Today"
-
Choose the a date where a future record exists, indicated by the yellow dot below the date | click Apply
-
Click Remove Settings | confirm Remove
 Removing any future dated ingredients will also remove any configured choices or cook times for the selected date
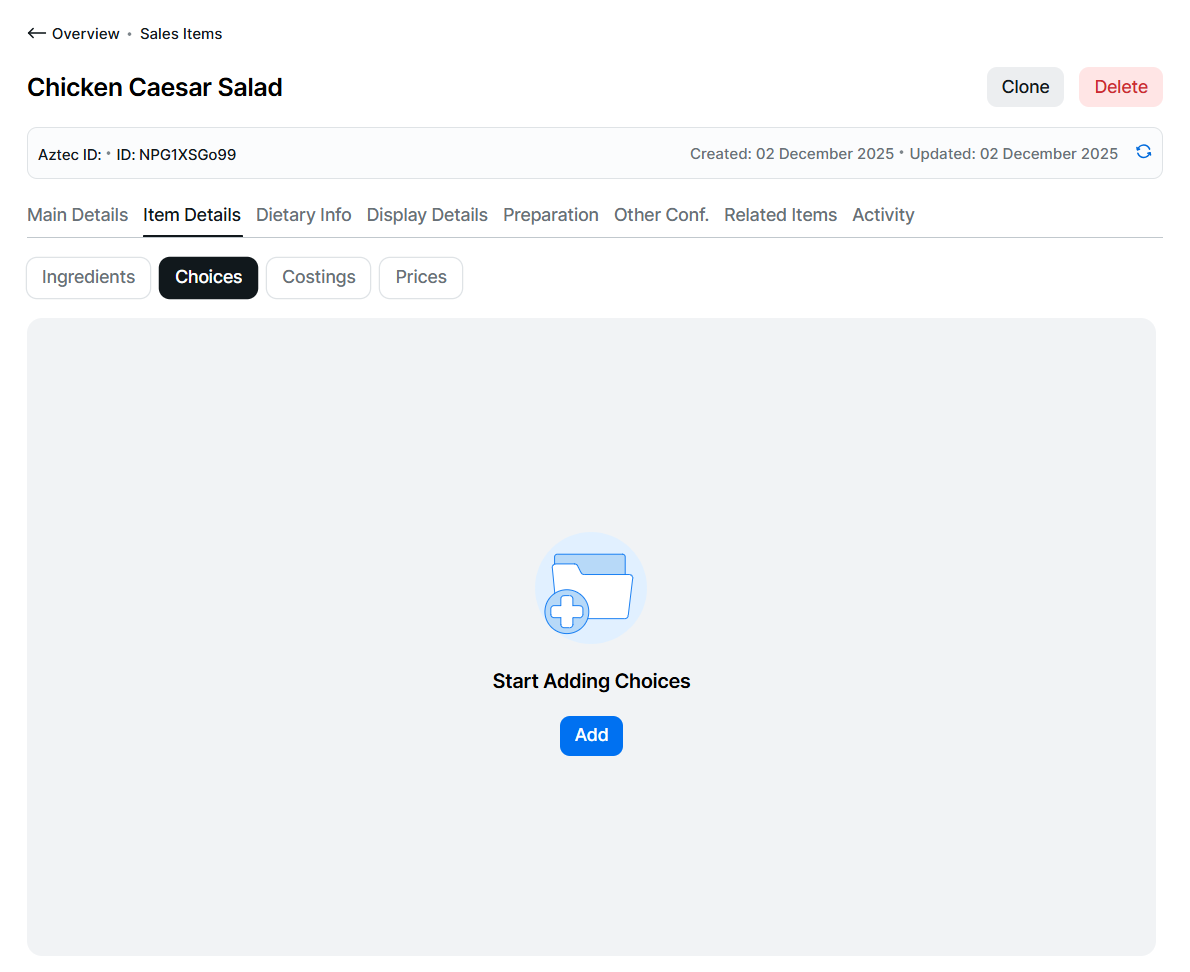
Choices
Step 4 of 4 - optional
Adding Choices to the Sales Item
This process can be followed to add new choices to an empty sales item or add additional choices to an item that already contains existing choices, an existing choices will be displayed as selected in the search screen in step 2 below.
Follow these steps to add choices:
-
Click Add
-
Search for the required choices to add to the sales item
If there are existing choices already added to the sales item these will be displayed as selected within the table of choicesClick here for more information on filtering and searchingProduct Structure Filter & Search Tips
When searching for product types you can:
-
Use the product structure to select 1 or more parts of the hierarchy
-
Click into a drop down and either type to search or scroll through the list of available items and select
-
Select filters from multiple sections, to provide more accurate results
-
Click the X on the selected item to remove
-
-
Apply a filter by selecting product tags
-
Use search to find items by main name, description, Aztec ID or external reference
-
-
Select the required choices | click the check box for each option or to select all check the box in the table header
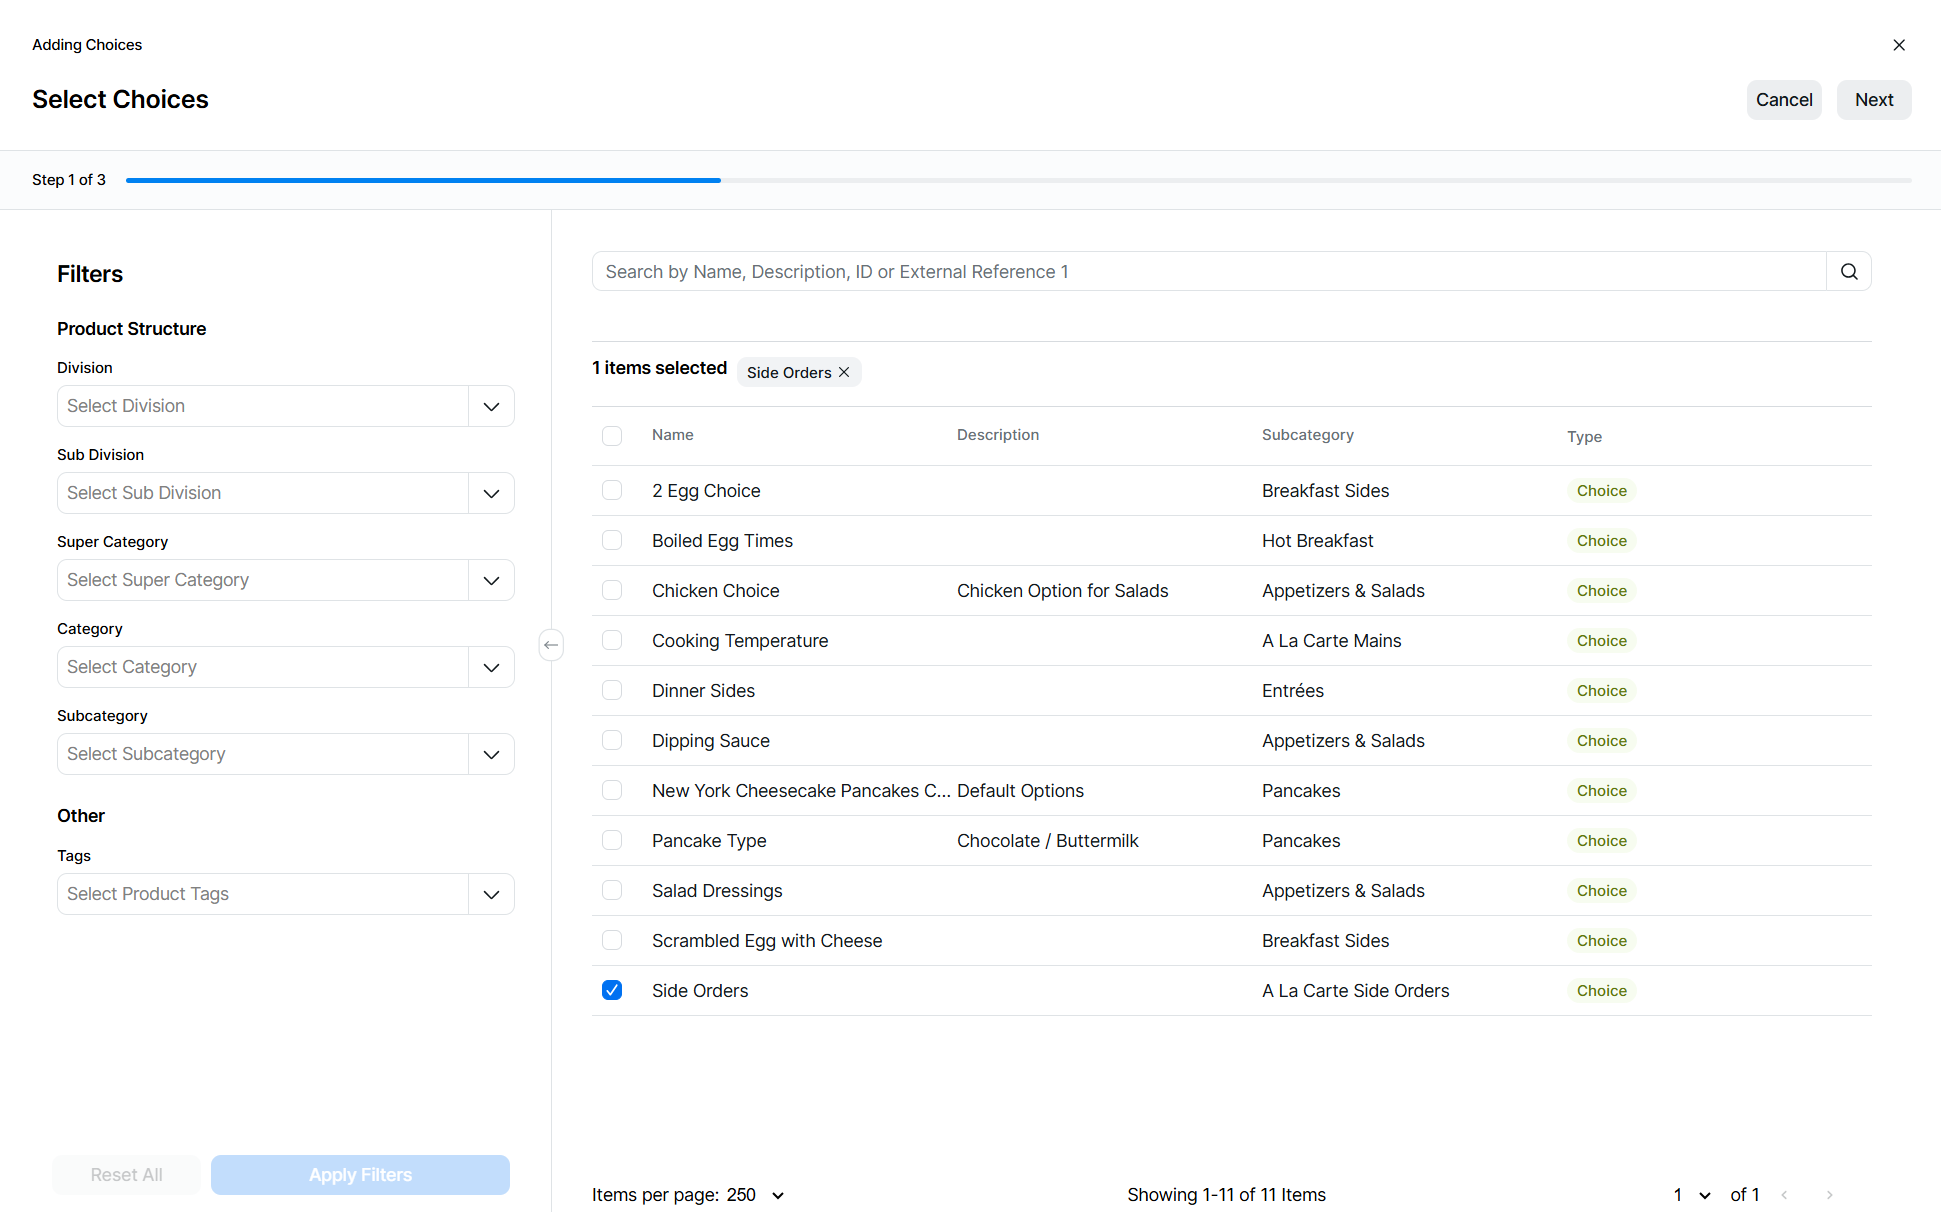
-
Continue filtering and searching until all choices are selected, selected items are displayed at the top of the screen, clicking the X on an option will remove it from the selection
-
Click Next
-
If you wish to sort the choices so they are displayed in the correct order during the ordering process follow this step | or click Next
-
Choices can be duplicated in this step, select the required choice | click Duplicate, choices can be duplicated as many times as required
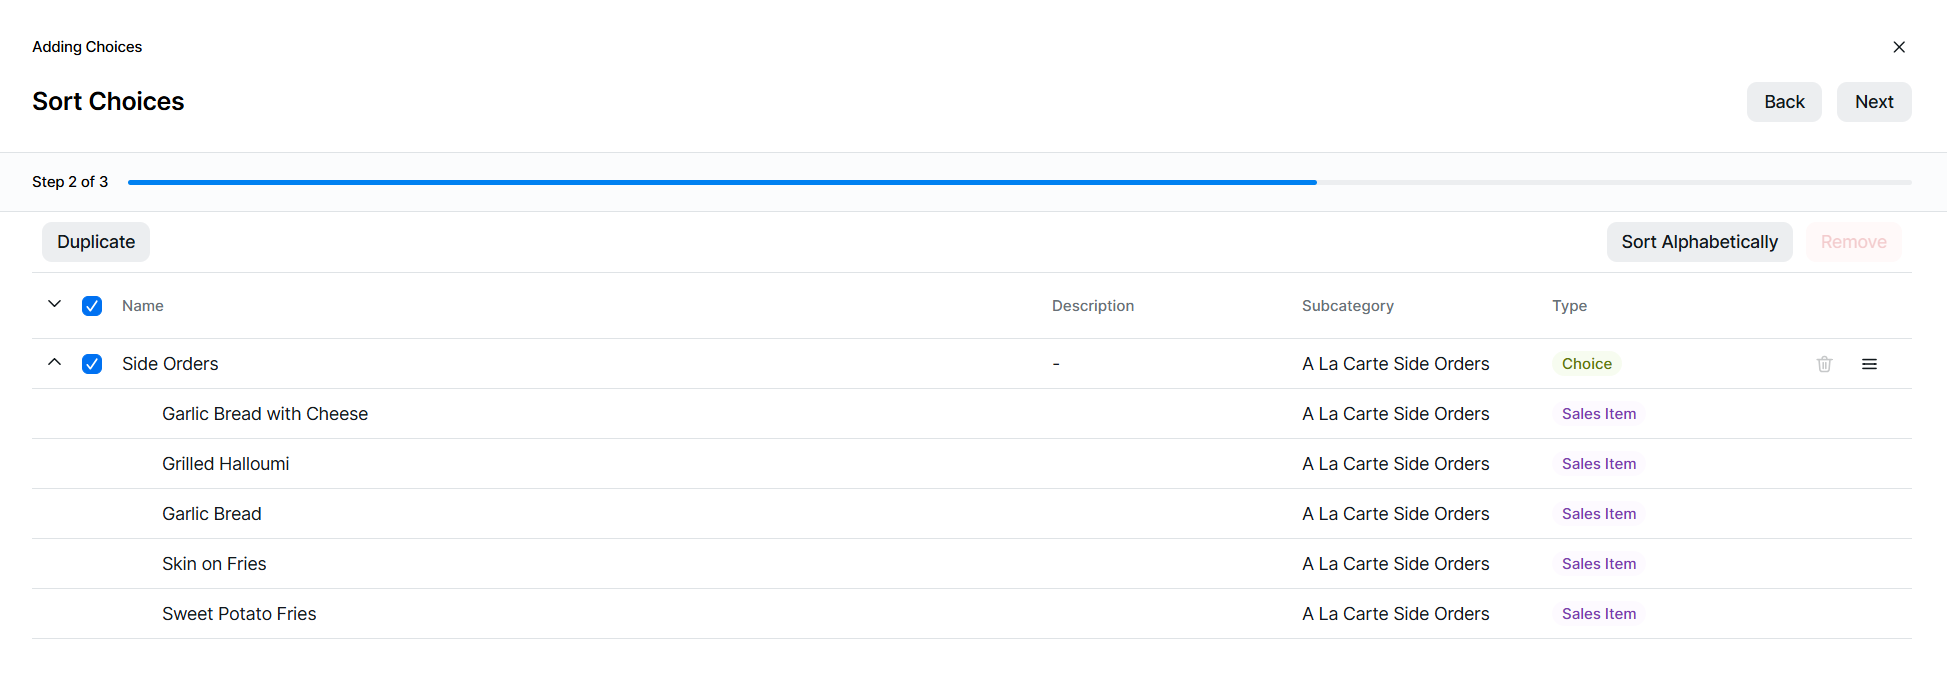 Click here for more information on sorting
Sorting Tips
To help sort options you can:
-
Click Sort Alphabetically to automatically sort items
-
Use the drag and drop icon to move options up and down
-
-
For each choice added the required mapping between the sales item portion and choice portion needs to be completed
-
For each choice row the choose the required portion from the Portion drop down
For ease if all portions are the same for each choice select the Default Setting portion and this will apply to all rows -
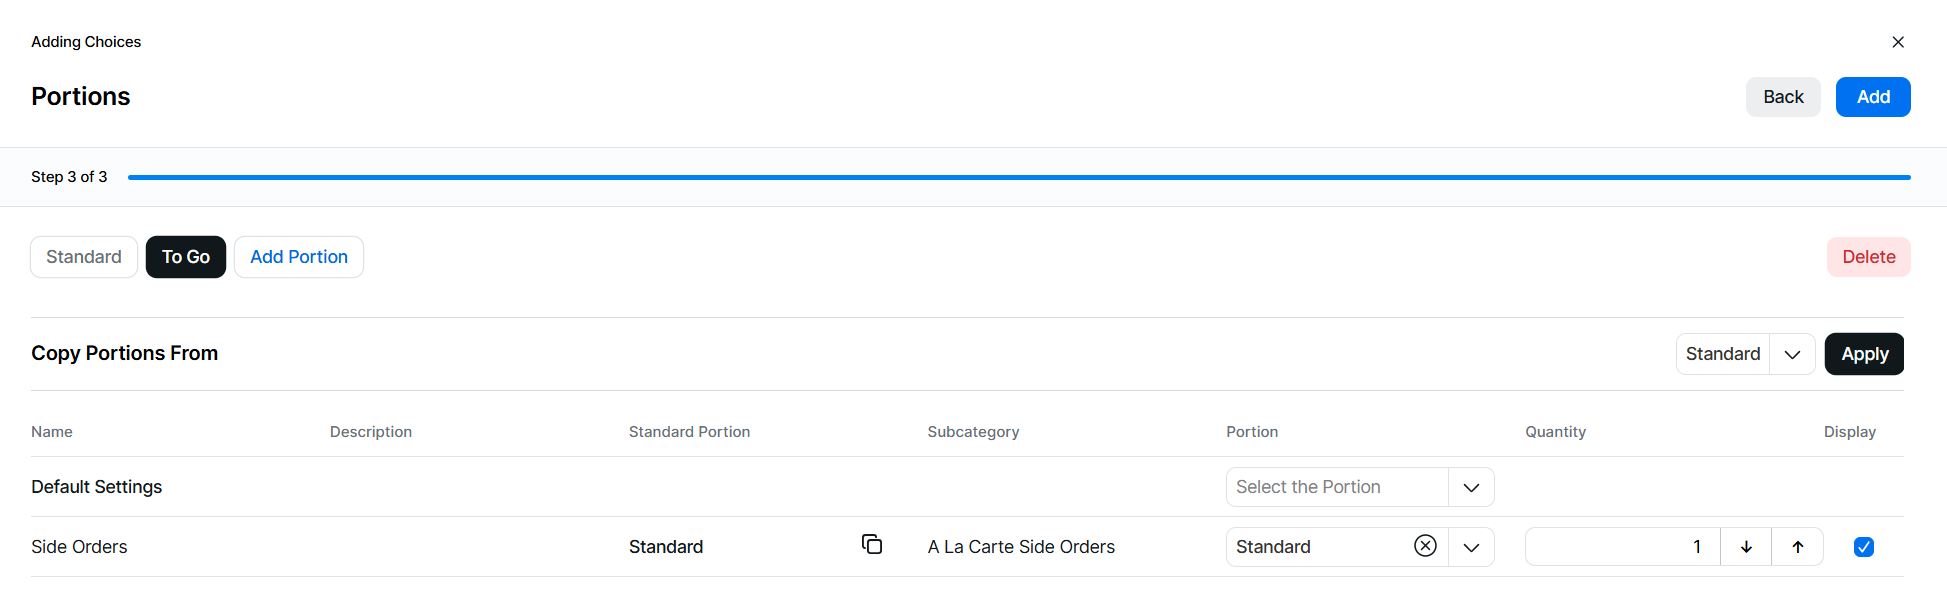
This process should be completed for all sales item portions, additionally new portions can be added at this stage | click Add Portion | select the portion from the drop down, this will automatically move to this portion for mapping to be complete
If the standard portion has been mapped any alternative portions will display what has been configured in the Standard Portion table column, the copy icon can also be used to copy that setting directly to the choice row or use the copy portion from drop down to select another portion and click ApplyAll portions must be mapped to complete this final step of adding the choices to the sales item -
Portions can be deleted from this step by choosing the required portion | click Delete
-
Choice added will automatically default to a quantity of 1, on a per portion basis it is possible to choose to exclude certain choices from being displayed, by default the "Display" check box will automatically be selected, if you wish not to display certain choices within a selected sales item portion deselect the check box
Alternatively if the choices are greater than 1 and should reduce a higher value of stock when sold then selecting the quantity toggle will enable an additional column for quantity, set the quantities required for any choices above the value of 1By removing the display check box you can remove a choice from being displayed during the ordering process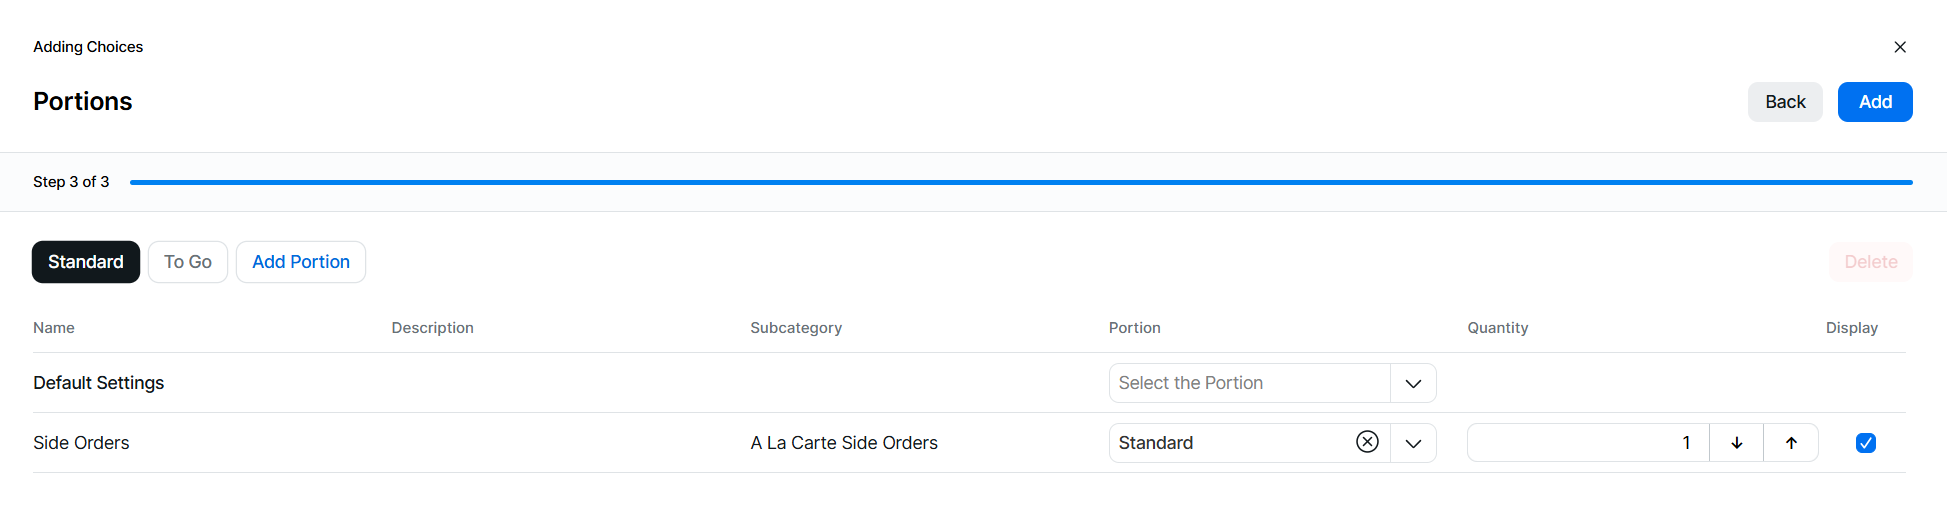
-
Click Add
-
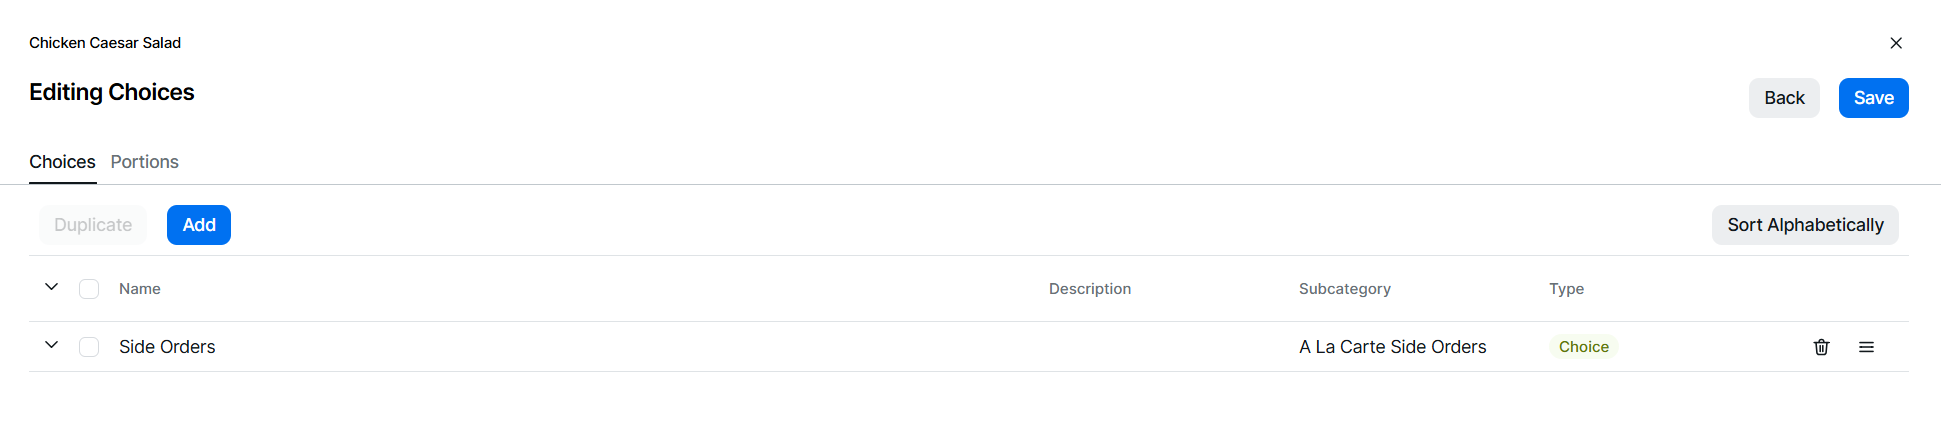
Editing Choices
Follow these steps to edit choices:
-
Click Edit

-
From the Choices tab the following options can be edited:
-
Duplicate a Choice - select a choice | click Duplicate
-
Sort Choices - sort by drag / drop or click Sort Alphabetically
-
Remove a Choice - select 1 or more choices | click Remove | or click the Delete icon
-
Add Additional Choices - click Add
-
-
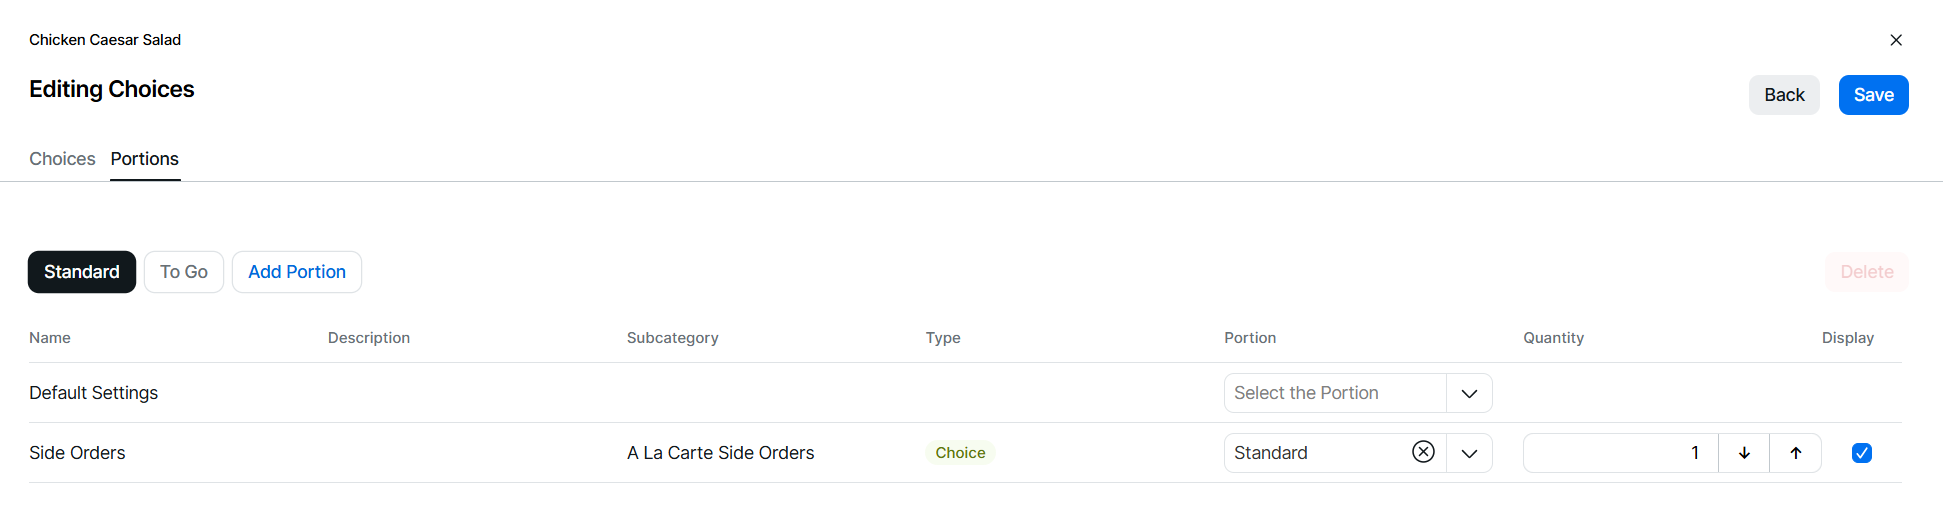
From the Portions tab the following options can be edited:
-
Add New Portions - click Add Portion | select required portion, this will automatically move to this portion for mapping to be complete
-
Delete Portions - select required Portion | click Delete
-
Change Portion Mapping - select required Portion, update mapping as required
-
Add or Remove Choice Display - select required Portion, add or remove check for Display or Update Quantities (if the quantity toggle is enabled)
-
-
When all edits have been completed, click Save
Future Dated Choices
Choices can be configured for future dated changes, enabling updates to be completed in advance.
-
Future dated records added for ingredients and choices are separate and do not populate any advanced dates within display details
-
Future dated records added for choice also add the same future date for ingredients and cook times
Follow these steps to create future dated choice options:
-
Select the calendar titled "As of Today"
Future dates with options already configured will be displayed with a yellow dot below the date -
Choose a date in the future for which you wish to update choices | click Apply
-
Click Edit | update ingredients options as required including
-
Removing existing choices
-
Editing existing choices, quantities and portion mapping
When editing future options new portions cannot be added -
-
Click Save
-
Or click Add | add additional choices as required
-
Click Next | set the required sort order
-
Click Next | complete the required portion and quantity mapping (per portion configured)
-
Click Add
Removing Future Dated Choices
Follow these steps to remove future dated portions:
-
Select the calendar titled "As of Today"
-
Choose the a date where a future record exists, indicated by the yellow dot below the date | click Apply
-
Click Remove Settings | confirm Remove
Removing any future dated choices will also remove any configured ingredients or cook times for the selected date
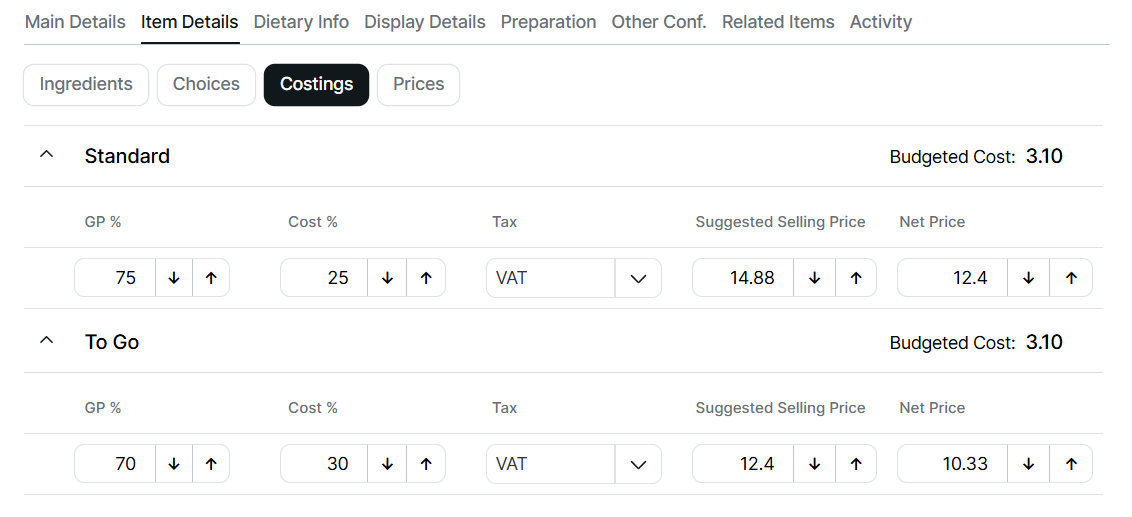
Costings
Item Costing Calculations
The costings calculator is and easy to use modelling tool to calculate the selling price of an item or based on an entered selling price what the gross profit and cost percentage will be.
To use to the costings calculator follow these steps:
-
Expand the required Portion
-
Choose which field to enter a value, a value entered into any of the following fields will be used to calculate the costings
-
GP % (Gross Profit)
-
Cost %
-
Tax - select a tax rule which is used for the calculation of the suggested selling price
-
Suggested Selling Price
-
Net Price
-
-
Click Save to retain the costings values entered
Prices
When configuring a sales item the prices can be added for any price group and price band, expediting the setup.
Follow these steps to add / edit prices:
-
From the drop down select a Price Group
-
Select one or more Price Bands | from the drop down each of the configured price bands with their corresponding letter and custom name are displayed, search or select as required
By default the first 4 bands of a price group are automatically selected -
Click Apply
By default the following columns are displayed:
-
Portion
-
Selected Price Bands
To show or hide price bands during edit click Columns and adjust displayed price bands as required
-
-
Click into a price cell and add or edit prices as required | navigate around the grid by using mouse and clicking into a cell or by the keyboard up / down arrows, enter or tab keys
-
Cells displayed in "Purple" are new prices that have been entered but not yet saved
-
Cells displayed in "Green" are prices that have been saved
Whilst any price changes made cannot be undone or reverted within products this functionality is available in the pricing app, click here for more information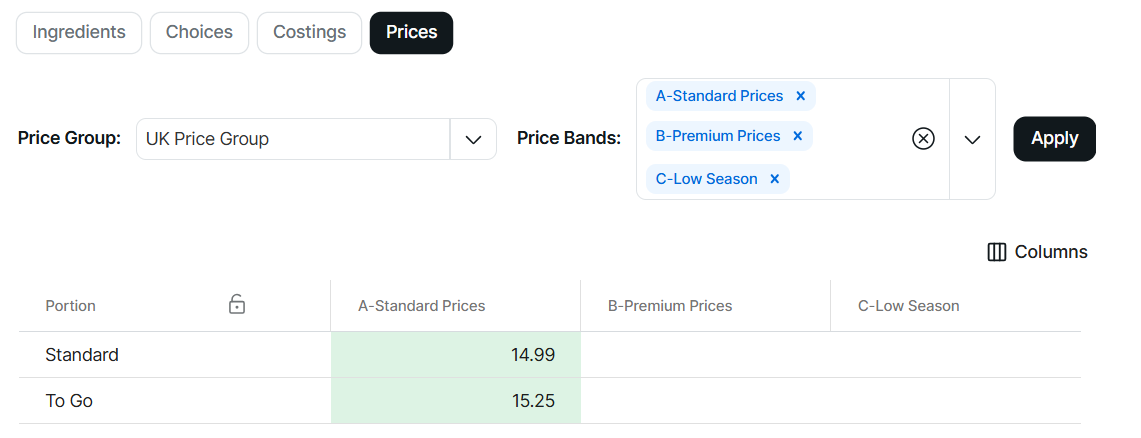
-
-
Click Save