Tables Preferences
Preferences can be defined at both Company and Site level. Depending on which level you are accessing, will depend on what options you can choose from. The below outlines how to configure each, with a description of how each will impact the operator.
Preferences Topics
Company Preferences
Company level administrators can define operational preferences for multiple sites. Any changes made at a Company level, will reflect when saved at site level.
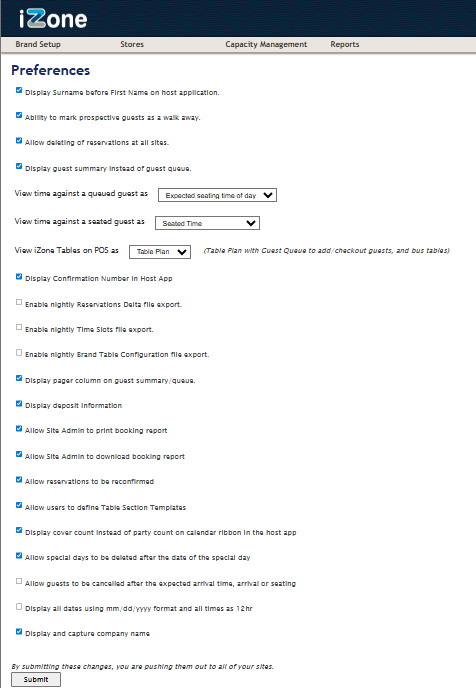
From top to bottom, below outlines what each setting impacts:
| Setting | Description |
|---|---|
|
Display Surname before First Name on host application |
Select the Display Surname before First Name on host application check-box to configure the host app to display Surnames first |
|
Ability to mark prospective guests as a walk away |
Select the Ability to mark prospective guests as a walk away check-box to allow site users to record the point of the reservation/ booking procedure when the customer decided to walk away. A Walk Away button is added to the Choose Wait Time window |
|
Allow deleting of reservations at all sites |
The ability to delete reservations at all sites allows reservations to be removed from the system without affecting restaurant statistics. Users can cancel or no-show a guest, but the guest’s reservation details are always retained with these methods. Allowing users to delete reservations made in error or during training leaves only an entry in the audit trail. Managers can review the number of deletions in Historical Summary reports to check that it is not being over-used Because the delete function is only provided to correct user error and to meet training requirements, reservations created online by the customer and reservations that have already been seated cannot be deleted |
|
Display guest summary instead of guest queue |
The Guest Summary displays an alternative view to the guest queue that groups guests into Seated, Arrived and Expected groups to make it quicker and easier to look after guests |
|
View time against a queued guest as:
|
The Guest User Interface (GUI) can be configured to display the expected seating time or a countdown to the guest’s arrival for queued guests |
|
View time against a seated guest as:
|
The GUI can be configured to display the seated time or a countdown to departure for seated guests. If , estimated status times have been defined for courses, the countdown to departure may adjust itself as the customer moves through the courses if they skip courses or take less time than estimated |
|
View iZone Tables on POS as:
|
Tables can be viewed on the POS in list or plan format. Plan format refers to the graphical POS rendered table plan and list format is a simple list of tables from which users can select the required table |
| Display Confirmation Number in Host App | The Display Confirmation Number in Host App check-box includes the confirmation number on the Enter Guest Details window for reference. |
| Enable nightly Reservations Delta file export |
The enable nightly Reservations delta file export configures Tables to create a nightly extract file containing all reservations that have been altered in the past 24 hours This file is saved as a CSV file in the tables_reports folder and compressed into a zip file to keep the file small. (If the client is also a Loyalty user (and has Loyalty extracts enabled) then the reservation extracts are zipped up with the Loyalty files and will appear in the ‘extract’ folder.) Part of the file name for the CSV file contains the date of the data contained within |
| Enable nightly Time Slots file export |
Same as above |
|
Enable nightly Brand Table Configuration file export |
Same as above |
|
Display pager column on guest summary/ queue |
The Display pager column on guest summary/ queue check-box allows you to configure Tables to display the pager numbers associated with customer accounts on the guest summary/ queue |
|
Display deposit information |
Select the Display deposit information check-box to include information about deposits received from customers on the Guest Summary screen and on the Enter Customer Details window. The value of the deposit is displayed within a yellow box |
|
Allow Site Admin to print booking report |
Select the Allow Site Admin to print booking report check-box to display the Print button on bookings reports. When enabled, site admin users can print hard copies of reports for filing or distribution |
|
Allow Site Admin to download booking report |
Select the Allow Site Admin to download booking report check-box to display the Export as CSV button on bookings reports. When enabled, site admin users can select Export as CSV to save a copy of the booking report as a comma separated values file |
|
Allow reservations to be reconfirmed |
Select the Allow reservations to be reconfirmed check-box to allow users on the Enter Guest Details window or the Bookings report to contact guests and reconfirm their booking to help reduce the number of no-shows |
| Allow users to define Table Section Templates. | Select the Allow users to define Table Section Templates check-box to allow users to create and edit table section templates. When enabled, servers can be assigned to different sections quickly and easily (please note this is not to be confused with Bookable Areas - the two are not linked). |
| Display cover count instead of party count on calendar ribbon in the host app. |
Select the Display cover count instead of party count on calendar ribbon in the host app check-box to display the cover count in the calendar ribbon on the Reservations and Seated tabs on the host app. The party count is displayed by default |
|
Allow special days to be deleted after the date of the special day |
Select the Allow special days to be deleted after the date of the special day check-box to allow sites to delete special days after the date has passed. This is enabled by default |
|
Allow guests to be cancelled after the expected arrival time, arrival or seating |
Select the Allow guests to be cancelled after the expected arrival time, arrival or seating check-box to allow sites to cancel guest bookings after they have been marked as arrived or seated. This is selected by default |
|
Display all dates using mm/dd/yyyy format and all times as 12hr |
Select to view dates as mm/dd/yyyy as opposed to dd/mm/yyyy |
|
Display and capture company name |
Select the ability to capture company name and this will present a new field to both Tables and Events users to enter a company name if applicable to bookings |
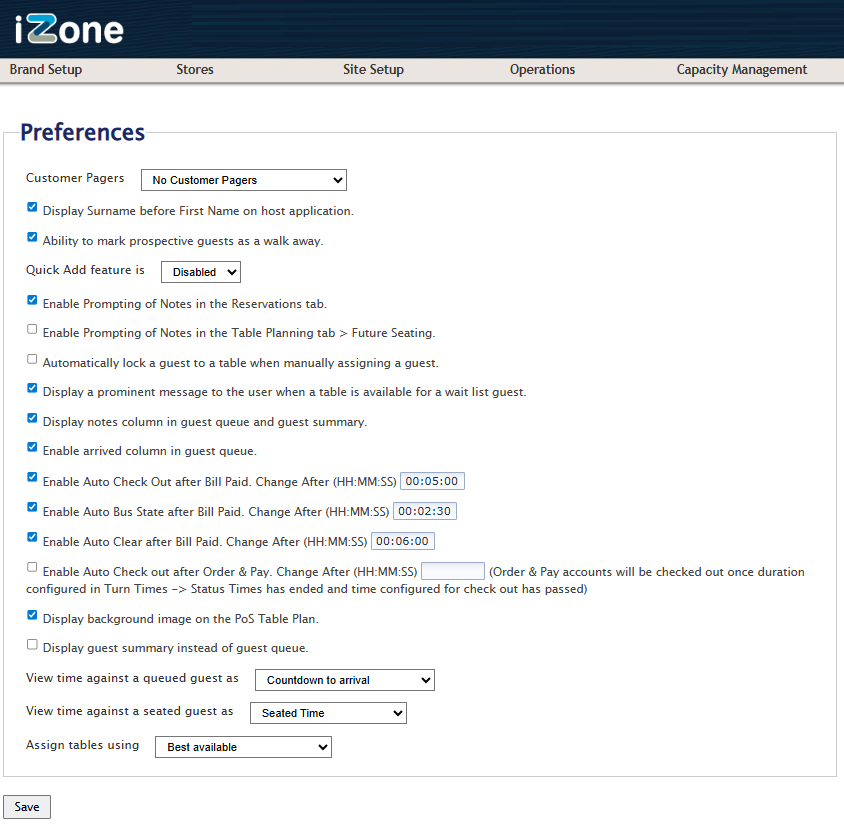
Site Preferences
Site level administrators can define operational preferences for a single site. Any changes made at a Site level, will reflect when saved. Some changes may require the Host application to be refreshed for them to be visible.
| Setting | Description |
|---|---|
|
Customer Pagers:
|
Select the customer pager usage for the site from the drop-down list:
|
|
Display Surname before First Name on host application |
Select the Display Surname before First Name on host application check-box to configure the host app to display Surnames first |
|
Ability to mark prospective guests as a walk away |
Select the Ability to mark prospective guests as a walk away check-box to allow site users to record the point of the reservation/ booking procedure when the customer decided to walk away. A Walk Away button is added to the Choose Wait Time window |
|
Quick Add feature is:
|
Select whether the Quick Add feature is enabled/ disabled or set as the default window for all walk in guests |
|
Enable Prompting of Notes in the Reservations tab |
Select the Enable Prompting of Notes in the Reservations tab check-box to configure the system to display notes associated with the selected date automatically in the Reservations tab |
|
Enable Prompting of Notes in the Table Planning tab > Future Seating |
Select the Enable Prompting of Notes in the Table Planning tab > Future Seating check-box to configure the system to display notes associated with the selected date automatically in the Future Seating tab on the Table Plan |
| Automatically lock a guest to a table when manually assigning a guest. | Select the Automatically lock a guest to a table when manually assigning a guest check-box to configure the system to lock the booking so that the guest cannot be moved by automatic shuffles |
|
Display a prominent message to the user when a table is available for a wait list guest |
Select the Display a prominent message to the user when a table is available for a wait list guest check-box to display a red information box at the bottom of the screen whenever a table suitable for a customer on the wait list becomes available |
|
Display notes column in guest queue and guest summary |
Select the Display notes column in guest queue and guest summary check-box to display a visual indicator in the Guest Queue or the Guest Summary so staff can see at a glance if a booking or customer note is saved for each customer |
|
Enable arrived column in guest queue |
Select the Enable arrived column in guest queue check-box to display a visual indicator in the Guest Queue so staff can see at a glance when a customer has arrived |
| Display Confirmation Number in Host App |
Select to display confirmation number in the Host app, for the confirmation number to display in the Tables Host app |
|
Enable Auto Check Out after Bill Paid. Change After (HH:MM:SS) |
Select the Enable Auto Check Out after Bill Paid check-box if you want to check out guests automatically after bill payment. Enter the delay between bill payment and automatic check out in HH.MM:SS format up to a maximum of 24 hours |
|
Enable Auto Bus State after Bill Paid. Change After (HH:MM:SS) |
Select the Enable Auto Bus State after Bill Paid check-box if you want to flag tables as dirty (bus state) automatically after bill payment. Enter the delay between bill payment and the table being put into bus state in HH.MM:SS format up to a maximum of 24 hours |
|
Enable Auto Clear after Bill Paid. Change After (HH:MM:SS) |
Select the Enable Auto Clear after Bill Paid check-box if you want to flag tables as cleared automatically after bill payment. Enter the delay between bill payment and the table being cleared in HH.MM:SS format up to a maximum of 24 hours |
|
Enable Auto Check out after Order & Pay. Change After (HH:MM:SS) (Order & Pay accounts will be checked out once duration configured in Turn Times -> Status Times has ended and time configured for check out has passed) |
|
|
Display background image on the PoS Table Plan |
Select the Display background image on the PoS Table Plan check-box to display the table plan image on the POS table plan. Deselect this check-box to remove the image from the POS (but not the host app) for improved responsiveness on the POS |
| Display guest summary instead of guest queue. |
Select the Display guest summary instead of guest queue check-box to replace the Guest Queue format with the Guest Summary |
|
View time against a queued guest as:
|
Select whether the time against a queued guest is displayed as the Countdown to arrival or the Expected Seating time of day by selecting the appropriate item from the drop-down list |
|
View time against a seated guest as:
|
Select whether the time against a seated guest is displayed as the Countdown to departure or the Seated Time by selecting the appropriate item from the drop-down list. |
|
Assign tables using:
|
Select whether you want to assign tables to the Best available or Server rotation (round robin) by selecting the appropriate item from the drop-down list. When set to Server rotation (round robin), Tables will assign guests to different servers in turn to ensure that all staff get an equal load |