Find out how using tags can create a more streamlined filtering experience
If you have previously used Aztec you may have seen the option for tags especially in Product Modelling and wondered what they were for or how to use them, or even skipped past them altogether, which might be understandable because the use of them was only available in selected places and sometimes it wasn't the easiest to apply and use the tags.
Within the new platform we want to really take advantage of them and have greatly improved the experience of using tags across many places, make day to day activities more streamlined and quicker.
Why might I choose to use tags?
Tags are associated to different records across the platform, when creating them you specify the association which means which app will they show in.
For example, if a tag was associated to "Products" and "Prices" it means that this tag will be displayed in both places, but if the tag was only associated to "Offers" then it can only be used in the offers app.
Once my tags are created the best of them is within filtering, whilst there are other filter options across the different apps being able to go to a deeper level can be a great advantage.
Tag Examples
-
Menu Season
-
Cocktail Type [with list]
-
Brand
-
Alcoholic / Non-Alcoholic
-
Delivery Item
Tag Use Examples
-
Filter my sales items within pricing group to only show items that have certain tags
-
Filter my purchase items when adding them as ingredients to a sales item
-
Filter my offers so I can easily complete setup changes
Where do I setup tags?
First we need to understand where to setup and manage the tags, the configuration is divided into two parts a "Tag Group" and a "Tag", a tag can be a single option, or list of tags (where you can choose one when selecting).
Both of these sections are setup in the Admin app anyone with the add or edit permissions can create and update groups and tags. You can view the quick steps below or view our detailed topic for tag groups here or tags here.
Adding New Groups
Follow these steps to add a new groups:
-
Click Add | select Tag Group
-
Enter the following details, Name | Description (optional)
-
Click Add
Adding New Sub Groups
Follow these steps to add a new sub groups:
-
Click Add | select Tag Sub Group
-
Enter the following details, Name | Description (optional)
-
Select the Group to link the sub group to | click Add
Adding New Sections
Follow these steps to add a new sections:
-
Click Add | select Tag Section
-
Enter the following details, Name | Description (optional)
-
Select the Sub Group to link the section to | click Add
Adding New Sub Sections
Follow these steps to add a new sub sections:
-
Click Add | select Tag Sub Section
-
Enter the following details, Name | Description (optional)
-
Select the Section to link the sub section to | click Add
Adding New Tags
Follow these steps to add a new tag:
-
Click Add
-
Enter the following details, Name | Description (optional)
-
Set the Type, Yes / No or List
-
Select the required Tag Associations
Tag associations determine in which area of the platform the tag will be available for selection, for example a tag association of "product" will only display within the products app of Zonal Connect -
Select the required Tag Group | Sub Group | Section | and Sub Section
-
Click Add
-
If the type List has been selected define the list, click Add
-
Enter the List Item | click Add, complete this process until all list items have been added
-
Click Save
Selecting Tags
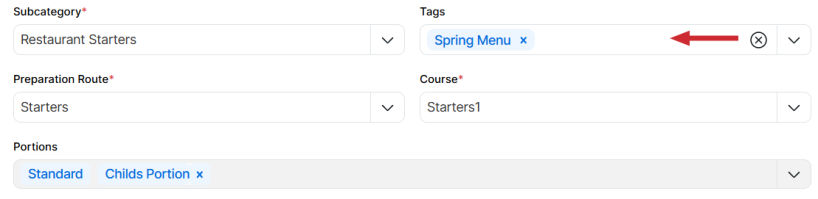
Items / Records
After the tags have been created they become available to be selected within an item or record.
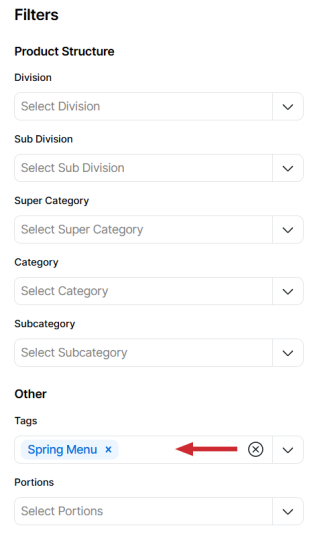
Filters
After tags have been created (and added to items / records) they become available to be selected within filter panels as an additional filter option.
So, take this opportunity to get started creating your tags and enjoy using them across the platform.