When an employee clocks in or out on the point of sale terminal, the recorded times appear in the verify clock times section and must be confirmed before the payroll week can be signed off.
Clock Times Topics
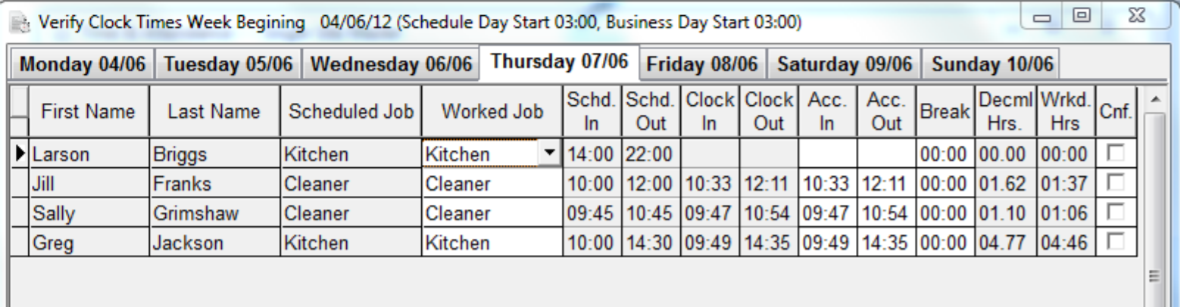
Confirming Times
For each employee clocked in and out an entry will be populated into the verify clock times screen, each entry is required to be confirmed so that at the end of the week the payroll can be signed off ready for processing.
Follow these steps to confirm times:
-
Select the required Week to complete the clock times | click OK
-
Select the required Day tab to confirm
All clocked times for the selected day will be displayed with the follow information
-
First and Last Name
-
Scheduled Job - if there was a scheduled entry the job will be displayed
-
Worked Job - will display the job the employee clocked in as
-
Scheduled In / Out - the time set when creating the schedule
-
Clock In / Out - the times recorded from the employee clocking in and out of the point of sale terminal
-
Actual In / Out - times are populated from clocked times and can be either
-
Left as per the clock times
-
Updated to times that the employee will be paid, for example in some organisation these are rounded up or down to the nearest 15 minutes
-
-
Breaks - any breaks taken through employee break function on the point of sale will be displayed
-
-
Set the required Actual In / Out Times as required
-
Confirm the required Break Times, if this requires adjustment 'double click' the break time and Insert or Delete break times as required
-
Click Confirm check box, complete for all entries
-
Click Close
All entries for each day must be confirmed before the payroll can be signed off
Managing Breaks
When verifying times if breaks are also recorded these will be automatically populated into the breaks section,
Other Options
Additional options can also be completed within the verify section.
-
Insert - enables extra missing shifts to be added
-
Click Insert | select the Employee | select the Worked Job | enter Start and End Times | click OK
-
-
Add Extra Payment - for an existing entry extra payments can be added
-
Select an Employee row | click Add Extra Payment | click Add | select the required options | click OK
-
-
Delete - any employees that did not work their schedule can be removed
-
Select an Employee row | click Delete | click OK to confirm deletion
-