Build Better Pre-Order Menus: Promotions, Pricing and Booking Rules
Pre-ordering from set menus only work smoothly if pre-order is configured correctly - guests choosing their courses in advance, at a fixed price, before they ever sit down. Building that experience touches three separate systems: the promotion that prices the bundle in Aztec, the menu guests select from in iOrder, and the booking rule in Events Admin that tells guests a pre-order is due. This guide walks through all three elements, plus how the Aztec promotion mechanics behind the fixed price actually work.
We will walk you through how to build a 2 course and 3 course menu in the following order:
Steps
Before you start
Decide whether you're offering a 2-course option, a 3-course option, or both (most sites offer both, priced differently). Confirm which products are included in each course, and make sure they're already set up and priced as individual products in Aztec - the promotion you build in Step 1 references existing products, it doesn't create them.
Step 1: Build the promotion in Aztec
The fixed price behind a set menu isn't set on the products themselves - it's an Aztec Multi Buy promotion that fires when a guest's order contains one item from each course.
-
Configure the products in Aztec in Product Modelling
-
Add the Products to the panel (and make sure each is individually priced)
The promotion references these products - it doesn't create them
-
In the Promotion Wizard, create a new Multi Buy promotion and work through:
-
add the areas it applies to
-
define one group per course (starters, mains, desserts) with a quantity of 1 in each group;
-
assign the correct products to each group, checking portion size where relevant (this matters most for wet stock)
-
set it to run all day, every day
-
then choose a single reward price for when one item from each group is selected - e.g. 1 starter + 1 main + 1 dessert = £40
-
-
Clone the promotion for each course combination you're offering
Typically one for starter + main + dessert, and one for main + dessert (or starter + main) only
-
Set priorities so the 3-course promotion is checked before the 2-course ones.
Get this the wrong way round and a 3-course order can be quietly discounted as if it were only 2 courses
How the Aztec promotion mechanics actually work
It's worth understanding what's happening under the hood in Aztec, when it comes to defining promotions working in conjunction with pre-orders - since most pre-order pricing issues trace back to one of these settings rather than anything in iOrder or Events.
Each group in the promotion represents one course. Setting the quantity to 1 per group is what stops a guest claiming two mains at the set price - Aztec only applies the reward when it sees exactly one qualifying item from every group in the same order. The reward price itself overrides the combined price of the individual products, which is why those products still need their own standalone price: it's the price charged if the promotion doesn't fire, and the input the promotion works from.
Priority is what resolves overlap between promotions. Aztec evaluates promotions in priority order and applies the first one that matches - so if the 2-course promotion sits above the 3-course one, a genuine 3-course order matches the 2-course rule first and never gets evaluated against the 3-course pricing. Cloning promotions per course combination, then prioritising the more specific (higher course count) version first, is what keeps each combination priced correctly.
Step 2: Building menus in iOrder
This is the menu guests pick from. It needs to mirror the course structure you just built in Aztec, so that the products a guest selects are the ones the promotion is watching for.
For more in depth details on how to build your menu, you can find them in the iOrder Menu Manager guides.
Below we have outlined the headline steps needed to build a menu for Pre-Order:
-
Go to Menu Manager
-
Edit an existing or Create a new menu
-
Edit Information - Tick 'Pre-Order' in the platforms section of the details tab
-
Assign the availability profile that matches when the menu should be orderable
-
Go to Build Your Menu
-
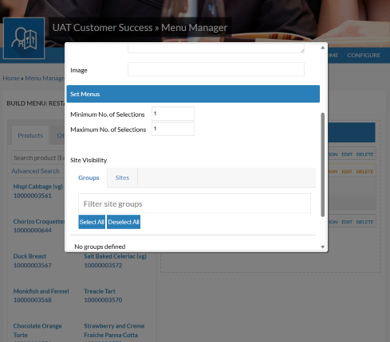
Create a group for each course - starters, mains, desserts
Select Edit for each group, set the maximum number of selections to 1, so a guest can only select 1 starter, 1 main, 1 dessert
-
Search for each product on the Products tab, configure it, and add it to the relevant group - remembering to configure any related choices attached to that product (sides, cooking preference, etc.) as you go
Step 3: Building menus in Events
The last piece is telling Events which sites and bookings the pre-order applies to, and when guests need to complete it by.
-
Go to Menus
-
Click Add New Menu
Zonal recommends using the same menu name as iOrder makes it easier to cross-reference the two if you need to troubleshoot later -
Select the required Companies and Sites
Select the site(s) you want this menu to be visible to
-
Define the Channels
-
Define the channels that should see the menu - decide whether it needs to be visible in the widget/API, or just to the host team for internal bookings
-
-
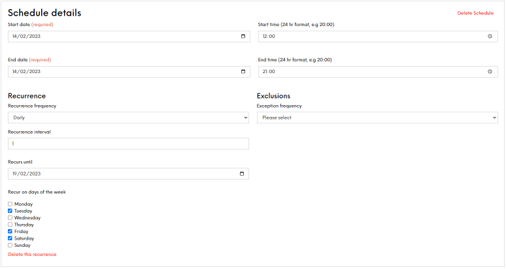
Set the menu schedule
Treat the start and end as one continuous 24-hour window - e.g. a Valentine's menu running 12pm-9pm on the day itself, or across a specific weekend only.
-
Select the iOrder menu on the Pre-Order Tab
Your iOrder menus will appear in the Available Pre-Order menus box. Select the required iOrder menu and move it into Selected Pre-Order Menus box. -
Define the Guest Portal Organiser Settings
The system will auto enable for the option of “Allow Organiser to add and invite (manage) attendees to booking”. You will need to define how you want bookings to work. Once a guest books, their booking is hard coded to this setting.

Step 4 – Define your Booking Rule
This is what defines to the booker, what they need to do and when i.e., pay a deposit, make a pre-order or even leave card details etc. Be aware, that once you enable your rules, it is instantly live for your booking journeys.
-
Go to Booking Rules
-
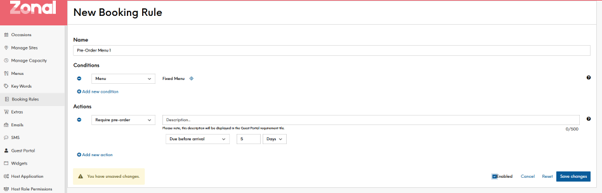
Click Add New Booking Rule:
-
Give it a name (internal only)
-
Set the condition that should trigger the requirement (cover range, occasion or menu)
-
Set the action to Requires Pre-Order
-
Define how many days before arrival it's due - guests see a countdown to this deadline in the guest portal
-
Tick Enabled to switch the rule on
-
-
Click Save Changes
Step 5 – Launching Pre-Orders
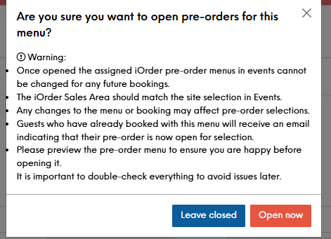
Up until this stage, your guests are able to book for your specified menus, as well as being notified of the requirements that fit for their booking. Only once you're sure your pricing and promotions is right, do you want to open pre-orders. When you are ready, you will need to follow the below steps:
-
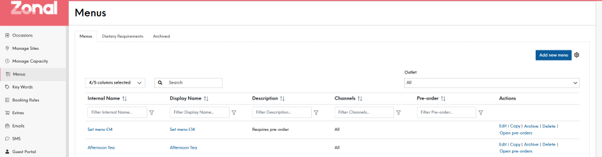
Go to Menus
-
Click Open Pre-Orders next to the menu
-
Read the warning - and click Open Now
Test before you roll it out
We highly recommend that before anything goes out public facing, you test!
Place a test booking and take it all the way through the guest portal before opening the menu to real guests. Check that ordering one item from each course triggers the single reward price rather than the sum of individual prices, and that a partial order (e.g. main only, no dessert) is correctly left at standalone pricing. It's far easier to catch a missing course ID or a wrongly-prioritised promotion on one test booking than after guests have started ordering.
Quick Checklist
-
Check the Products for each course are set up and individually priced in Aztec
-
Multi Buy promotion created per course combination (2-course, 3-course), each with groups set to quantity 1 and a single reward price
-
Check that your Promotions are prioritised -so the higher course-count promotion is checked first
-
Ensure iOrder menus have Pre-Order ticked, one group per course, and max selections set to 1 per group
-
Events menu created with matching name, correct sites/ channels, and the pre-order menu linked in via the Pre-Order tab
-
Booking rule set up with the right trigger condition and days-before-arrival deadline, and enabled
-
ONLY when everything above is done, and you're ready for guests to start ordering - open Pre-orders
-
End-to-end test booking placed and priced correctly before rollout
Once the menu is live and pre-orders are coming in, the operational side - send times, chef reports, and seating guests with their pre-order attached - is covered in our 7 Steps to Pre-Order guide.