3.33.0 - Setup & Operations
The following information describes the setup and use of features within this release of Aztec.
Course Hold
Setup
-
Set Course Hold check box to be enabled
-
Select the Course(s) and enable the Allow Course Hold check box
-
From the Button Picker | Functions | Ordering add the Course Hold button
-
Perform a Comms Job & Send to POS to site
POS Operations
-
Order the required products on to the account
-
Tap Course Hold
-
Tap each course to hold as required, courses will be then 'toggled on'
-
Tap OK | products that are held will be shown in orange on the order display
Alternatively the courses to hold option can be completed before ordering products and all items matching the selected courses will be automatically held -
Save the account as normal any products not held will be sent to dispense printers as normal
-
When viewing accounts in the Pickup Account Screen any that contain held items will be shown with a flashing 'Held' indicator
-
To send any remaining products tap Course Hold toggle off the courses as required
All courses must be sent before payment can be completed
Delayed Ordering - Auto Serve Delayed Orders
Setup
-
Set Auto Serve Delayed Orders check box to be enabled
This will only be available if 'Use Delayed Order' box is enabled
-
Perform a Comms Job & Send to POS to site
POS Operations
-
Tap Session Change
-
If there are any open delayed orders that meet this criteria a total that can be served will be displayed
-
Zero Balance
-
Past Service Time
-
-
Tap Yes to serve or No to continue
Any orders that have not reached the correct serving criteria will be displayed as a quantity so POS operators are aware there are still outstanding orders -
Continue the session change as per the organisations normal proceses
Delayed Ordering - Updated Prompt
Setup
For the prompt to be displayed delayed ordering is configured for Order Send Time to be 'Before Pickup Time'
POS Operations
-
Tap Pickup Account
-
Select a Delayed Order that has not reached the pickup time
After pickup time this prompt is no longer displayed as the order will have been fulfilled -
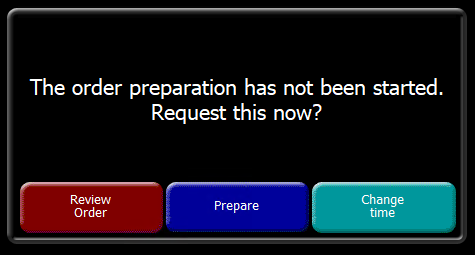
The following updated prompt is displayed

With the following options
-
Review Order - open the account without sending or changing time
-
Prepare - send the order now for dispense
-
Change Time - change the order pickup time
The previous options were Yes | No | Change Time -
Dojo Integrated Payments no to prompt for Cashback
Setup
-
Click Add
-
Enter the Payment Method Name
-
Select EFT without Cashback from the Type drop down
-
Set Auto Declare to be Enabled
-
Set any other settings as required
-
Click Save
-
From the Button Picker | Other Lists | Payments add the payment method button added
-
Perform a Comms Job & Send to POS to site
Cashback is has to be enabled for both the estate and on a per site basis:
Theme Modelling → Estate Setup → Config Sets - enable cashback options
Theme Modelling → Site Setup → Configuration Settings - enable Prompt for Cashback check box
POS Operations
-
Process an integrated card payment as normal, when using the new payment method / type
The POS operator will not be prompted for any cashback options