Themes
Themes serve as the foundation for configuring all available products and functions across physical point of sale terminals, iServe, and MOA terminals. This page explains how to manage theme panel designs and their associated settings.
Themes Topics
Available Themes
Depending on the size of your organisation, there may be only one 'Available Theme'. In companies with multiple brands, themes can optionally be created on a per brand basis, depending on your requirements.
Individual themes will require:
-
Static Panel Security per Theme
-
Theme Panel Designs per Theme
Theme Panel Designs cannot be copied between Themes and have to be created from an empty state -
Theme Table Plans per Theme
Adding Themes
Follow these steps to add a theme:
-
Click Add
-
Enter Theme Name and Description (optional)
-
Set the Idle Time before Automatic Log Off
This setting, which defaults to 60 seconds, defines the period of inactivity after which the point of sale terminal will automatically log off. It applies to all theme panel designs associated with the theme -
Click OK
Editing Themes
Follow these steps to edit a theme:
-
Select the required Available Theme
-
Click Edit
-
Update the Name, Description or Idle Time
-
Click OK
Theme Panel Designs
A theme panel design is allocated to the each terminal to determine which products and functions will be displayed.
Zonal typically provides a theme panel design template that can be used whenever a new design is created, saving time by automatically applying the relevant panel properties and common function buttons and layout.
Copying Theme Panel Designs
Follow these steps to copy a theme panel design:
-
Select an existing Theme Panel Design
-
Click Copy
-
Enter Panel Design Name and Description (optional)
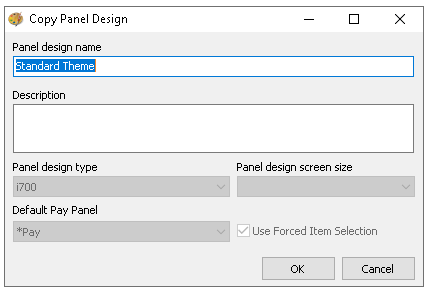 All other settings will be predefined based on the design being copied but some can be adjusted later within the 'Edit' option
 -
Click OK
Editing Theme Panel Designs
Follow these steps to edit a theme panel design:
-
Select an existing Theme Panel Design
-
Click Edit
-
Update the Name, Description
-
Set the following as required
-
Default Pay Panel – when using per seat ordering or multiple bill functions, some screens include a Pay button. This setting allows you to associate the appropriate pay panel, ensuring the correct payment information is displayed when POS operators tap the button. The drop down list will display any panel that has payment methods configured
-
Use Forced Item Selection - when enabled this option adds additional functionality when ordering for more information to setup this option click here
-
-
Click OK
Adding Theme Panel Designs
While new theme panel designs can be created, Zonal recommends using existing ones as a template to save time and ensure accuracy during setup. Creating a new design is typically only necessary when the panel size changes for example, if your organisation has been using 12" terminals and is now switching to 15" terminals.
Follow these steps to create a new theme panel design:
-
Click Add
-
Enter Panel Design Name and Description (optional)
-
Select the required Panel Design Type from the drop down
-
Z400 / Z500 - 12" or 15"
-
Select Panel Design Screen Size
-
-
i700 - Defaults to 15" and also used for Z9 terminals
-
Other settings are now redundant and should not be used
-
-
Select the Default Pay Panel and optionally select Use Forced Item Selection
-
Click OK
Designing
Depending on your configuration and organisational setup, you may not need to make many changes to the theme panel design, as product updates are managed within shared panels. However, you might still need to add new functional buttons or additional shared panels to the root panel, along with updating certain theme attributes.
Follow these steps to manage designs:
-
Select an existing Theme Panel Design
-
Click Design | the Root panel is displayed
As theme panel designs are totally customisable this is just an example, your setup might have different buttons, functions and colours the only fixed options are the Help button (top right) and the order display left hand-side (although the height can change)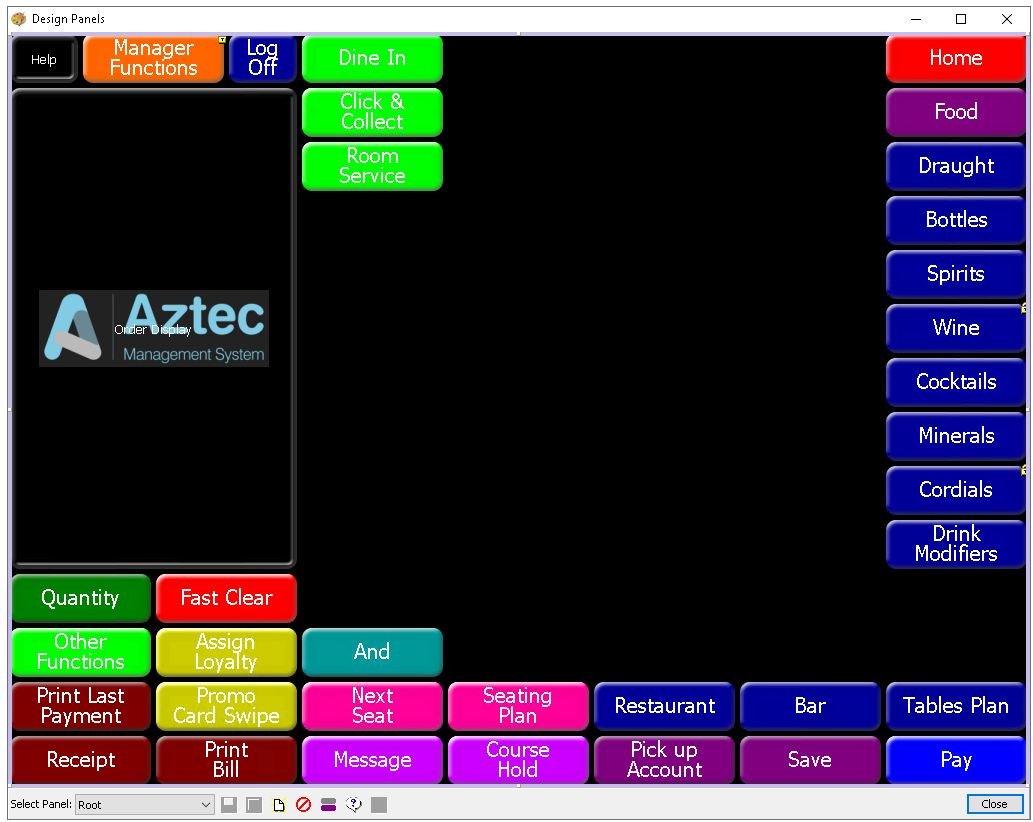
-
From the Button Picker navigate to the required folders and drag the buttons on to the theme panel design
-
Adjust the properties of the buttons as required, Size | Colour | Position | Security
-
Click Save
Corrections Screen
The corrections screen is unique to each design, allowing selected function buttons, single item discounts, and correction methods to be added.
Follow these steps to add buttons to the corrections screen:
-
From the Select Panel drop down choose Corrections Account
-
From the Button Picker select Other Lists | Corrections for
-
Correction Methods
-
Move Seat Options
-
Move Separate Bill Options
-
Edit Choice
and drag the buttons on to the panel
As correct account panels are totally customisable this is just an example, your setup might have different buttons, functions and colours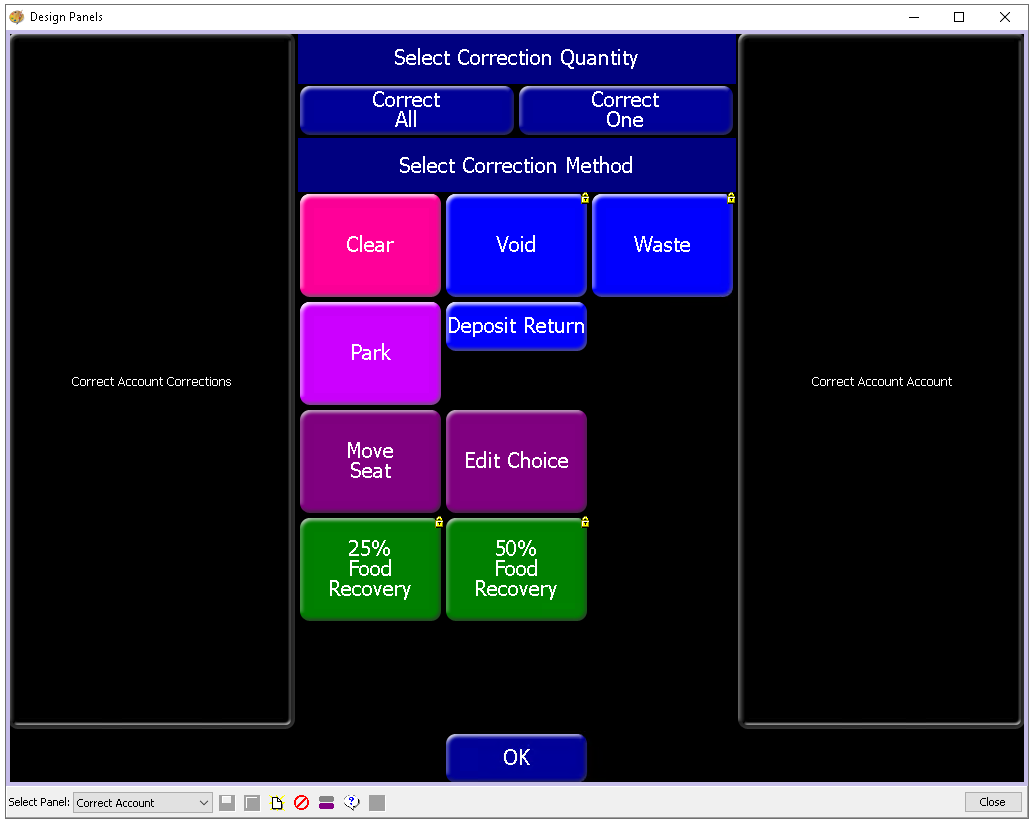
Adjust the properties of the buttons as required, Size | Colour | Position | Security
-
-
Click Save
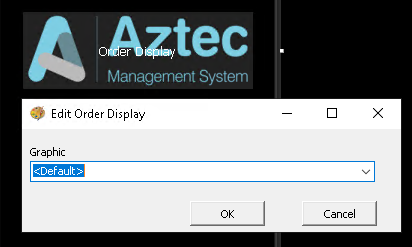
Order Display Graphic
A simple graphic can be added to the order display so that, when there is no activity on the point of sale terminal, the graphic is shown on the screen.
Follow these steps to assign the graphic:
-
Double click the Aztec logo showing on the order display, select the required graphic from the drop down
-
Click OK
Theme Table Plans
Table plans are created separately but require a 'Theme Table Plan' button to be added so that a match can be made. This ensures that when the Table Plan button is tapped on the point of sale terminal, the correct plan is displayed.
Follow these steps to create theme table plans:
-
Click Add
-
Enter Theme Table Plan Name and Description (optional)
-
Update the EPOS Text as required
The EPOS text will be used as the button name which is shown on theme designs -
Optionally select Allow New Split Table
Zonal recommends using this function for large sharing tables assigned to a single table number. When viewing the table plan on the point of sale terminal, an operator can choose to split the table and create a new account under the same table, alongside other open accounts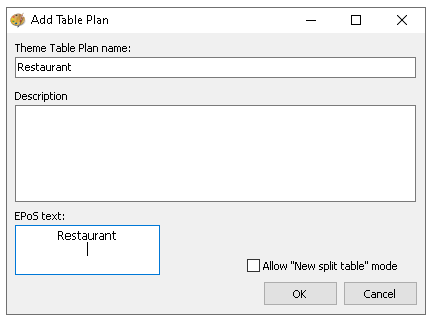
-
Click OK
-
Optionally click Groups
-
Using the Arrow buttons Assign Theme Table Plans to Groups 1-3
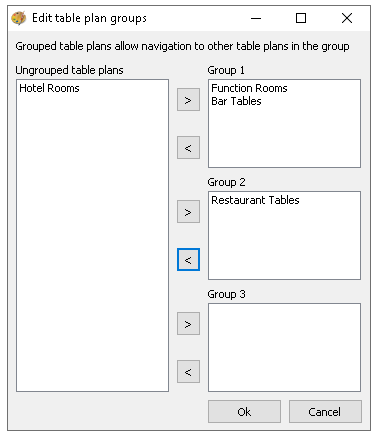
This allows POS operators to switch between table plans within a group, with the other table plan buttons displayed at the bottom of the screen

-
Click OK
-
Select an existing Theme Panel Design
-
Click Design
-
From the Button Picker select Panels | Open Table Plans and drag the table plan buttons on to the panel
Adjust the properties of the buttons as required, Size | Colour | Position | Security
For more detailed information on the contents of the button picker click here or managing button properties click hereOpen Table Plan buttons can also be added to Shared Panels -
Click Save
Other Options
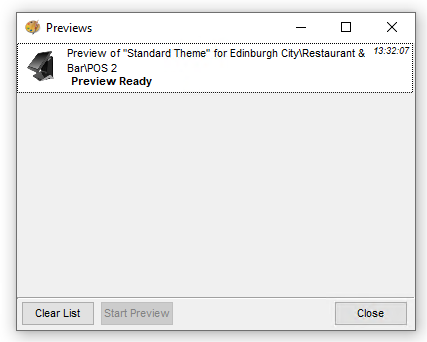
Theme Preview
A valuable feature within 'Themes' is the ability to preview a terminal the design. This allows you to verify that everything is set up and functioning as expected.
Follow these steps to complete a preview:
-
Select an existing Theme Panel Design
-
Click the Preview Drop Down
-
Select either Random Terminal or Choose Terminal
-
Click Preview
-
For the choose terminal option from the estate hierarchy select a site and terminal or for random terminal the preview build will automatically start
The Previews list will be displayed during this time the selected terminals theme will be generated
When the complete the Preview will show 'Preview Ready' -
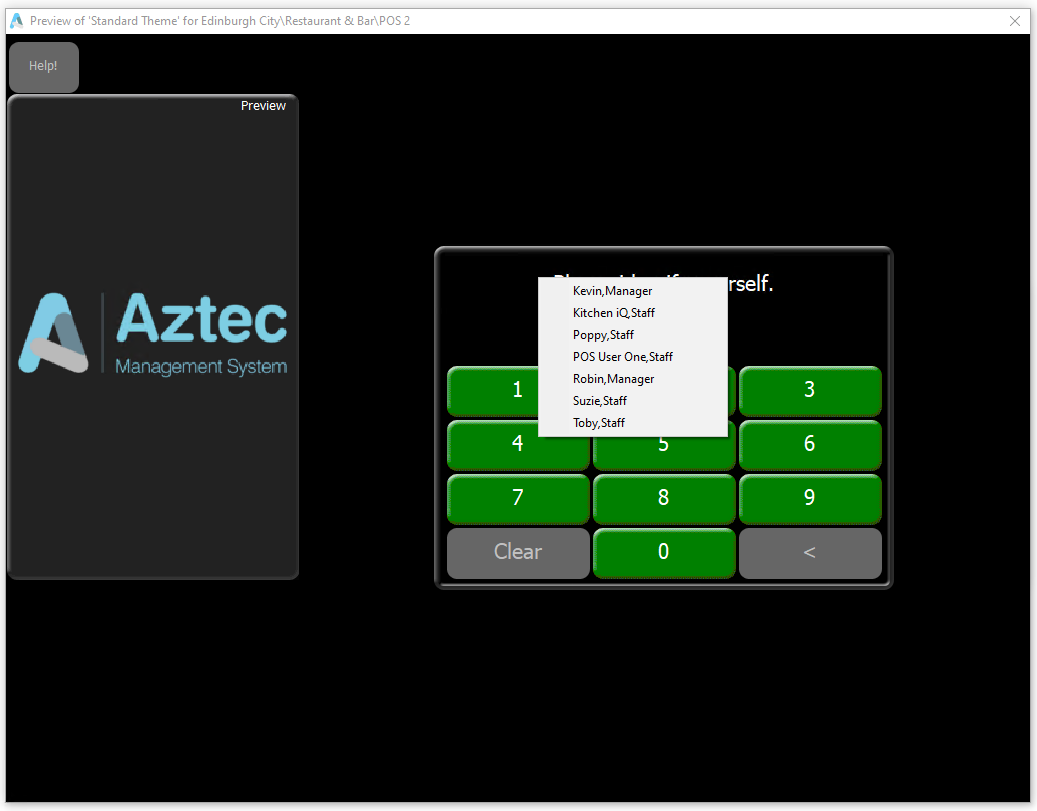
Double click the terminal row or select the row and click Start Preview
-
The POS terminal selected window will be displayed on screen, right click and select a POS operator from the presented list
-
When the preview is complete close the window
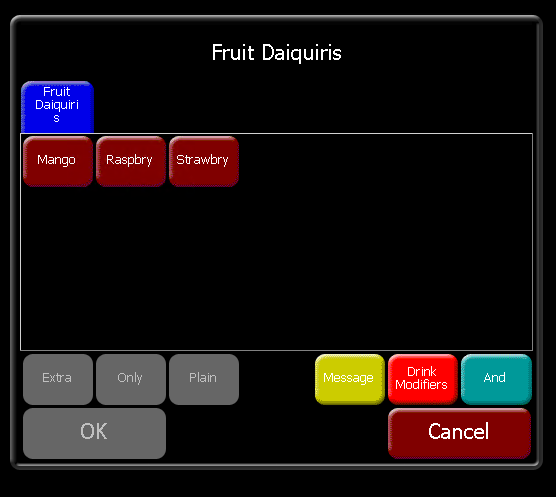
Edit Choices
When a choice is displayed on the point of sale terminal, it's possible to include a button that links to a separate panel. Selecting a product from this panel will close it and return the operator to the original choice. This can be useful, for example, for applying additional modifications or changes to an item during the ordering process.
In this example for a Fruit Daiquiri there is a drinks mods button shown which will take the POS operator to the modifications screen for drinks
Follow these steps to assign panels to choices:
-
Select an existing Theme Panel Design
-
Click Edit Choices
-
From the list choose a choice and select a panel from the MOD panel

-
Assign as many choices to panels as required
-
Click OK
Macros
Macros are sequences of pre-recorded button presses assigned to a 'Macro Button'. With a single tap, the POS operator can execute the entire sequence, allowing actions to be completed quickly and accurately, with all buttons pressed in the correct order.
The following rules apply to macros:
-
Macros buttons have to be added to the root or local panels only
-
Macros sequences cannot contain a pause, if you get to a prompt that requires user intervention the macro has to stop
-
Macros can be recorded with buttons across any panel type but there are restrictions on which buttons can be used, those buttons not applicable will be greyed out
-
Macros are unique to a theme panel design, if the same macros is required on multiple designs it needs to be added and recorded per design
-
Moving buttons on an existing design can break existing macros as the button position is now different to what was recorded
Follow these steps to create a macro:
-
Select an existing Theme Panel Design
-
Click Macros
-
Click Add
-
Enter Macro Name and Description (optional)
-
Update the EPOS Text as required
The EPOS text will be used as the button name which is shown on theme designs -
Click OK
-
Click Close the on Macro List | click Design
-
From the Button Picker select Other Lists | Macro and drag the macro button on to the panel
Adjust the properties of the buttons as required, Size | Colour | Position | Security
-
Click Save
-
Start a Preview of the selected theme panel design
For more information on starting a preview click here -
Login to the to the preview terminal, the macro button will be greyed out, from the Preview List click Record Macro
-
Click the Macro Button on the preview and then continue to click other buttons in the sequence
-
From the Preview List click Save Macro
The preview terminal will reload -
Login to the preview terminal and preview
Macro previews run at a slower speed than on a live point of sale terminal, allowing you to check that the sequence is accurate
Role Panels
Role panels automatically display a default panel to POS operators upon login, tailored to their front of house job role.
Follow these steps to define role panels:
-
Select an existing Theme Panel Design
-
Click Role Panels
-
Click Add
-
Select the required Panel from the drop down
-
Select the Job Roles
Once a job role has been selected it will not be available for other role panel configurations in this theme panel design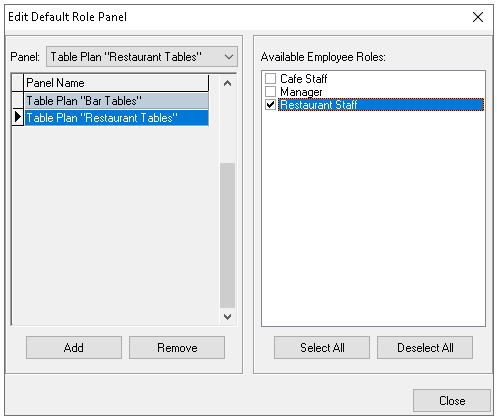
Click Remove to delete an assigned role panel
-
Click Close